
You can run a single monolithic instance of a server application only if the number of clients accessing your application doesn’t exceed a couple of thousand. But what if you expect hundreds of thousands, or even millions, of clients to connect to your application simultaneously? Then a single instance of an application won’t be able to handle the load and you will need to scale the application out.
Scaling out a stateless application is relatively easy. If your web application merely accepts HTTP requests and then sends a query to a different application or a service that stores the data, you can have as many instances of such a web application as you want. To the client, it doesn’t make any difference which specific instance it connects to. The outcome will be exactly the same.
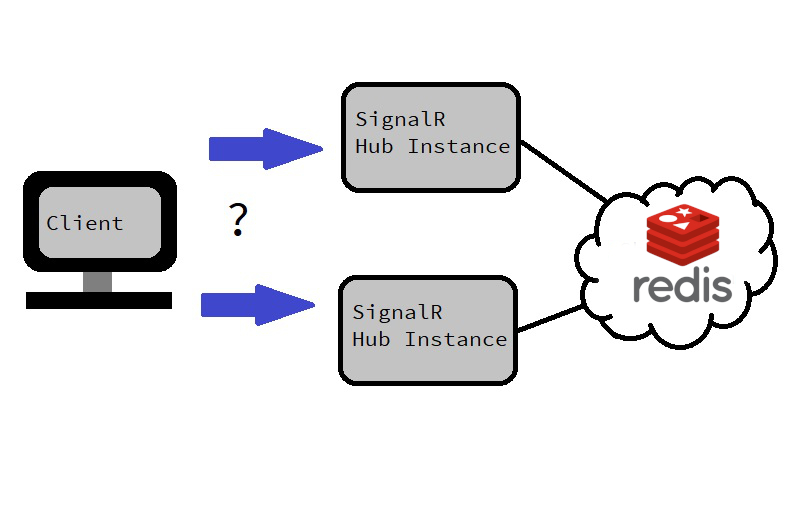
But what would you do if your application needs to maintain a persistent connection with each client, like it is the case with SignalR? After all, you would still need to maintain the ability to send messages to specific clients and groups. But what if those groups are connected to a different instance of the application?
Fortunately, SignalR comes with a scaling-out mechanism that will allow multiple instances of your application act as if it’s a single application. And this is what we will be talking about in this article.
The article covers the following topics:
- Setting up Redis backplane
- Running multiple hub instances via Redis backplane
- Using HubContext to send messages from outside SignalR hub
By the end of this article, you will have learned how to use Redis to build a distributed SignalR hub that can support as many client connections as needed.
Prerequisites
This article assumes that you already have set up your development environment. You will need the following:
- A machine with either Windows, Mac OS or Linux operating system
- A suitable IDE or code editor (Visual Studio, JetBrains Rider or VS Code)
- .NET 6 SDK (or newer)
Also, since we are continuing to build on top of the application that we have developed in the previous article, we need the code that we have written previously. If you have skipped the previous article, you can access the complete code from the following location in the GitHub repository:
The complete code samples from this article are available from the following location in the GitHub repo, which has separate folders corresponding to individual parts of the article:
https://github.com/fiodarsazanavets/SignalR-on-.NET-6—the-complete-guide/tree/main/Chapter-09
Setting up Redis backplane
There are two primary ways of scaling out SignalR hub – Azure SignalR Service and Redis backplane. Azure SignalR Service is what we will cover in the next article. And it’s not suitable for all scenarios, as you will require Azure subscription and your hub will be hosted in Microsoft cloud. Redis backplane, on the other hand, is what allows you to host your SignalR hub anywhere, even on premises.
Redis backplane allows the hubs to exchange information between the instances of SignalR hubs connected to it. So, when you have your client connected to one instance of the hub and another client that you want to send a message to is connected to another hub instance, Redis backplane will transfer the message to the right instance of the application, so it can then be sent to the right client.
To set up Redis backplane, we will need to first set up Redis service. Redis is an open-source (BSD licensed) in-memory data store system. It is primarily used as in-memory cache, but it can also be used for other purposes, such as pub-sub system.
To set up a SignalR backplane, you don’t need to know how Redis works. You just need to have a Redis server running, so you can pass its URL into SignalR configuration. And you can install and run Redis on your development machine, no matter which operating system you use.
Running Redis on Linux
Installation instruction for Linux operating is available on the official website and is accessible via this link:
You would just need to choose to either download the source code and compile Redis yourself, or use one of package installers, such as apt-get or snapcraft. Different ways of installing Redis are provided in the article supplied in via the link above. And so is the launch instruction.
Once you install and launch Redis, by default, it will be hosted on localhost address (IP 127.0.0.1) and port 6379. But you can change this configuration if you need to.
Running Redis on Mac
As Mac is a Unix-based OS, just like Linux, Redis will work on it too. You can either download the source code from its official page and compile it yourself, as per instruction on its official download page, or you can install Redis via Homebrew package manager.
To install Homebrew, you can follow the instructions on the following webpage:
And then, once it’s installed, you can run the following command to install Redis:
brew services start redis
If you install Redis via Homebrew, it will be running in the background automatically. Otherwise, if you have compiled it yourself, you would need to launch it by executing the following command:
redis-server
As on Linux, default, Redis will be accessible via the localhost address and port 6379.
Running Redis on Windows
Because Redis is primarily designed to run on Linux, you will need to set up Windows Subsystem for Linux (WSL) on your Windows machine to run it. To enable WSL, you will need to open PowerShell and execute the following command:
Enable-WindowsOptionalFeature -Online -FeatureName Microsoft-Windows-Subsystem-Linux
After you’ve enabled WSL on your machine, you will need to reboot the machine.
You will then need to download and install one of the supported Linux distros from Windows store. The supported distros are Ubuntu and Debian. You will just need to get the latest version.
Once installed, you can install Redis by executing the following commands:
sudo apt-get update
sudo apt-get upgrade
sudo apt-get install redis-server
redis-cli -v
To make sure that the Redis server is running, you can execute the restart command:
sudo service redis-server restart
This will restart Redis background service if it was running already and will start it if it wasn’t running.
Redis server comes with a handy tool called redis-cli that you can use to make sure that the server is running. To access this tool, you will need to execute the following command:
redis-cli
Then, you can execute an insertion command. For example, you can set client record with the id of 1 and the value of Test by executing the following:
set client:1 "Test"
Then, to verify that Redis cache is working as it should, you can run the following command to obtain the value from client record with id of 1:
get client:1
And, if everything works correctly, you should see Test as the output.
Running Redis on Docker (all operating systems)
Docker is a containerization platform. It allows your services to run in isolated consistent mini-environments, known as containers. Many common software applications are available as Docker containers, so you don’t have to install them on your actual machine.
You don’t have to use Docker, but it would be useful to know it as another way of launching your Redis on any operating system.
To download the latest version of Docker, you can follow this link:
https://docs.docker.com/get-docker/
Then, once set up, you can pull the latest Redis container image from the default registry. The following page contains the setup instruction:
https://hub.docker.com/_/redis
Because your Redis container will have its port mapped to a port on your host machine, you would still be able to access it via localhost URL.
Once our Redis server is running, we can implement it inside our ASP.NET Core application that hosts the SignalR hub.
Running multiple hub instances via Redis backplane
Normally, when your application is scaled out, you will be running multiple instances of the same application that was created from the same code. And there are different systems that allow you to scale applications: Docker Swarm, Kubernetes, Azure Service Fabric, etc.
The entry point into the application for the clients would typically be a reverse proxy, a load balancer or a combination of both. Basically, some gateway software would accept the initial request. And then this request would be re-routed to a specific instance of the application. Typically, there would be some algorithm in place to ensure that it’s an instance with a reasonably low load that the request gets routed to.
There are many different ways you can scale your application. But the scope of this article is to show you general principles of working with SignalR backplane rather than showing you a specific way of scaling out your web application. This is why we won’t cover any specific scaling-out techniques. Instead, we will just manually create two copies of a web application and connect them to the same instance of the Redis backplane. Then, we will just connect different clients directly to different web application instances and verify that they can communicate with each other via SignalR.
Setting up multiple SignalR hubs
To connect your SignalR hub to Redis backplane, you will first need to install Microsoft.AspNetCore.SignalR.StackExchangeRedis NuGet package in the application that hosts the hub. To install it, just run this command inside the project folder of that application, which, in our case, is SignalRServer:
dotnet add package Microsoft.AspNetCore.SignalR.StackExchangeRedis
Next, we will locate the call to builder.Services.AddSignalR() and replace it with the. following:
builder.Services
  .AddSignalR()
  .AddStackExchangeRedis("< your Redis connection string>");
You can use any standard Redis connection string format. If you have Redis running locally on the same machine that you are hosting SignalR hub on and it runs on the default port, the connection string would be localhost:6379 or 127.0.0.1:6379.
It’s up to you if you want to replace the call to AddSignalR or just append AddStackExchangeRedis at the end of it. But if you want to remove the MessagePack configuration that we have added to it previously, you will also need to remove calls related to MessagePack protocol from the clients that you still intend to use. Otherwise, the clients will be sending MessagePack messages and the server won’t know how to read them.
That’s all we needed to do to make the web application that hosts SignalR hub scalable. Now, we could have just copied the content of SignalRServer project folder (or its compile outputs) into a different folder and changed ports in the URLs of launchSettings.json file. This would allow us to then launch two instances of an identical web application with different access points. But we will do something else instead.
Hosting the same SignalR hub in different applications
SignalR hub is structured in such a way that you can scale the hub independently from scaling the web application that hosts it. How is it possible, you may ask, if the hub is an integral part of the web application? Well, if you are using Redis backplane, you can have the same hub code in multiple different applications. And all these hub instances will still work as the same hub, even though the applications that host them are different.
There are some valid use cases for this approach. For example, you may want to have an MVC or Razor Pages web application with in-browser SignalR client. This way, if the SignalR hub was hosted by a separate service, the client-side configuration would be more complicated. And you would need to apply different configuration for different environment. However, if SignalR hub is hosted in the same web application that serves the page with the SignalR client to the browser, all you need is a relative path, which would be identical for all environments.
Perhaps you would need another service inside your distributed app that would use REST API or gRPC interface alongside your hub. Again, if some of your clients use SignalR and one of those other protocols, you can simplify their configuration by just using a single URL. And to do so, you would need to host SignalR hub inside the same application as your other API.
For example, you may have a service that IoT devices talk to. That service would have gRPC interface for the devices to make occasional client-initiated call and SignalR connection for the server application to issue real-time instructions to these devices. But what if you also need a web page that the users will be able to access to view real-time device status information, which is also managed by SignalR?
You could have it all in one application, but this will only work until you’ll need to scale it. And because it’s quite likely that the number of IoT devices that will be connected to the application will be different from the number of users looking at the devices, it would be more efficient to scale those two parts of the application separately. Therefore, it makes sense to have one application that serves web pages to the users and another one that has gRPC interface for the IoT devices to talk to.
But if you have yet another application that is purely dedicated to hosting SignalR hub, things will start getting excessively complicated. Firstly, there are above-mentioned issues with additional client configuration, where they will need to have additional endpoints added to it. Secondly, it would be harder to decide how to scale the separate SignalR service correctly. Thirdly, the topology of your distributed application would be harder to comprehend by someone who has never worked on it before. And this is why it’s just better to have the same hub hosted by both the user-facing web app and the web API service that the IoT devices use.
The best way to share the hub between different host applications is to have it inside a class library that any application can reference. And this is what we are going to do here.
Moving SignalR hub to a class library
Inside our LearningSignalR solution folder, we will create a class library project by executing the following command:
dotnet new classlib -o SignalRHubs
Once the project has been created, we will add it to the solution by executing the following command:
dotnet sln add SignalRHubs\SignalRHubs.csproj
Next, we will open the terminal inside SignalRHubs project folder and will install the required NuGet packages by executing the following commands:
dotnet add package Microsoft.AspNetCore.Authentication.JwtBearer
dotnet add package Microsoft.AspNetCore.SignalR.StackExchangeRedis
You can now also remove these package references from SignalRServer.csproj file, as this project will still obtain them by referencing SignalRHubs class library.
We will need the first package because our SignalR hub needs it, as it uses Authorize attributes associated with JWT. And we will need the second package so we don’t have to install it on individual project that will use this class library. All of them will then be able to connect to Redis backplane.
Next, we will move LearningHub.cs and ILearningHubClient.cs files from SignalRServer project to SignalRHubs. In each one of those, we will need to replace the existing namespace with SignalRHubs.
Our code will no longer compile, so we will need to make some changes to it. We will first add SignalRHubs project reference to SignalRServer project. You can either do it via an IDE, or you can manually add the following snippet to SignalRServer.csproj file:
<ProjectReference Include="..\SignalRHubs\SignalRHubs.csproj" />
This can go inside any ItemGroup element, but to make your file structure clean, it would make sense to place it alongside the existing project references.
Next, we will open Program.cs file. In there, we will locate the SignalRServer.Hubs namespace reference and we will replace it with the following:
using SignalRHubs;
Now, our code will compile again. What we will need to do next is add another application that will be hosting the same hub.
Adding another web application to host the hub
We can add absolutely any ASP.NET Core app to our application, as SignalR hub would be compatible with any of them. And the setup would be almost identical, regardless of whether you have chosen MVC, Web API or just an empty ASP.NET Core template.
For example, to create another MVC application, you would need to open your terminal inside the LearningSignalR solution folder and execute the following command:
dotnet new mct -o SignalRServer2
We can then add this application to the solution by executing the following command:
dotnel sln add SignalRServer2\SignalRServer2.csproj
Then, we will add the following markup to the SignalRServer2.csproj file to ensure that it references SignalRHubs class library:
<ItemGroup>
    <ProjectReference Include="..\SignalRHubs\SignalRHubs.csproj" />
</ItemGroup>
Next, we will open Program.cs file inside SignalRServer2 project and will add the following namespace reference to it:
using SignalRHubs;
Afterwards, we will add the following line anywhere before the Build call on builder object:
builder.Services.AddSignalR()
  .AddStackExchangeRedis("< your Redis connection string>");
The connection string needs to be the same as the one we have defined in SignalRServer project.
And finally, we will register the hub endpoint by adding the following line just before Run call on app object:
app.MapHub<LearningHub>("/learningHub");
Then, there is either of two things you can do. You could either copy all authentication and authorization setup calls from the Program.cs file of the SignalRServer project to Program.cs file of SignalRServer2 project. Or you could simply remove all Authorize attributes from LearningHub class of SignalRHubs project. Either option is fine.
Now you have ended up with two different ASP.NET Core applications that host exactly the same version of SignalR hub and use exactly the same Redis instance to connect those hubs together. Both of the applications would have been generated with different ports for the default URL, so you can launch them both at the same time. Let’s do it and see how Redis backplane operates.
Launching distributed SignalR hub
We will now launch both SignalRServer and SignalRServer2 applications. You can either do it from the IDE, or you can execute dotnet run command from inside of each of the project folders.
Once the applications are up, you can navigate to the main page of the SignalRServer application. Then, you can launch DotnetClient application and, when prompted, get it to connect to the SignalR hub of the SignalRServer2 application. This would be the base URL of the application, as defined in launchSettings.json file inside the project, followed by /learningHub path.
Now, to verify that everything has been set up correctly, you can broadcast a message from DotnetClient app to all clients (either option 0 or 1). And even though the message was sent to the hub on SignalRServer2 app, it should appear on the open homepage of SignalRServer app, because both of the hubs are connected by the same Redis backplane. And this is how distributed SignalR hub works.
But there is more to it. What if we wanted to send a message to any of the hub clients from outside the actual hub? For example, we may have some backround process running inside of our web application, which occasionally sends some updates to the clients. But we can’t make direct calls on the methods from our SignalR hub, as those are only meant to be accessed by the clients.
Fortunately, there is a way to do it. And this is what we will have a look at next.
Using HubContext to send messages from outside SignalR hub
SignalR comes with IHubContext interface, the implementations of which allow you to access all fields of a specific SignalR hub, including its groups, clients and so on. You don’t have to worry about registering any concrete implementations of this interface yourself. If you inject this interface into the constructor of any class, an appropriate implementation will be automatically resolved. All the dependencies get automatically registered when you call AddSignalR method on Services field of builder object inside Program.cs class.
HubContext is not designed specifically for a scaled SignalR hub. You can use it with monolithic SignalR hubs too. But because it’s especially useful in the context of a distributed SignalR hub, we will talk about it in this section.
Implementing HubContext in our application
To demonstrate how HubContext works, will now open HomeController.cs file, which is located in Controllers folder of SignalRServer project. First, we will make sure that the file has the following namespace references (which, on .NET 6, you could alternatively make global if they are already referenced elsewhere):
using Microsoft.AspNetCore.SignalR;
using SignalRHubs;
Then, there are two ways we can create a HubContext field. You can just specify the name of the hub, like this:
private readonly IHubContext<LearningHub> hubContext;
Or you can use strongly-typed hub context, which will be defined like this:
private readonly IHubContext<LearningHub, ILearningHubClient> hubContext;
Then, whichever type of HubContext we’ve chosen, we need to inject it into the constructor. So, it will be done like this for a standard HubContext:
public HomeController(IHubContext<LearningHub> hubContext)
{
    this.hubContext = hubContext;
}
Or it will be done like this for a strongly-typed HubContext:
public HomeController(IHubContext<LearningHub, ILearningHubClient> hubContext)
{
    this.hubContext = hubContext;
}
Next, we will add the following line before the return statement of the Index action method:
await hubContext.Clients.All
  .SendAsync("ReceiveMessage", "Index page has been opened by a client.");
For a strongly-typed variety, use this line instead:
await hubContext.Clients.All
  .ReceiveMessage("Index page has been opened by a client.");
And now we can test our HubContext implementation and see how it works with a distributed hub.
Testing HubContext on a distributed SignalR hub
We will launch SignalRServer and SignalRServer2 applications. Then, once these applications are up, we will launch DotnetClient application and connect it to the SignalR hub of SignalRServer2 application.
Now, if you refresh the homepage of SignalRServer application, you should see the following message in the console of DotnetClient app:
Index page has been opened by a client.
Other than that, HubContext implementation would have all the same properties as Hub base class. Anything you can do from the hub implementation can be done from IHubContext implementation.
And this concludes an overview of how to scale SignalR hubs. Let’s summarize what we have learned.
Summary
In this article, you have learned how to scale SignalR hub by using Redis backplane. You have also learned how SignalR hub can be scaled independently of scaling individual web applications. By using Redis backplane, multiple application can use the same SignalR hub definition and share messages across all hub implementations, even if those applications aren’t just copies of each other.
You have also learned that there is a way to send messages to SignalR hub clients from outside the hub. To do so, you can use injectable IHubContext interface with the definition of the hub you want to use. It will be resolved automatically if you have registered SignalR dependencies.
IHubContext can use either a standard or a strongly-typed hub implementations. For the latter, you need to pass specific client interface into IHubContext. And you will then have to use actual client methods to call clients instead of the generic SendAsync method.
You have learned that HubContext is especially appropriate for the use inside of a scalable SignalR application. However, you can still use it inside a singular monolithic application.
In the next article we will have a look at an alternative way of scaling out SignalR hub. You will learn how to do it by using Azure SignalR Service.
Further reading
SignalR Redis backplane documentation: https://docs.microsoft.com/en-us/aspnet/core/signalr/redis-backplane
Official HubContext documentation: https://docs.microsoft.com/en-us/aspnet/core/signalr/hubcontext
Getting started with Redis: https://redis.io/topics/introduction
Docker tutorial: https://docs.docker.com/get-started/
Getting started with Kubernetes: https://kubernetes.io/docs/tutorials/kubernetes-basics/
Load balancing explained: https://www.nginx.com/resources/glossary/load-balancing/
P.S. This article is a chapter from the book SignalR on .NET 6 — the complete guide.