
We have already covered all the fundamental ways of using SignalR messages. We have learned how to set up clients of all supported types, how to send messages to specific clients and how to use data streams, both client-to-server and server-to-client. Now, we will be moving on to more advanced SignalR concepts. And in this article, we will cover SignalR configuration.
Most of the time, you won’t have to configure SignalR. The default settings are more than sufficient to cover the majority of scenarios where SignalR is used. But sometimes you will have to fine-tune configuration. Some of the settings would allow you to significantly improve the performance or make your application more secure.
SignalR allows you to configure both the server and the client. And both of those have multiple levels of configuration. In this article, we will cover them all.
We will covers the following topics:
- Configuring SignalR server
- Configuring SignalR client
- Pros and cons of MessagePack protocol
By the end of this article, you will have learned how to configure both SignalR server and the client.
Prerequisites
This article assumes that you already have set up your development environment. If not, you will need the following:
- A machine with either Windows, Mac OS or Linux operating system
- A suitable IDE or code editor (Visual Studio, JetBrains Rider or VS Code)
- .NET 6 SDK (or newer)
- NPM is installed on the machine, as described here.
Also, since we are continuing to build on top of the application that we have developed in the previous article, we need the code that we have written previously. If you have skipped the previous article, you can access the complete code from the following location in the GitHub repository:
The complete code samples from this article are available from the following location in the GitHub repo, which has separate folders corresponding to individual parts of the article:
https://github.com/fiodarsazanavets/SignalR-on-.NET-6—the-complete-guide/tree/main/Chapter-07
To fully understand the JSON settings, you would need to be familiar with JSON format and how you can serialize and deserialize JSON data.
Configuring SignalR server
We will begin by applying some advanced configuration to SignalR server. And before we start, we will need to make sure that Program.cs file in SignalRServer project has the following namespace references:
using Microsoft.AspNetCore.Http.Connections;
using System.Text.Json.Serialization;
On the server-side, there are three levels of configuration: top-level SignalR configuration, message protocol configuration and HTTP transport configuration. Let’s cover all these categories one by one.
Top-level SignalR configuration
We will begin by locating the following line in Program.cs file:
builder.Services.AddSignalR();
We will then insert the following block into the brackets at the end of `AddSignalR` method call:
hubOptions => {
    hubOptions.KeepAliveInterval = TimeSpan.FromSeconds(10);
    hubOptions.MaximumReceiveMessageSize = 65_536;
    hubOptions.HandshakeTimeout = TimeSpan.FromSeconds(15);
    hubOptions.MaximumParallelInvocationsPerClient = 2;
    hubOptions.EnableDetailedErrors = true;
    hubOptions.StreamBufferCapacity = 15;

    if (hubOptions?.SupportedProtocols is not null)
    {
        foreach (var protocol in hubOptions.SupportedProtocols)
            Console.WriteLine($"SignalR supports {protocol} protocol.");
    }
}
This code demonstrates all possible configuration options that are available at the context of top-level SignalR configuration. Let’s examine them one by one.
KeepAliveInterval
When a client connects to the server, the connection is maintained by sending ping requests to connected clients at regular intervals. This setting controls the interval between the ping requests.
By default, it is set to 15 seconds. Making this interval shorter would allow you to detect a disconnection quicker. Making it longer will save the bandwidth. So, you would decrease this interval when performance and resilience are important and you would increase it when you have to work with limited bandwidth.
MaximumReceiveMessageSize
This setting determines the maximum size of a message that a client can send to the hub. It’s represented in bytes and, by default, it’s 32 kilobytes.
This setting can be increased if you need to deal with large messages. But if your system is intended to deal with a large quantity of small messages, then it makes sense to decrease this number to increase the performance.
HandshakeTimeout
When client establishes a connection with a SignalR hub, it initiates a handshake. This setting determines how long the server should wait for a response from the client before it gives up on it and considers the connection to be broken. By default, the timeout is 15 seconds.
If you intend to only ever use your system on a fast network, then it may make sense to decrease this number. If the client goes offline during the handshake, your application will detect it quicker. However, if some of your clients are expected to be on slower networks, then it may make sense to increase the interval.
MaximumParallelInvocationsPerClient
By default, each client is only allowed to execute one hub method at a time. The next invocation is queued and is triggered when the current invocation has completed. This setting allows you to change it. It determines the number of invocations a client can do in parallel.
The higher the number – the higher the performance of the clients. But this is achieved at the expense of increased use of computational resources by the server. So it may not be a good idea to use a high number in this field if you have a large quantity of clients and where each client invokes hub methods in a quick succession.
EnableDetailedErrors
This setting determines if the clients would receive internal error information when an exception is thrown during an invocation of a hub method. This setting is disabled by default. We can see how this setting works by replacing SendToCaller method of LearningHub class with the following:
public Task SendToCaller(string message)
{
    throw new Exception("You cannot send messages to yourself.");
}
So, if a client invokes this method, an unhandled exception would be thrown. In this case, if we had EnableDetailedErrors set to true, we would receive the inner exception message by the client that invoked this method. This is demonstrated by the following screenshot, which shows the message being displayed in in-browser console of the JavaScript client:
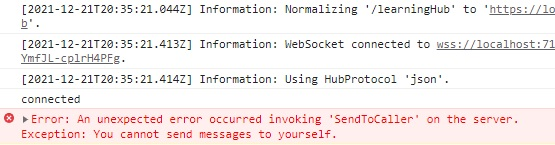
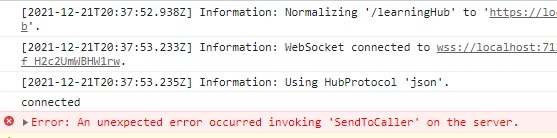
If, however, we set EnableDetailedErrors set to false, the client would still be notified of an error, but the error information would be completely lost, as can be seen in the following screenshot:
This setting should only be used in development environment. It should never be used in production or any other environment that mimics production (integration test, staging, etc). Instead, the actual error should be logged on the server. This is needed to prevent any potential information of inner working of the system from being leaked to malicious users.
StreamBufferCapacity
This setting determines the maximum number of items that can be uploaded into a client-to-server stream. If the limit is reached, the call will be blocked until the existing items are processed.
By default, this number is 10. The higher the number – the faster the server can process the client streams. But this is done at the expense of increased usage of computational resources.
SupportedProtocols
This is a collection of message protocol names that the server supports. The names of these protocols are written as lowercase strings, e.g. json and messagepack. JSON is supported by default, while MessagePack protocol needs to be explicitly enabled.
This setting is redundant, as there are more intuitive ways of configuring which messaging protocols should be supported. And now we will move on to applying advanced settings for JSON protocol.
JSON message protocol settings
At the end of AddSignalR method call, you can replace the semicolon with the following block of code:
.AddJsonProtocol(options => {
    options.PayloadSerializerOptions.PropertyNamingPolicy = null;
    options.PayloadSerializerOptions.Encoder = null;
    options.PayloadSerializerOptions.IncludeFields = false;
    options.PayloadSerializerOptions.IgnoreReadOnlyFields = false;
    options.PayloadSerializerOptions.IgnoreReadOnlyProperties = false;
    options.PayloadSerializerOptions.MaxDepth = 0;
    options.PayloadSerializerOptions.NumberHandling = JsonNumberHandling.Strict;
    options.PayloadSerializerOptions.DictionaryKeyPolicy = null;
    options.PayloadSerializerOptions.DefaultIgnoreCondition = JsonIgnoreCondition.Never;
    options.PayloadSerializerOptions.PropertyNameCaseInsensitive = false;
    options.PayloadSerializerOptions.DefaultBufferSize = 32_768;
    options.PayloadSerializerOptions.ReadCommentHandling = System.Text.Json.JsonCommentHandling.Skip;
    options.PayloadSerializerOptions.ReferenceHandler = null;
    options.PayloadSerializerOptions.UnknownTypeHandling = JsonUnknownTypeHandling.JsonElement;
    options.PayloadSerializerOptions.WriteIndented = true;

    Console
    .WriteLine($"Number of default JSON converters: {options.PayloadSerializerOptions.Converters.Count}");
});
Even though JSON protocol is enabled by default, using AddJsonProtocol method allows you to fine-tune it. Pretty much all of the settings are related to payload serialization. And here is what each of these settings does.
PropertyNamingPolicy
This setting determines the policy of naming JSON properties. It used `JsonNamingPolicy` abstract class from `System.Text.Json` namespace. If you need to, you can create your own implementation of it by inheriting from this class. And then you can apply your own implementation to this setting.
Encoder
This property accepts any implementation of JavaScriptEncoder class from System.Text.Encodings.Web namespace. If your clients use any custom encoding in JSON data that they exchange with the server, you can override this class and apply the custom encoding rules in it.
IncludeFields
This option determines whether or not fields are handled during serialization and deserialization. Normally, just C# properties of your data classes are handled. With this option set to true, fields will be handled too.
IgnoreReadOnlyFields
If this option is set to true and IncludeFields option is also set to true, then the fields that are marked as readonly will be ignored during serialization. By default, this option is set to false.
IgnoreReadOnlyProperties
This option determines whether data class properties that only have a getter and no setter are ignored during serialization. The default value is false, so these properties are included.
MaxDepth
This property determines the maximum depth of nested JSON objects used during deserialization. By default, the system will accept 64 levels. If you set the value to 0, there will be no limit.
NumberHandling
This setting is represented by JsonNumberHandling enum from System.Text.Json.Serialization namespace. It determines how numeric data in JSON messages is handled. Here are the possible values:
- Strict – numbers are only accepted in a standard JSON format with no quotes
- WriteAsString – numbers will be written as string surrounded by quotes
- AllowReadingFromString – numbers would be readable either from standard JSON numbers or from string values
- AllowNamedFloatingPointLiterals – NaN, Infinity, and -Infinity can be read as floating-point constants and translated to their corresponding double or float numeric values
Normally, you would just use Strict option. But there might be some use cases where other options are appropriate.
DictionaryKeyPolicy
This option determines how keys in C# dictionaries get translated to JSON. It’s represented by JsonNamingPolicy class of System.Text.Json namespace, which can be inherited from and overridden.
DefaultIgnoreCondition
This setting controls whether or not properties with default values are ignored during serialization and deserialization. It’s represented by JsonIgnoreCondition enum of System.Text.Json.Serialization namespace, which has the following values:
- Never – the properties with default values will always be serialized and deserialized
- Always – the properties with default values will always be ignored
- WhenWritingNull – a reference-type property or a field will be ignored during serialization when null is its value
- WhenWritingDefault – a property that has the default value of `null` will be ignored during serialization when null is its value
The default value is Never.
PropertyNameCaseInsensitive
If this option is set, then the comparison between JSON fields and C# properties won’t be case sensitive during deserialization. The default value is false.
DefaultBufferSize
This setting determines the default size of a temporary data buffers in bytes. The bigger the buffer – the more data can be transferred in one chunk. But smaller buffers would be useful in an environment with a limited network bandwidth.
ReadCommentHandling
This setting determines how comments are handled in JSON. It’s represented by JsonCommentHandling enum from `System.Text.Json` namespace and here are the possible values:
- Allow – the comments are read from JSON
- Skip – the comment are allowed, but they are not read
- Disallow – a JSON with comments is considered to be invalid
ReferenceHandler
This setting determines how JSON references are handled. It’s represented by ReferenceHandler class of System.Text.Json.Serialization namespace. The class can be overridden and custom logic can be applied to it.
UnknownTypeHandling
This setting determines how unknown types are handled during deserialization. It’s represented by JsonUnknownTypeHandling enum from System.Text.Json.Serialization namespace and the values are as follows:
- JsonElement – a type declared as object is deserialized as JSON element
- JsonNode – a type declared as object is deserialized as JSON node
WriteIndented
If this option is set to true, then JSON will be written in a human-readable format with indentations applied. It will be written as a single-line string otherwise. The default value is false.
Converters
This setting holds a collection of JsonSonverter objects from System.Text.Json.Serialization namespace. This overridable class allows you to determine custom conversion rules to transform your JSON data before it’s processed. By default, there aren’t any converters applied, so the collection is empty.
And this concludes the overview of JSON serialization properties. We will now move on to HTTP transport settings.
Applying advanced transport configuration
We will now locate the line that contains app.MapHub and replace it with the following code:
app.MapHub<LearningHub>("/learningHub", options =>
{
    options.Transports =
                HttpTransportType.WebSockets |
                HttpTransportType.LongPolling;
    options.CloseOnAuthenticationExpiration = true;
    options.ApplicationMaxBufferSize = 65_536;
    options.TransportMaxBufferSize = 65_536;
    options.MinimumProtocolVersion = 0;
    options.TransportSendTimeout = TimeSpan.FromSeconds(10);
    options.WebSockets.CloseTimeout = TimeSpan.FromSeconds(3);
    options.LongPolling.PollTimeout = TimeSpan.FromSeconds(10);

    Console
    .WriteLine($"Authorization data items: {options.AuthorizationData.Count}");
});
These are the options where you apply transport settings. Let’s now examine these settings one by one.
Transports
This setting allows you to set the availability of SignalR transport mechanisms. By default, it supports WebSocket, long polling and server-sent events. In our example above, we’ve set it to only support WebSocket and long polling.
The values are added together by using bitwise operations.
CloseOnAuthenticationExpiration
This setting determines whether SignalR connection gets closed when authentication expires. If set to true, the clients would need to re-authenticate. Otherwise, the connection remains live until the client disconnects.
ApplicationMaxBufferSize
This option represents the maximum buffer size for the data exchange in the application layer in bytes. By default, it’s set to 65 kilobytes.
As with any other buffer size settings, the higher the value – the quicker you can transfer the data. But you will be putting a bigger load on your network, so it makes sense to lower this value for low-bandwidth networks.
TransportMaxBufferSize
This option represents the maximum buffer size for the data exchange in the transport layer in bytes. By default, it’s set to 65 kilobytes.
MinimumProtocolVersion
This setting determines the minimum protocol version supported by the server. If it’s set to 0, then any version would be supported.
TransportSendTimeout
This setting determines how long the application will wait for send action to complete. If this time is exceeded, the connection will be closed.
WebSockets
This is a set of options specific to WebSocket transport mechanism.
LongPolling
This is a set of options specific to long polling transport mechanism.
AuthorizationData
The collection of authorization data used in HTTP pipeline.
And this concludes the overview of SignalR server configuration. Next, we will have a look at how you can configure the clients.
Configuring SignalR client
Different SignalR client types have different settings. But they share some common settings. Also, in all of the client types, you can set some configuration only once when you create a connection object, while other options can be changed at any point.
We will start with an overview of configuration options of a JavaScript client.
Configuring JavaScript client
We will open our site.js file, which is located under js folder of wwwroot folder of SignalRServer project. We will find the statement where connection object is instantiated and replace it with the following:
const connection = new signalR.HubConnectionBuilder()
    .withUrl("/learningHub", {
        transport: signalR.HttpTransportType.WebSockets | signalR.HttpTransportType.LongPolling,
        headers: { "Key": "value" },
        accessTokenFactory: null,
        logMessageContent: true,
        skipNegotiation: false,
        withCredentials: true,
        timeout: 100000
    })
    .configureLogging(signalR.LogLevel.Information)
    .build();
Here, we have added a number of configuration options. Let’s go over each one of them.
transport
This option determines the transport mechanisms that the client supports. As on the server, you can add multiple transport mechanisms by using bitwise operators.
By default, the client would support all three transport mechanisms and WebSocket will be prioritized.
headers
This option allows you to apply any custom HTTP headers to your request in a form of key-value pairs.
accessTokenFactory
This setting allows you to apply authentication token. We will cover it in more detail in one of future articles.
logMessageContent
If set, this setting will log the content of the messages into the console.
skipNegotiation
If WebSocket transport is used, the negotiation can be skipped. Otherwise, this option will have no effect.
Skipping negotiation will establish the connection faster.
withCredentials
If set, this option will apply cr`HttpTransportType.WebSockets`edentials to the request. This is especially relevant to CORS requests.
timeout
This setting determines the maximum allowed time for HTTP requests. It’s not applied to poll requests of long polling, EventSource, or WebSocket.
Setting logging level
configureLogging method allows you to set the minimal severity level at which messages will be logged. It can be either represented by a literal string value, or a constant. When a particular severity level is set, events of that severity level and above are logged, but events of lower severity levels aren’t logged.
The available severity levels are as follows:
| Literal | Constant | Description |
| trace | LogLevel.Trace | Includes verbose output of routine processes |
| debug | LogLevel.Debug | Includes information intended only to be viewed during debugging |
| info or information | LogLevel.Information | Includes information on key events |
| warn or warning | LogLevel.Warning | Includes some events that may be a cause of concern |
| error | LogLevel.Error | Includes errors |
| critical | LogLevel.Critical | Includes critical failures |
| none | LogLevel.None | No logging is done |
Next, we will apply some configuration options that may change at any time after the connection object has been created.
Changeable options
After connection object has been initialized, we can add the following lines of code:
connection.serverTimeoutInMilliseconds = 30000;
connection.keepAliveIntervalInMilliseconds = 15000;
Let’s now go over each one of these options.
serverTimeoutInMilliseconds
This option determines how long the client should wait for a message from the server before the connection is considered dead and `onclose` event is triggered. The value is in milliseconds and it’s 30 seconds by default.
keepAliveIntervalInMilliseconds
As the server sends ping messages to the clients to keep the connection alive, so do the clients send ping messages to the server. And this option determines how frequently these messages are sent by the client. By default, this value is 15 seconds, or 15,000 milliseconds.
And this concludes our overview of JavaScript client configuration. Let’s now move on to .NET client.
Configuring .NET client
Before we start, we need to make sure all of the following namespace references are present in Program.cs file of DotnetClient project:
using Microsoft.AspNetCore.Connections;
using Microsoft.AspNetCore.Http.Connections;
using Microsoft.AspNetCore.SignalR.Client;
using Microsoft.Extensions.Logging;
Then, we will locate the initialization statement for hubConnection object and replace it with the following:
var hubConnection = new HubConnectionBuilder()
    .WithUrl(url,
        HttpTransportType.WebSockets,
        options => {
            options.AccessTokenProvider = null;
            options.HttpMessageHandlerFactory = null;
            options.Headers["CustomData"] = "value";
            options.SkipNegotiation = true;
            options.ApplicationMaxBufferSize = 1_000_000;
            options.ClientCertificates = new System.Security.Cryptography.X509Certificates.X509CertificateCollection();
            options.CloseTimeout = TimeSpan.FromSeconds(5);
            options.Cookies = new System.Net.CookieContainer();
            options.DefaultTransferFormat = TransferFormat.Text;
            options.Credentials = null;
            options.Proxy = null;
            options.UseDefaultCredentials = true;
            options.TransportMaxBufferSize = 1_000_000;
            options.WebSocketConfiguration = null;
            options.WebSocketFactory = null;
    })
    .ConfigureLogging(logging => {
        logging.SetMinimumLevel(LogLevel.Information);
        logging.AddConsole();
    })
    .Build();
You may have noticed that we have applied HttpTransportType.WebSockets as one of the call parameters. This is one of the ways of applying allowed transport mechanisms to .NET clients. Another way is to set it as one of the options. But whichever way you choose, you can still use bitwise operations to apply multiple transport mechanisms.
As you can see, there are more configuration options on .NET client compared to the JavaScript one. But, as before, we will overview them all.
AccessTokenProvider
This setting determines the provider for authorization token. It’s used when you are applying authentication to the SignalR connection. We will cover this in more detail in a future article.
HttpMessageHandlerFactory
We can use this setting to apply a custom message handler logic to the HTTP middleware. We would need it if we would want to transform the default data in any way. Otherwise, we can just use the default value.
Headers
This option allows us to apply custom HTTP headers to the SignalR connection. Those are represented as key-value pairs.
SkipNegotiation
This option will only be applied if you are using WebSocket transport mechanism. If set to true, the connection will get established faster.
ApplicationMaxBufferSize
This setting represents the maximum buffer size, i.e. how much data can be transferred at once. The value is in bytes and the default value is one megabyte.
ClientCertificates
One of the common ways to authenticate a client, especially if the client is to use a certificate with stored credentials. This is especially common when the client is an automated service rather than something that an end-user would use directly. Remote procedure calls within a distributed application that uses microservices architecture is a common use case for client certificates. And this is what this option allows you to configure.
CloseTimeout
This setting controls how long the client should wait for the service response when the client has issued a request to close. If the server doesn’t respond within this time, the connection is forcefully terminated.
Cookies
This option allows you to set a collection of cookies to send to the server.
DefaultTransferFormat
This option determines whether HTTP connection is started with either text or binary as the transfer format.
Credentials
This setting allows you to configure the credentials to include in HTTP request.
Proxy
This option allows you to configure a proxy that is positioned between the client and the SignalR hub.
UseDefaultCredentials
If this value is set, then default credentials will be used while making a HTTP request. This setting is applied if you want the users of Windows machines to re-apply their Microsoft Active Directory credentials to the SignalR connection.
WebSocketConfiguration
This option allows you to apply custom configuration if WebSocket transport mechanism is used.
WebSocketFactory
This delegate allows you to modify or replace the default WebSocket implementation.
Setting logging level
In C#, logging is configured via ConfigureLogging method call. This is where you set the log level and apply any specific logging provider. Otherwise, the available logging levels would be the same as have been described in the section dedicated to JavaScript client.
And now we will move on to those configuration options that can be changed after the connection object has been instantiated.
Applying dynamic configuration options
After we have initialized our hubConnection object, we can insert the following code:
hubConnection.HandshakeTimeout = TimeSpan.FromSeconds(15);
hubConnection.ServerTimeout = TimeSpan.FromSeconds(30);
hubConnection.KeepAliveInterval = TimeSpan.FromSeconds(10);
These are the options that we can change dynamically. And this is what each one of them represents:
HandshakeTimeout
This option determines how long the client should wait for the server response during the handshake before it the client terminates the connection. The default value is 15 seconds.
ServerTimeout
This determines the interval during which the client waits for the server to send a message. If no message is sent by the server during this interval, the client terminates the connection. The default value is 30 seconds.
KeepAliveInterval
This setting determines how frequently pings are sent from the client to the server. These pings will keep the connection active. And the default interval is 15 seconds.
This concludes the overview of .NET client configuration. Let’s now have a look at Java client.
Configuring Java client
For Java client, logging is configured via the following package:
org.slf4j:slf4j-jdk14
If you don’t have this package installed, some errors will appear in your application’s console. But those will not prevent your application from working.
We will now apply some configuration to our Java client that we have created previously. And the first thing we will do is open our App.java file and replace the instantiation of hubConnection object with the following:
HubConnection hubConnection = HubConnectionBuilder.create(input)
        .withHeader("Key", "value")
        .shouldSkipNegotiate(true)
        .withHandshakeResponseTimeout(30*1000)
        .withTransport(TransportEnum.WEBSOCKETS)
        .build();
These are the configuration options that are available to you when a SignalR connection from Java client gets instantiated. And here is what each of these options means:
withHeader
This option determines custom HTTP headers that get applied when the connection gets established. Each of these calls represents a key-value pair.
shouldSkipNegotiate
If you are using WebSocket transport mechanism, then this option would allow you to establish the connection faster. Otherwise, it will be ignored.
withHandshakeResponseTimeout
This option sets the time for the client to wait for the server response during the handshake. If the response doesn’t arrive within this time, the connection is terminated. The value is represented in milliseconds.
withTransport
This setting represents the transport mechanisms that the client will support. If not set, all three transport mechanisms are supported and WebSocket is given a priority.
Now, we will move on to those options that can be configured once the connection object is instantiated.
Dynamic configuration options
After we have instantiated our hubConnection object, we can add the following code:
hubConnection.setServerTimeout(30000);
hubConnection.withHandshakeResponseTimeout(15000);
hubConnection.setKeepAliveInterval(15000);
And here is what each of these options represents:
getServerTimeout / setServerTimeout
Gets or sets the interval during which the client waits for the server to send a message. If no message is sent by the server during this interval, the client terminates the connection. The value is in milliseconds. And the default value is 30 seconds.
withHandshakeResponseTimeout
This option determines how long the client should wait for the server response during the handshake before it the client terminates the connection. The value is in milliseconds. And the default value is 15 seconds.
getKeepAliveInterval / setKeepAliveInterval
This setting determines how frequently pings are sent from the client to the server. These pings will keep the connection active. The value is in milliseconds. And the default interval is 15 seconds.
This completes our overview of how to configure all types of supported SignalR clients. And now we will move on to a topic that deserves a section of its own. You will now learn how to fine-tune MessagePack protocol in SignalR.
Pros and cons of MessagePack protocol
MessagePack protocol is not exclusive to SignalR. It’s similar to JSON in its structure, but it’s binary rather than textual. So, you will have the same types of fields and the same object structure, but you won’t be able to easily read the message while it’s being transferred. But at the same time, the fact that the message is binary makes it much smaller; therefore it will get transferred faster.
Enabling MessagePack on the server
MessagePack is not included in the default SignalR packages. To enable it on the server, you will need to install a NuGet package, which can be achieved by running the following command inside SignalRServer project folder:
dotnet add package Microsoft.AspNetCore.SignalR.Protocols.MessagePack
Then we will open Program.cs file inside the project and will add the following namespace reference:
using MessagePack;
After this, we will locate AddSignalR method call. We can then either replace AddJsonProtocol or add the following call to it:
.AddMessagePackProtocol(options =>
{
    options.SerializerOptions = MessagePackSerializerOptions.Standard
        .WithSecurity(MessagePackSecurity.UntrustedData)
        .WithCompression(MessagePackCompression.Lz4Block)
        .WithAllowAssemblyVersionMismatch(true)
        .WithOldSpec()
        .WithOmitAssemblyVersion(true);
});
So, this is how we enable MessagePack on the server. We don’t have to change any settings, as the default settings would be sufficient for most of scenarios. But this code demonstrates what settings are available if we do need to fine-tune it. Let’s go through them all.
SerializerOptions
This setting allows you to apply custom serialization logic to your MessagePack messages. It’s represented by MessagePackSerializerOptions class from MessagePack namespace, which you can override. In the above example, we are just using the standard serialization settings.
WithSecurity
This setting allows you to apply security options to MessagePack messages. It’s represented by overridable MessagePackSecurity class from MessagePack namespace. This class also has UntrustedData and TrustedData static fields, which will give you pre-configured settings that would either allow or disallow deserialization of untrusted message sequences.
WithCompression
This setting allows you to apply a specific compression algorithm to your MessagePack messages. It’s represented by MessagePackCompression enum from MessagePack namespace. The available values are as follows:
- None – no compression is applied
- Lz4Block – compression is applied to the entire MessagePack sequence as a single block
- Lz4BlockArray – compression is applied as an array of blocks, which makes compression/decompression faster, but this happens at the expense of the compression ratio
WithAllowAssemblyVersionMismatch
If this setting is set to `true`, then the assembly version, if included in MessagePack message, is allowed to be different from the one that the server is using.
WithOldSpec
If this setting is set to true, then old MessagePack specifications are accepted.
WithOmitAssemblyVersion
If this setting is set to true, then the assembly version is not included in the messages.
This concludes our overview of applying MessagePack configuration on the server. We will now have a look at how to enable it on the clients. And the first client we will have a look at will be JavaScript client.
Applying MessagePack on JavaScript client
For JavaScript client, there wasn’t a suitable SignalR MessagePack library available via CDN at the time of writing. So the best way to obtain such a library is to install it via NPM.
If you haven’t done it already, you will need to first initiate a Node.js project in any directory of our choice by running the following command:
npm init
Then, we will run the following command to install the official SignalR MessagePack protocol library:
npm install @microsoft/signalr-protocol-msgpack
This will create node_modules folder inside the folder that we are in. We will open this folder and navigate to the following location:
@microsoft\signalr-protocol-msgpack\dist\browser
Inside this folder, we will copy either signalr-protocol-msgpack.js or signalr-protocol-msgpack.min.js. It doesn’t matter which one. Functionally, they are identical. The former file has human-readable content, but it’s larger in size. The latter file is miniated, which means that all unnecessary characters have been removed from it and all local variable names have been shortened. It’s smaller in size, but it’s impossible to read.
Whichever file we have chosen, we will then navigate to wwwroot/lib directory inside SignalRServer project folder, create signalr folder inside this directory and will paste the JavaScript file there.
Then, we will need to add a script element to the _Layout.cshtml file. For example, if it’s signalr-protocol-msgpack.min.js file that we have copied, the script element would look like the one below:
<script src="~/lib/signalr/signalr-protocol-msgpack.min.js"></script>
We will need to insert it immediately below the reference to the main SignalR library.
To add MessagePack protocol to our JavaScript client, we will then need to open site.js file and add the following line to the statement that builds connection object. This line needs to be inserted before build call.
.withHubProtocol(new signalR.protocols.msgpack.MessagePackHubProtocol())
And this is it. Our JavaScript client will now be using MessagePack protocol instead of JSON. We can now move on to our .NET client.
Applying MessagePack on .NET client
To enable MessagePack protocol on a .NET client, you would need to install exactly the same NuGet package as you would on the server. So, we would execute the following command in our DotnetClient project folder:
dotnet add package Microsoft.AspNetCore.SignalR.Protocols.MessagePack
Then we will need to ensure that Program.cs file in the DotnetClient project has all of the following namespace references:
using MessagePack;
using Microsoft.AspNetCore.Connections;
using Microsoft.AspNetCore.Http.Connections;
using Microsoft.AspNetCore.SignalR.Client;
using Microsoft.Extensions.DependencyInjection;
using Microsoft.Extensions.Logging;
using System.Threading.Channels;
Then we can navigate to the place where hubConnection variable is initialized and add the following block of code to the builder immediately before Build call:
.AddMessagePackProtocol(options =>
{
    options.SerializerOptions = MessagePackSerializerOptions.Standard
    .WithSecurity(MessagePackSecurity.UntrustedData)
    .WithCompression(MessagePackCompression.Lz4Block)
    .WithAllowAssemblyVersionMismatch(true)
    .WithOldSpec()
    .WithOmitAssemblyVersion(true);
})
As you may have noticed, .NET client MessagePack settings are identical to the ones available on the server. And this is because both of them use the same library.
We will now configure our Java client to use MessagePack protocol.
Applying MessagePack on Java client
SignalR MessagePack package for Java can be found on the following page of Maven repository:
https://mvnrepository.com/artifact/com.microsoft.signalr.messagepack/signalr-messagepack
You will need to select the latest version and then just follow the installation instruction that is appropriate to the build system that you are using in your application. For example, assuming that the latest version is 6.0.1, if you are using Maven, you would need to add the following block into the dependencies section of pom.xml file:
<dependency>
    <groupId>com.microsoft.signalr.messagepack</groupId>
    <artifactId>signalr-messagepack</artifactId>
    <version>6.0.1</version>
</dependency>
If you are using Gradle with Groovy DSL, this is the entry you would need to insert into dependencies section of gradle.build file:
implementation 'com.microsoft.signalr.messagepack:signalr-messagepack:6.0.1'
This would be the entry you would need to insert into dependencies section of gradle.build.kts file if you have used Kotlin DSL during project setup:
implementation("com.microsoft.signalr.messagepack:signalr-messagepack:6.0.1")
Then, once this package has been added, you can apply MessagePack protocol to your SignalR connection object by adding .withHubProtocol(new MessagePackHubProtocol()) line on HubConnectionBuilder before build is called. For example, this what the instantiation of connection object may look like:
HubConnection hubConnection = HubConnectionBuilder.create(input)
        .withHubProtocol(new MessagePackHubProtocol())
        .build();
And this concludes MessagePack protocol setup on a Java client.
But as well as having its advantages in terms of decreased payload size, MessagePack protocol has some disadvantages. We will now examine those.
Disadvantages of MessagePack protocol
The first disadvantage of MessagePack protocol is that it’s not available out of the box. You need to install external packages to enable it.
Another disadvantage of MessagePack protocol compared to JSON is that it’s highly case-sensitive. While JSON easily translates between camelCase JavaScript object field names and PascalCase C# property names, MessagePack requires the names to match exactly. For example, if you use the following class in C# as one of SignalR hub method parameters:
public class Data
{
    public int Id { get; set; }
    public string Message { get; set; }
}
Then this is how JavaScript client will have to invoke the method that uses this message:
connection.invoke("SomeHubMethod", { Id: 1, Message: "Some text" });
This will go against the accepted naming conventions in JavaScript. And if you already have a lot of JSON data in your JavaScript client before you’ve decided to switch to MesssagePack hub protocol, the migration process would not be as straight-forward.
There is a work-around available. You can use Key attribute on your C# properties to map the names to camelCase versions of them. But it still requires some effort, especially if you have a lot of classes in your code that represent SignalR messages. For more information on how field mapping works, you can read MessagePack-CSharp documentation, which is available in further reading section of this article.
We have now concluded the overview of advanced SignalR configuration. Let’s summarize what we’ve learned.
Summary
SignalR server has three levels of configuration: top-level SignalR configuration, message protocol configuration and HTTP transport configuration. You can apply custom serializers, change default timeouts and buffer sizes, change transport mechanisms, etc.
Different SignalR client types have different configuration options available. But all clients support configuration of transport mechanism (WebSocket, server-sent events and long polling), timeouts and logging.
By default, clients communicate with SignalR hub by using JSON. But MessagePack protocol can be used instead. This protocol is similar to JSON, but stores data in a binary format. Although it’s better for performance, it’s more strict than JSON and you will need to install additional libraries to use it.
And this concludes the article about configuring SignalR. The next article will teach you how to secure your SignalR endpoints and prevent unauthorized clients from accessing them.
Further reading
Official SignalR configuration documentation: https://docs.microsoft.com/en-us/aspnet/core/signalr/configuration
MessagePack protocol in SignalR: https://docs.microsoft.com/en-us/aspnet/core/signalr/messagepackhubprotocol
MessagePack-CSharp library documentation: https://github.com/neuecc/MessagePack-CSharp
General MessagePack overview: https://msgpack.org/
WebSocket API documentation: https://developer.mozilla.org/en-US/docs/Web/API/WebSockets_API
P.S. This article is a chapter from the book SignalR on .NET 6 — the complete guide.


