
Securing your applications is very important, especially if they are accessible via a network that you don’t have control over, such as public internet. Without security, absolutely anyone can connect to your application, including someone who is up to no good. And this may result in a catastrophic failure that your business may not then be able to recover from.
In this article, we will have a look at how to protect your SignalR endpoints. We will start by looking at the way of restricting your application to only be accessible by clients from specific domains. And then we will set up a single sign-on system, which will allow us to apply user authentication and authorization on SignalR endpoints. The article will explain the difference between authentication and authorization, and you will learn how to integrate them both with SignalR.
Today we will cover the following topics:
- What is CORS and why it’s important
- Setting up single sign-on provider
- Applying authentication in SignalR
- Applying authorization in SignalR
You will have learned how to make your SignalR endpoints secure by preventing unauthorized clients from accessing them. You will learn how to secure individual hub endpoints as well as the entire SignalR hub.
Prerequisites
This article assumes that you already have set up your development environment. You will need the following:
- A machine with either Windows, Mac OS or Linux operating system
- A suitable IDE or code editor (Visual Studio, JetBrains Rider or VS Code)
- .NET 6 SDK (or newer)
Also, since we are continuing to build on top of the application that we have developed in the previous article, we need the code that we have written previously. If you haven’t read the previous article, you can access the complete code from the following location in the GitHub repository:
The complete code samples from this article are available from the following location in the GitHub repo, which has separate folders corresponding to individual parts of the article:
https://github.com/fiodarsazanavets/SignalR-on-.NET-6—the-complete-guide/tree/main/Chapter-08
What is CORS and why it’s important
Perhaps one of the most basic things you can do to your ASP.NET Core application to make it more secure is to enable CORS policies. CORS stands for Cross-Origin Resource Sharing. And it’s all about allowing (or restricting) access to the client applications hosted on specific domains that the clients are hosted on.
CORS configuration doesn’t just apply to SignalR. It applies to the entire ASP.NET Core application and all of its HTTP endpoints, including SignalR.
Without further ado, let’s add some CORS policies to our application. And to do so, we will insert the following into Program.cs file of SignalRServer project. It can go anywhere before Build method is called on builder variable.
builder.Services.AddCors(options =>
{
    options.AddPolicy("AllowAnyGet",
        builder => builder.AllowAnyOrigin()
            .WithMethods("GET")
            .AllowAnyHeader());

    options.AddPolicy("AllowExampleDomain",
        builder => builder.WithOrigins("https://example.com")
            .AllowAnyMethod()
            .AllowAnyHeader()
            .AllowCredentials());
});
Let’s now examine what we’ve done. We have added two CORS policies. One is called AllowAnyGet and the other one is called AllowExampleDomain. Inside AllowAnyGet policy, we are allowing any HTTP request from any domain, but only if it uses GET HTTP verb. AllowExampleDomain policy allows any method with any header. It also allows the application to accept credentials. But it only allows those things if a request comes from https://example.com origin.
And now, we can apply the policies that we have added. To do so, we will insert the following code just after the call to app.UseRouting:
app.UseCors("AllowAnyGet")
   .UseCors("AllowExampleDomain");
Please note that it is important in what order you call methods on app variable. After all, these are request middleware stages. Therefore the capabilities that are represented by these method calls are added to the request processing chain in the same order as these methods are called. For UseCors method, the order is less critical than it is for some other steps. But if you have UseResponseCaching method call in your middleware pipeline, UseCors must be called first.
You will probably see no effect of this configuration with our client applications, unless you move any of the stand-alone clients to a different machine. But this exercise was still useful, as you now know how to blacklist or whitelist domains that can access your application.
And now we will move on to a different method of securing our SignalR server endpoints. We will set up a single sign-on system (SSO).
Setting up single sign-on provider
SSO is a system where different applications can re-use the same authentication data. Usually, there will be a single application within this system that manages user login information. We will refer to such an application as SSO provider. This application will generate authentication data that can then be used by other applications and shared between them. So, if you logged into one application of the system, you have automatically logged into them all.
There are many different SSO providers: Keycloak, Okta, Microsoft Azure Active Directory, etc. Major tech companies use their own SSO providers. This is what allows you to log on a website that you’ve never used before by using your Google or Facebook credentials.
The compatibility of apps with different SSO providers was made possible by the standardization of authentication protocols. More often than not, those system would be using a combination of OpenID Connect and OAuth. Let’s briefly have a look at what those are.
Overview of OpenID Connect and OAuth
OpenID Connect is a protocol that was specifically designed for authentication, while OAuth is authorization protocol. And this is how these two protocols can be used in combination. OpenID Connect defines the login process. And OAuth determines the structure of authentication token that will allow the system to easily tell if the user has all the required permissions to access a particular resource.
There are several different authentication flows in OpenID Connect, but the general principles of them all can be summarized as follows:
- A user opens an application and initiates a login
- The application gets redirected to the authentication page of SSO provider application
- If the user enters credentials correctly, a time-sensitive code is generated by the SSO application
- SSO provider redirects the user back to the original application and shares the code with this application
- The code is sent back to SSO provider and, if the codes match, authentication token is returned to the original application
- The token can be stored in a cookie, so the application knows that the user is authenticated
Please note that the original application that the user wants to access has absolutely no idea what the user credentials are. For example, when you use “Log in with Google” option on the web, you get taken to Google’s own page. And it’s that page where you enter the credentials. You return back to the original page only if the credentials you supplied were correct. And to enable this, a redirection URL is sent to the SSO provider when the log in page is requested. So rest assured that you won’t be sharing your Google or Facebook credentials with some third-party website.
The authentication token that gets retrieved from the SSO provider usually comes as JSON Web Token (JWT). We will have a look at JWT structure later. For now, let’s set up an SSO provider of our own.
In our example, we will be using IdentityServer. This specific SSO provider was chosen because it’s based on ASP.NET Core project template, so it will be easy to add to our solution.
Setting up IdentityServer 4
We will need to open our CLI terminal in LearningSignalR solution folder. Then, we will need to execute the following command to download IdentityServer 4 project templates:
dotnet new -i IdentityServer4.Templates
Once the templates have been downloaded, we will execute the following command to instantiate a project based on a template that contains Admin UI. We could have chosen a different template, but this particular one has a user-friendly web interface, so it will be more convenient to work with than any alternative.
dotnet new is4admin -o AuthProvider
Then, we will add our newly created project to the solution by executing the following command:
dotnet sln add AuthProvider\AuthProvider.csproj
By default, IdentityServer 4 comes with only a limited set of its capabilities unlocked. We will need to make some custom code modifications to ensure that all the information that we are interested in gets passed into the authentication token. And to do so, we will create UserProfileService.cs file inside AuthProvider project folder. We will add the following content to this file:
using AuthProvider.Models;
using IdentityModel;
using IdentityServer4.Extensions;
using IdentityServer4.Models;
using IdentityServer4.Services;
using Microsoft.AspNetCore.Identity;
using System;
using System.Linq;
using System.Security.Claims;
using System.Threading.Tasks;

namespace AuthProvider
{
    public class UserProfileService : IProfileService
    {
        private readonly IUserClaimsPrincipalFactory<ApplicationUser> claimsFactory;
        private readonly UserManager<ApplicationUser> usersManager;

        public UserProfileService(
            UserManager<ApplicationUser> usersManager,
            IUserClaimsPrincipalFactory<ApplicationUser> claimsFactory)
        {
            this.usersManager = usersManager;
            this.claimsFactory = claimsFactory;
        }
    }
}
The class that we have created implements IProfileService interface from IdentityServer4.Services namespace. This interface allows us to execute some custom logic when an authentication token gets requested. And this is the method that we will add to it to execute such logic:
public async Task GetProfileDataAsync(ProfileDataRequestContext context)
{
    var subject = context.Subject.GetSubjectId();
    var user = await usersManager.FindByIdAsync(subject);
    var claimsPrincipal = await claimsFactory.CreateAsync(user);
    var claimsList = claimsPrincipal.Claims.ToList();

    claimsList = claimsList
        .Where(c => context.RequestedClaimTypes
        .Contains(c.Type))
        .ToList();

    // Add user-specific claims
    claimsList.Add(new Claim(JwtClaimTypes.Email, user.Email));
    claimsList.Add(new Claim(JwtClaimTypes.Name, user.UserName));

    if (usersManager.SupportsUserRole)
    {
        foreach (var roleName in await usersManager.GetRolesAsync(user))
        {
             claimsList.Add(new
            Claim(JwtClaimTypes.Role, roleName));

            // Add a special claim for an admin user
            if (roleName == "admin")
                claimsList.Add(new Claim("admin", "true"));
        }
    }
    context.IssuedClaims = claimsList;
}
Let’s examine what this method is doing. The payload of JWT would be a JSON object with multiple fields. Each of these fields is known as claim. And we are just adding some claims that were missing from the original payload.
We first add some claims specific to the user. We populate the email claim with the user’s email and we add the username to the name claim. Then we iterate through all available user roles. We add each one of those to role claim. The result of adding multiple values to the same claim would be that the value of this JSON field will be an array. So, we will still have a claim called role. But inside this claim, there would be a collection of roles.
Then, if we locate a role called admin, we add a special custom claim to the token. We create a claim called admin and set its value to true.
We will have a look at how claims work in more detail when we will be talking about user authorization. But for now, we will need to complete our newly created service by adding the following method to it. It’s not doing anything interesting, but we need it to make sure that IProfileService interface is implemented.
public async Task IsActiveAsync(IsActiveContext context)
{
    var subject = context.Subject.GetSubjectId();
    var user = await usersManager.FindByIdAsync(subject);
    context.IsActive = user != null;
}
Now, we will need to register our newly created class in the dependency injection system. To do so, we will need to add the following namespace reference to the Startup.cs file of the AuthProvider project:
using IdentityServer4.Services;
Then, we will need to insert the following line right at the bottom of ConfigureServices method. Placing right at the bottom of this method is important to guarantee that we overwrite the original implementation.
services.AddScoped<IProfileService, UserProfileService>();
Now, will need to ensure that our SSO provider application is accessible via HTTPS and not just HTTP. This is because, without any additional configuration, many frameworks and browsers would not work with an SSO provider that doesn’t have HTTPS encryption.
To add HTTPS URL, we will need to open launchSettings.json file that’s located in Properties folder of our SSO project. Then, we will need to replace applicationUrl entry with the following:
"applicationUrl" : "https://localhost:5001;http://localhost:5000"
Now, our application will be accessible via https://localhost:5001 URL and this will be the URL that will be given priority. We just need to make sure that this is the default URL the internal components of the application would be accessible on. To do so, we will need to open env.js file that is located in wwwroot/admin/assets folder. In there, just replace every URL with https://localhost:5001.
Our SSO provider application is now ready to be launched and configured.
Configuring SSO application
We can launch our application by executing dotnet run command inside the AuthProvider project folder. The first launch may take a while, as it will need to run some database migrations. Once ready, we can open https://localhost:5001/admin address in our browser to ensure that our application works correctly.
Assuming that our admin console launches successfully and there are no errors displayed on the screen, we can register a client application. In the context of SSO, client application is any application that is allowed to redirect to the login page of the SSO application and request an authentication token from it. The configuration information that we enter in the SSO admin console and the information we add to the client application itself must match in order for this to work.
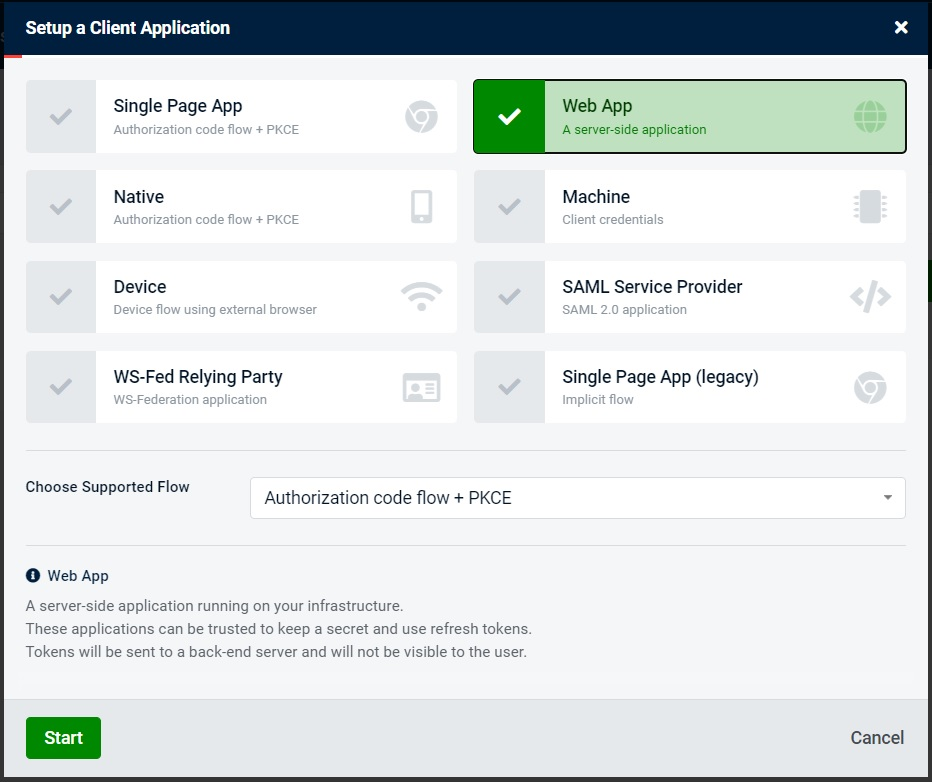
We will first navigate to Clients tab and create new client. In the dialog that opens, we will choose Web Application as our client type, like the following picture demonstrates:
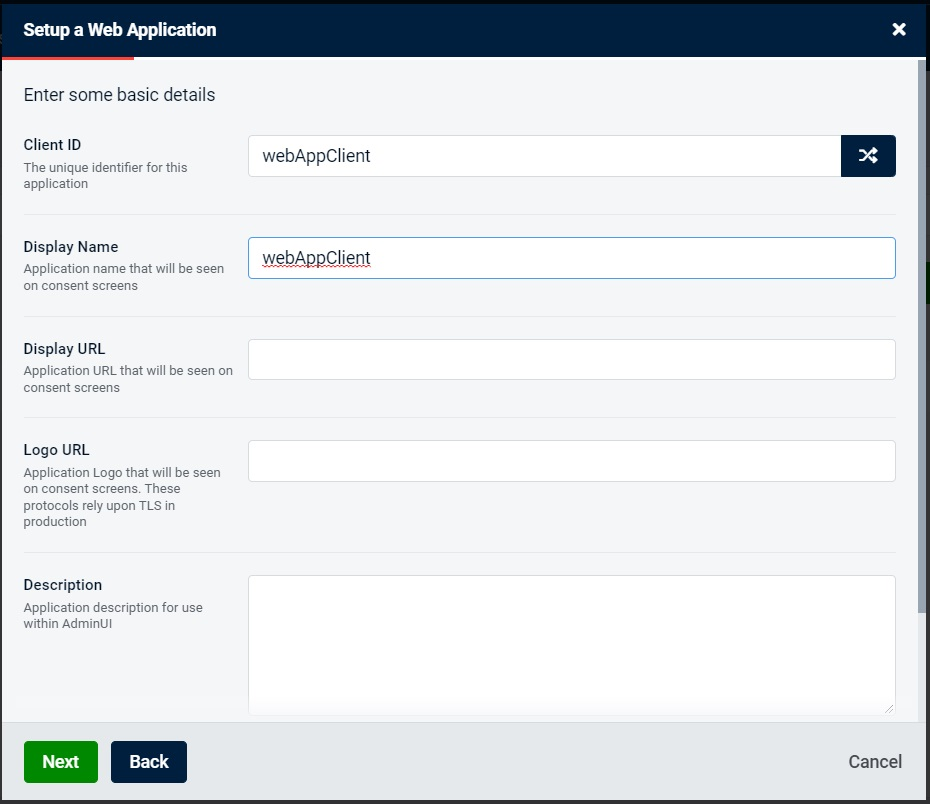
We will then enter webAppClient as both client name and client id, like shown on the screenshot below. Client name can be anything, but it’s important that the client id is the same as what’s configured on the actual client application, as this information will be used in the requests to SSO. And it will be used by the SSO provider to authenticate the client application and prevent malicious users from sending a request from somewhere else.
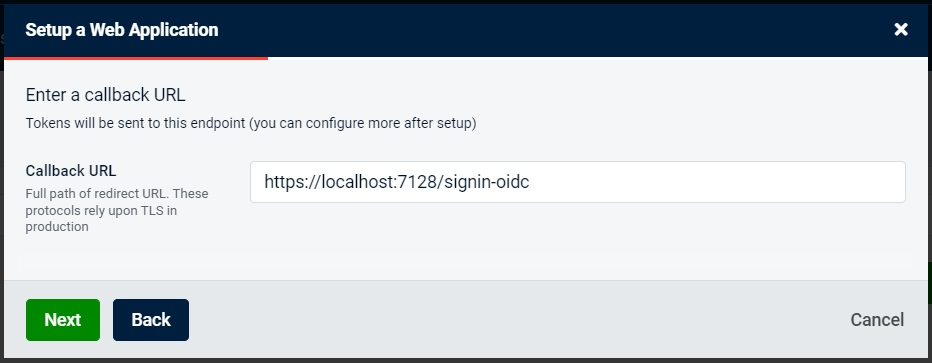
Next, we will need to add the redirection URL. This is the URL that the SSO provider will redirect to if the user is successfully authenticated. This can be overridden by the client, which can send a different endpoint in the request.
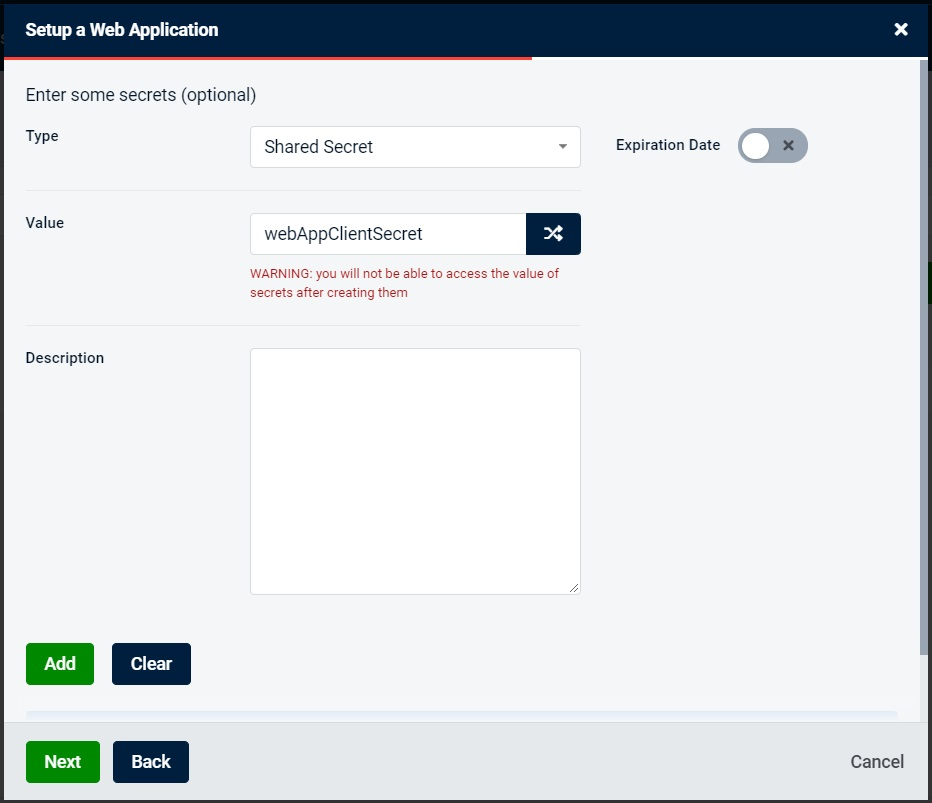
Next, we will need to add a client application secret. This value would be hidden and normally it would be represented by a complex string of characters. But for the sake of demonstration, we will set this value to webAppClientSecret. If client id is analogous to the username, then client secret is an equivalent of the password.
Next, we will add some client scopes, as demonstrated on the screenshot below. And we will just select default values in all the following steps.
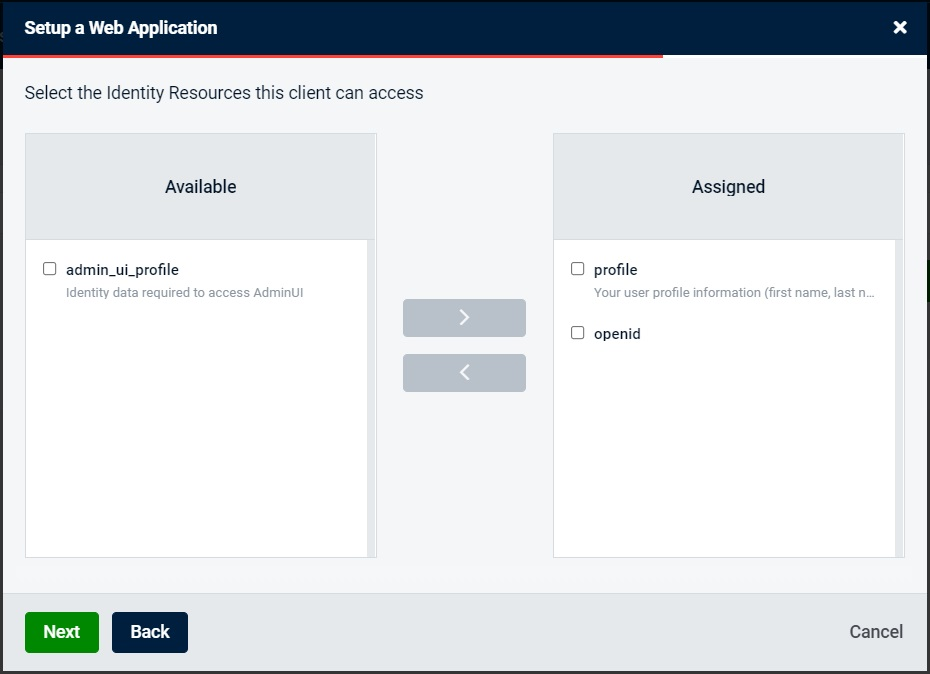
Once the client has been created, we will navigate to Roles tab. We will add two roles – user and admin.
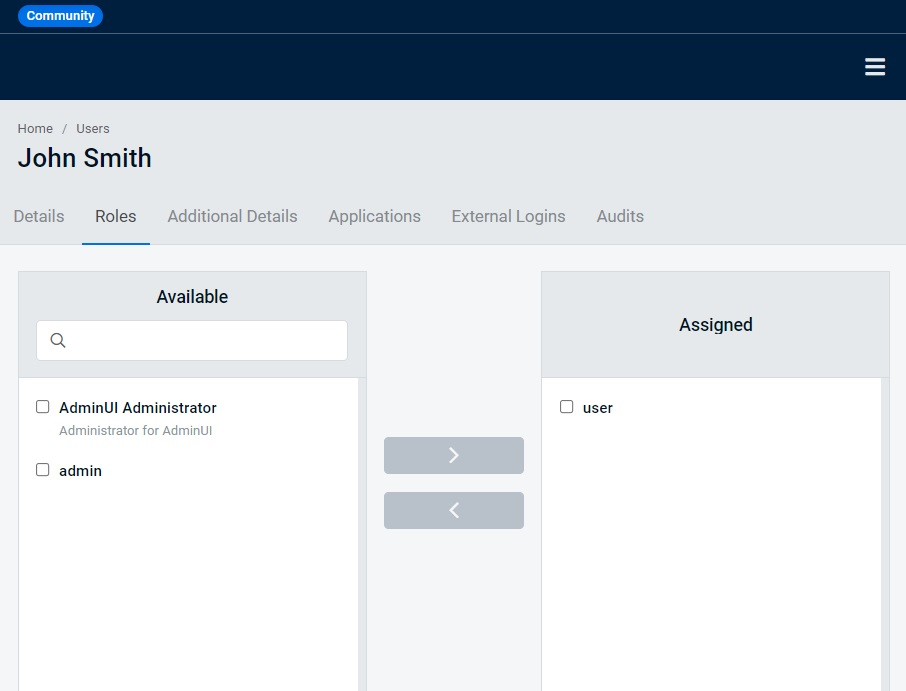
Next, we will navigate to the Users tab and create some users. Once a user has been created, we can navigate to the Roles sub-tab of the user details section, and we can add roles to the user by selecting them in the left box and clicking on the button with the arrow pointing right, as can be seen on the following screenshot:
And now we have finished setting up our SSO provider. Next, we will modify our SignalR server to make sure that only authenticated users can connect to it.
Applying authentication in SignalR
We will first enable authentication middleware on our SignalR server application. Then we will apply access restrictions to the SignalR hub, so only authenticated users would be allowed to access it. And then we will ensure that our clients are authenticated.
Setting up authentication on SignalR server
To apply authentication to our SignalR hub, we will first need to configure and enable authentication middleware. And before we do this, we need to ensure that JwtBearer and OpenIdConnect NuGet packages have been added to our SignalRServer project. To add them, you can either locate and install them via NuGet package manager of your IDE, or execute the following commands inside the project folder:
dotnet add package Microsoft.AspNetCore.Authentication.JwtBearer
dotnet add package Microsoft.AspNetCore.Authentication.OpenIdConnect
Then, we will open Program.cs file of the project and add the following namespace references:
using Microsoft.AspNetCore.Authentication.Cookies;
using Microsoft.AspNetCore.Authentication.JwtBearer;
using Microsoft.IdentityModel.Tokens;
using System.IdentityModel.Tokens.Jwt;
Then, we will add configure OpenID Connect and cookie authentication middleware by adding the following code anywhere before builder.Build method is called:
builder.Services.AddAuthentication(options =>
{
    options.DefaultScheme = CookieAuthenticationDefaults.AuthenticationScheme;
    options.DefaultChallengeScheme = "oidc";
})
.AddCookie(CookieAuthenticationDefaults.AuthenticationScheme)
.AddOpenIdConnect("oidc", options =>
{
    options.Authority = "https://localhost:5001";
    options.ClientId = "webAppClient";
    options.ClientSecret = "webAppClientSecret";
    options.ResponseType = "code";
    options.CallbackPath = "/signin-oidc";
    options.SaveTokens = true;
    options.RequireHttpsMetadata = false;
})
So, this is what we are doing here. We are first setting the default authentication scheme and the default challenge scheme. oidc stands for OpenID Connect, so we are just telling our middleware that this is the authentication mechanism that we are using. And we are using cookie authentication by default.
We can’t use cookie authentication unless we add a handler for it. And this is precisely what AddCookie method does. We just add the name of the authentication scheme to it that we have set as default.
Then we configure our OpenID Connect options. And this is where we configure our client. Normally, all of these options would come from a configuration file and would be different on different environments. But to make it easier to demonstrate the principles, we have hard-coded them.
Authority
This setting contains the base URL of our SSO provider. The middleware will construct the full URL when required.
ClientId
This setting contains our client id, which must match exactly with the client id we have configured in the admin section of our IdentityServer instance.
ClientSecret
This value must match the client secret we had configured in our SSO provider application. Normally, this value would come from an encrypted source, such as Azure Key Vault, and it would not be easily readable. But we have hardcoded it here just for the sake of demonstration.
ResponseType
There are multiple ways OpenID Connect can be configured to send the response. Response type code represents a time-sensitive code that gets given to the client application after a user has successfully authenticated.
CallbackPath
This is the path of that is used as a redirect address. The base URL would be the URL of our current application.
SaveTokens
When this option is enabled, the application will automatically store the authentication token in a cookie. It will also store refresh tokens.
RequireHttpsMetadata
This option is needed if the SSO provider is accessible via an unencrypted HTTP address. Since our SSO provider is accessible via HTTPS, we don’t need this setting. And, unless you are on a development environment, there is no chance that you would ever be dealing with an SSO provider that is not accessible via HTTPS. But we have placed this setting here just to show what it does.
So, we have configured OpenID Connect and we have added cookie authentication for our browser-based clients. But what about external apps that can’t easily access the authentication page? Well, in this case, we can add an additional handler that can process a JWT bearer token. And to do so, we will just need to append the following to our call:
.AddJwtBearer(options =>
{
    options.Authority = "https://localhost:5001";
    options.TokenValidationParameters = new TokenValidationParameters
    {
        ValidateAudience = false
    };
    options.RequireHttpsMetadata = false;
    options.Events = new JwtBearerEvents
    {
        OnMessageReceived = context =>
        {
            var path = context.HttpContext.Request.Path;
            if (path.StartsWithSegments("/learningHub"))
            {
                // Attempt to get a token from a query sting used by WebSocket
                var accessToken = context.Request.Query["access_token"];

                // If not present, extract the token from Authorization header
                if (string.IsNullOrWhiteSpace(accessToken))
                {
                    accessToken = context.Request.Headers["Authorization"]
                        .ToString()
                        .Replace("Bearer ", "");
                }

                context.Token = accessToken;
            }

            return Task.CompletedTask;
        }
    };
});
The settings inside this handler are similar to the ones we have used inside the AddOpenIdConnect call. We just aren’t supplying the client information used by the SSO provider, as this handler accepts the token that already has been generated. There is no redirection happening here.
We have applied TokenValidationParameters setting to make the token validation less strict. In our case, because our token would not contain audience claim that determines which specific endpoints the token would be allowed to authenticate against, we set ValidateAudience setting to false.
We also have OnMessageReceived event handler inside this block of code. This is the code that gets executed when the application receives a request. In most cases, the token that we will receive will be present inside Authorization header. The header would contain the token type (which, in this case, would be Bearer) and the actual base64-encoded token value. This is why we are removing Bearer from the header to extract the actual token.
However, some types of requests, for example, browser-initiated WebSocket and server-sent events connections can’t use Authorization header. Instead, the token would be sent in access_token query string parameter. The event handler doesn’t know how the client would send the token to it, so we just check both the header and the query string. Then, once the token has been extracted, we apply it to the context object.
Please note that, by default, JWT handler would apply token verbatim. All claims from the token would be transferred into the application without any changes. Cookie authentication handler alongside OpenID Connect handler, however, has its own in-built logic when it maps the claims. Some of them may be mapped to claims with names that are different from the ones we had in the original token. This behavior can be controlled by using JwtSecurityTokenHandler.DefaultMapInboundClaims. For example, we can insert the following line either inside any specific authentication handler or outside the handlers to prevent the token claims from being mapped to some inbuilt names:
JwtSecurityTokenHandler.DefaultMapInboundClaims = false;
Or we can use the following line to clear the mapped claims:
JwtSecurityTokenHandler.DefaultMapInboundClaims.Clear();
Once we’ve set up our authentication middleware, we need to enable it. In ASP.NET Core, authentication and authorization are linked. We will be using authorization attributes for the purpose of authentication. And this is why you would need to have both of the following next to each other in your middleware pipeline in Program.cs file:
app.UseAuthentication();
app.UseAuthorization();
Now, we will actually apply authentication restriction on our SignalR hub. Before we do so, we will need to add the following namespace references to LearningHub.cs file, unless you haven’t marked them as global elsewhere in the project code:
using Microsoft.AspNetCore.Authentication.Cookies;
using Microsoft.AspNetCore.Authentication.JwtBearer;
using Microsoft.AspNetCore.Authorization;
Then, we will add the following attribute just above the class definition:
[Authorize(AuthenticationSchemes = JwtBearerDefaults.AuthenticationScheme + "," +
CookieAuthenticationDefaults.AuthenticationScheme)]
This is it. Now only authenticated users can access our hub. And it’s exactly the same Authorize attribute that we use elsewhere in ASP.NET Core applications, such as REST API controllers and gRPC services.
Normally, Authorize attribute could be applied without any parameters. But because we use two authentication schemes in our application, we would need to define them both. Otherwise only the default authentication scheme would work.
We can also apply this attribute to individual methods of the hub rather than the whole hub. If we decide that most of the hub needs to be restricted, but it’s OK to allow a handful of its methods to be accessible by unauthenticated users, we can apply the following attribute to those methods:
[AllowAnonymous]
The authentication configuration on our SignalR server is almost finished. There is just a couple of final bits that we need to do before we can connect clients to it. We will need to print the access token into the application console once we log in, so we can copy and paste it into request headers to make it possible to authenticate from other client applications. And we need to implement some log out functionality. Both of these will be implemented inside HomeController.cs file. And before we start, we need to ensure that the file has the following namespace references:
using Microsoft.AspNetCore.Authentication;
using Microsoft.AspNetCore.Authentication.Cookies;
using Microsoft.AspNetCore.Authorization;
Then, we will add the following code at the beginning of the Index method, which will retrieve the token from our HTTP context and print it in the console:
var accessToken = await HttpContext.GetTokenAsync("access_token");
Console.WriteLine($"Access token: {accessToken}");
Finally, we will add the following method, which, when triggered, will clear the authentication cookies and will log us out:
public IActionResult LogOut()
{
    return new SignOutResult(new[] {CookieAuthenticationDefaults.AuthenticationScheme, "oidc" });
}
We just now need to ensure that this new endpoint is accessible from our web page. And to do so, we will open _Layout.cshtml file and insert the following markup inside ul element with the navbar-nav class attribute:
<li class="nav-item">
    <a class="nav-link text-dark" asp-area="" aspcontroller="Home" asp-action="LogOut">Log Out</a>
</li>
And this is it. Only authenticated users can now access the hub. We now just need to make sure that our clients can authenticate. And this is what we will do next.
Authenticating JavaScript client
Because we are using cookie authentication, we don’t need to add anything extra to our JavaScript client. The back-end configuration ensures that the page is redirected to the login page if the user is not yet authenticated. And then the authentication cookie is being passed automatically in the request.
However, if we were to use our JavaScript client in a different context, we could get it to use Bearer token for authentication instead of a cookie. To do so, we would just need to add the following option to withUrl call on HubConnectionBuilder:
accessTokenFactory: () => myToken
myToken represents a token that we obtain from SSO provider. Obtaining the token outside the browser is beyond the scope of this article, as it’s not a subject that is specific to SignalR. However, information on it is available in the official OpenID Connect documentation, which can be found in the further reading section of this article.
JavaScript client also has withCredentials option, which, if set to true, will apply direct credentials to the request that it can extract from a specific cookie. This is especially applicable for Azure App Service, which uses cookies for sticky sessions. This type of service will not work correctly without this option enabled.
And these are all the authentication parameters we can use in JavaScript client. Let’s now move on to .NET client.
Authenticating .NET client
In the Program.cs file of the DotnetClient project, we will add the following lines after we have been prompted:
Console.WriteLine("Please specify the access token");
var token = Console.ReadLine();
Then, we can replace WithUrl call on HubConnectionBuilder with the following:
.WithUrl(url, options => {
    options.AccessTokenProvider = () => Task.FromResult(token);
})
We have removed all unnecessary configuration and we can now apply JWT to the requests.
In this case, JWT that we provide is the one that we copy and paste manually. This way, the concept is easier to demonstrate. But in a real-life application, this action associated with AccessTokenProvider would be obtaining the token from the SSO provider.
But AccessTokenProvider option is not the only option we can use in our .NET SignalR client for authentication. We can use Cookies option to apply cookie authentication. However, it’s not a recommended way to authenticate from a stand-alone client, as the cookies are harder to work with than they are in the browser. We also have Credentials option that allows us to send the credentials to the application rather than the token. Finally, there’s UseDefaultCredentials option, which allows us to apply Microsoft Active Directory credentials of the logged-in user. This option is only applicable on Windows.
And now we will move on to Java client.
Authenticating Java client
Java client has far fewer configuration options than either the .NET or JavaScript client. The only option available for authentication is withAccessTokenProvider call, which can be added to HubConnectionBuilder.create call when SignalR connection object is created. The function placed inside withAccessTokenProvider call will return a string, which will be applied as the bearer token.
And this concludes the overview of applying authentication on all of our clients. We will now launch our applications and see how they work.
Retrieving access token from the SSO provider
If you haven’t got AuthProvider application running, launch it by executing dotnet run inside of its project folder. Then, launch SignalRServer application.
When you open the homepage of the SignalRServer application in the browser, you will be created with the login screen that looks like this:
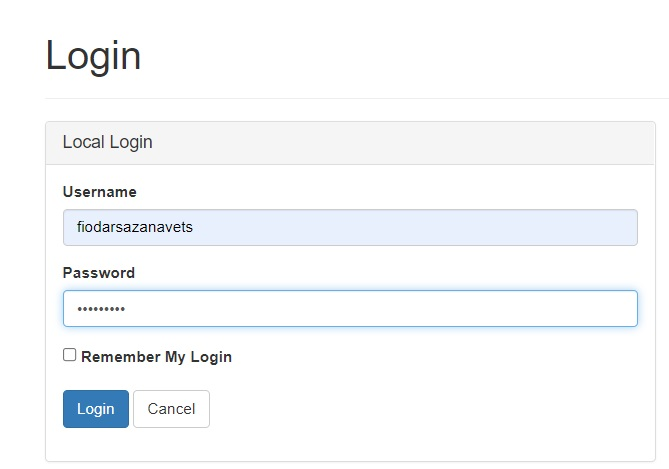
After a successful login by using one of the user credentials you’ve created earlier, you get redirected back to the homepage. And the authentication token will be printed in the application console:
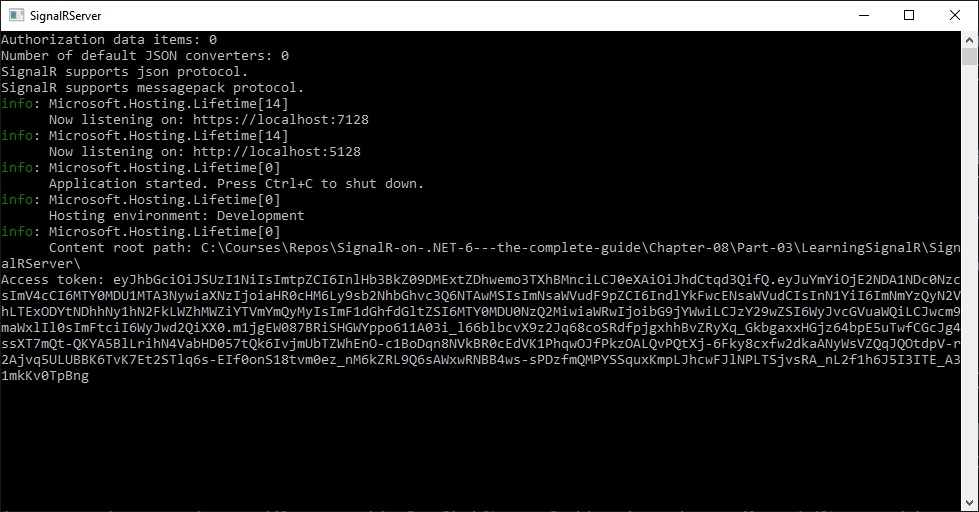
Let’s now have a closer look at the structure of the JWT.
JWT format structure
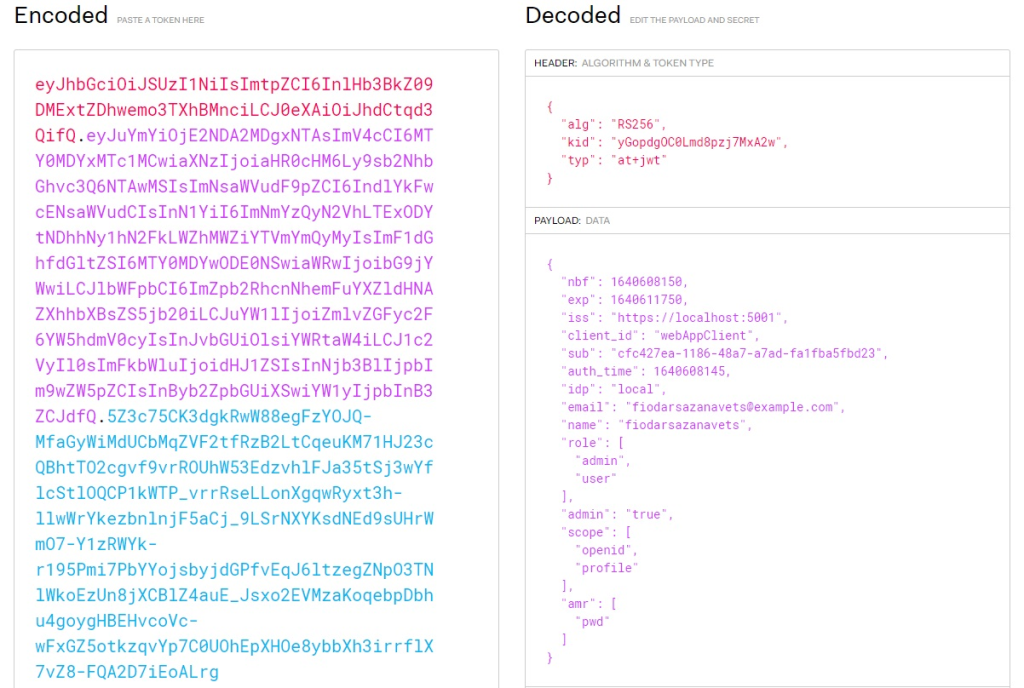
JWT consists of three parts, each of which is a base64-encoded string. Inside the token, the parts are separated by dots. And each of them can be read by decoding the string.
The first part is the header. It provides information on what type of token it is and what hashing algorithm it uses. Typically, it would look like this when decoded:
{
    "alg": "HS256",
    "typ": "JWT"
}
The second part is the payload. It is the actual object that contains the claims. This is an oversimplified example of the payload structure:
{
    "sub": "1234567890",
    "name": "John Smith",
    "iat": 1516239022
}
The third part is the signature, which only works when secret is used. Without the signature, anyone could forge a token. But because it uses the same secret that is registered in both SSO provider and the client application, it provides a reliable way of determining that the token came from a trusted source. The formula used to generate the signature is as follows:
HMAC_SHA256( secret, base64urlEncoding(header) + '.' + base64urlEncoding(payload))
And now we will have a look at the structure of our real token. We can do so by visiting https://jwt.io website and pasting the token from the console of SignalRServer application. The token will be automatically decoded in the browser and you will see the result similar to this:
We can also launch our DotnetClient application and paste the token there when prompted. This will authenticate our client.
One thing to note though. Tokens have expiry time and normally applications have logic that would refresh the token at specific intervals. We didn’t add such logic to our application, as the aim of this article is to only show enough of authentication concepts to make them applicable to SignalR. So, if our token expires, we can refresh it by logging out and logging back in.
And this concludes the overview of how to apply authentication to SignalR endpoints. Next, we will have a look at how to apply authorization.
Applying authorization in SignalR
Authentication on its own is good, but it’s rarely sufficient. You don’t only need to ensure that only known users can access your application, but that only those users that are permitted to use a specific resource can access it. And this is what the role of authorization is.
There are standard HTTP response codes that demonstrate the difference between authentication and authorization. 401 (Unauthorized) indicates that the user’s credentials haven’t been supplied or are invalid. 403 (Forbidden), one the other hand, is returned when the server is happy with the user’s credentials, but the user doesn’t have special privileges to access a specific resource.
There are several different types of authorization available in ASP.NET Core and all of them are applicable to SignalR. We just need to configure authorization handlers in our application. There are multiple ways of doing it and we will cover some of them.
Creating a custom requirement
One of the ways of applying authorization is to add a custom requirement class that inherits from AuthorizationHandler base class. We will create such a class. This will be done by creating RoleRequirement.cs file inside SignalRServer project folder. The content of the file will be as follows:
using Microsoft.AspNetCore.Authorization;
using Microsoft.AspNetCore.SignalR;
using System.Security.Claims;

namespace SignalRServer
{
    public class RoleRequirement : AuthorizationHandler<RoleRequirement, HubInvocationContext>,
    IAuthorizationRequirement
    {
        private readonly string requiredRole;

        public RoleRequirement(string requiredRole)
        {
            this.requiredRole = requiredRole;
        }

        protected override Task HandleRequirementAsync(AuthorizationHandlerContext context,
            RoleRequirement requirement,
            HubInvocationContext resource)
        {
            var roles = ((ClaimsIdentity)context.User.Identity).Claims
                .Where(c => c.Type == ClaimTypes.Role)
                .Select(c => c.Value);

            if (roles.Contains(requiredRole))
                context.Succeed(requirement);

            return Task.CompletedTask;
        }
    }
}
When this class is registered in authorization middleware, HandleRequirementAsync method will be called when we receive a request, from which we have already extracted authentication token. In this specific instance, we are simply checking whether a role that we specified exists inside the claims.
One of the types that we are using in this class is HubInvocationContext. We aren’t using it in our flow, but this is the class that tells us that we expect to run this requirement in the context of a request to a SignalR hub. But it’s not there merely as a marker. We can actually apply some logic on the resource parameter of this type.
When we call context.Succeed, we tell the middleware that the requirement has been met. Otherwise, the request wouldn’t be authorized.
Now, we will configure our application to actually use this requirement in its authorization middleware.
Configuring authorization middleware in ASP.NET Core application
We will first need to add the following namespace reference to the Program.cs file of SignalRServer project:
using SignalRServer;
Then, we will add the following code anywhere before builder.Build call:
builder.Services.AddAuthorization(options =>
{
    options.AddPolicy("BasicAuth", policy =>
    {
        policy.RequireAuthenticatedUser();
    });

    options.AddPolicy("AdminClaim", policy =>
    {
        policy.RequireClaim("admin");
    });

    options.AddPolicy("AdminOnly", policy =>
    {
        policy.Requirements.Add(new RoleRequirement("admin"));
    });
});
This code demonstrates different ways of how we can add the so-called authorization policies. The first policy we have added has been given the name of BasicAuth. This policy merely requires that only authenticated users can access the endpoint that it’s applied on. This makes its behavior pretty much the same as using Authorize attribute on its own without specifying any additional parameters.
The next policy, AdminClaim, requires that the token contains the claim called admin. It doesn’t matter what specific values that claim contains. The authorization will be successful if this claim is present at all. However, RequireClaim method can also accept an array of allowed values as the second parameter. If supplied, the authorization would be successful only if the claim contains one of these values. This specific claim, admin, is the custom claim that we previously have given to the users that have been assigned an admin role.
Finally, AdminOnly policy is the policy where we apply the custom requirement object that we have created earlier. We simply add our requirement to the list of requirements on the policy object. And the role that this requirement is applied to is admin.
The configuration of our authorization middleware is now complete and we have a variety of rules in it. We can now apply specific rules to our SignalR hub endpoints.
Applying authorization rules to individual endpoints
We will start by modifying the top-level attribute that we have above LearningHub class definition. We will add Policy parameter to it, so it will look like the following:
[Authorize(AuthenticationSchemes = JwtBearerDefaults.AuthenticationScheme + "," +
CookieAuthenticationDefaults.AuthenticationScheme, Policy = "BasicAuth")]
This code demonstrates how an authorization policy can be applied to an endpoint in ASP.NET Core, whether it’s in a SignalR hub, a controller, or a gRPC service. Behavior-wise, however, we haven’t made any change, because BasicAuth policy merely ensures that authenticated users can use the resource. But the Authrorize attribute did it already.
Next, we will add the following attribute above SendToGroup hub method:
[Authorize(Roles = "user")]
We are not applying any named policies here. We are telling the endpoint that it can be only accessed by those users that have user role assigned. The Roles parameter accepts a comma-separated list of roles. And it will only be accessible if one of those roles exists inside the role claim of the authentication token payload.
Finally, we will now have a look at another way of applying a named policy inside an Authorize attribute. We can place the following attribute above the AddUserToGroup method:
[Authorize("AdminOnly")]
Policy name is the default constructor parameter in Authorize attribute. So, if this is the only parameter that you need to pass, you don’t have to specify the parameter name explicitly.
You can now try all of these endpoints and see how they behave when you try to access them by using different user logins with different roles assigned. And this concludes the article on securing SignalR endpoints. Let’s now summarize what we’ve learned.
Summary
In this article, you have learned that CORS stands for Cross-Origin Resource Sharing. CORS configuration is used to allow or disallow clients hosted on specific domains to access your application via HTTP.
You have also learned that single sign-on (SSO) is a system where everything related to authentication and authorization is managed by a specialized application. Other applications connect to this authentication provider when a user login is required. During a successful login, an encoded JSON token is generated, which contains the information about the user.
You now know that authentication is the process that confirms that the users are who they say they are. In order to be authenticated, a user needs to supply a verifiable information that is, in theory, is only known to them and to the server. This may include a password that matches the username, the client certificate of the user, one-time access code, etc.
You also now know the difference between authentication and authorization. While the former exists to confirm that the user is who they say they are, the latter confirms whether or not the user is allowed to access any specific resources. For example, the user may be registered on the system, but might not be assigned to a specific role that the endpoint requires.
In the next article, we will have a look at how to scale SignalR applications while maintaining the ability to message specific clients.
Further reading
CORS configuration on ASP.NET Core: https://docs.microsoft.com/en-us/aspnet/core/security/cors
Security considerations in ASP.NET Core SignalR: https://docs.microsoft.com/en-us/aspnet/core/signalr/security
Overview of ASP.NET Core authentication: https://docs.microsoft.com/en-us/aspnet/core/security/authentication
Introduction to ASP.NET Core Identity: https://docs.microsoft.com/en-us/aspnet/core/security/authentication/identity
Authentication and authorization in ASP.NET Core SignalR: https://docs.microsoft.com/en-us/aspnet/core/signalr/authn-and-authz
Official OpenID Connect documentation: https://openid.net/connect/
OAuth 2.0 documentation: https://oauth.net/2/
IdentityServer 4 documentation: https://identityserver4.readthedocs.io/en/latest/
Using cookie authentication without ASP.NET Core Identity: https://docs.microsoft.com/en-us/aspnet/core/security/authentication/cookie
P.S. This article is a chapter from the book SignalR on .NET 6 — the complete guide.