
SignalR hub can broadcast a message to all connected clients. But this is far from being the only way you can use SignalR. The hub allows you to send messages to individual clients. You can also group clients together and send messages to specific groups of clients. And this is what we will talk about today.
But even if you broadcast messages to all clients, you don’t necessary have to include the client that the message has originated from. After all, the client already knows what the message is. So you can exclude it from the list of recipients.
So, this article covers the following topics:
- Broadcasting messages to all clients
- Sending messages to specific clients
- Working with client groups
By the end of this article, you will have learned how to be selective on which clients you want to send messages to from SignalR hub.
Prerequisites
To follow the examples from this article, you will need the following:
- A machine with either Windows, Mac OS or Linux operating system
- A suitable IDE or code editor (Visual Studio, JetBrains Rider or VS Code)
- .NET 6 SDK (or newer)
Also, since we are continuing to build on top of the application that we have developed in the previous article, we need the code that we have written previously. If you have skipped the previous chapter, you can access the complete code from the following location in the GitHub repository:
The complete code samples from this article are available from the following location in the GitHub repo, which has separate folders corresponding to individual parts of the article:
https://github.com/fiodarsazanavets/SignalR-on-.NET-6—the-complete-guide/tree/main/Chapter-05
So, let’s begin.
Broadcasting messages to all clients
In the previous article, we have already broadcasted SignalR messages to all connected clients. This was achieved by making the call on Clients.All property in the server-side hub. But this way of broadcasting a message has its limitations. What if you want to exclude the client that has sent the message from the list of its recipients?
In SignalR, this can be achieved by using Clients.Others instead of Clients.All. And this is what we will now implement.
Open LearningHub.cs file in your SignalRServer project and add the following method to the class:
public async Task SendToOthers(string message)
{
    await Clients.Others.ReceiveMessage(message);
}
So, as you can see, this method is identical to BroadcastMessage we had previously, except for one little detail. And now we need to get our clients to call it.
Applying changes to JavaScript client
We will modify our JavaScript client first. And we will start by adding new controls to the markup of the page. let’s open Index.cshtml file, which is located in Home folder inside the Views folder. We will locate div element with the value of class attribute set to col-md-4 and insert the following markup into the element:
<div class="control-group">
    <div>
        <label for="others-message">Message</label>
        <input type="text" id="others-message" name="others-message" />
    </div>
    <button id="btn-others-message">Send to Others</button>
</div>
We will now need to add JavaScript that the newly added button will trigger to make the relevant call. To do so, we will open site.js file, which is located inside js folder of wwwroot folder. We will add the following click event handler to the file:
$('#btn-others-message').click(function () {
    var message = $('#others-message').val();
    connection.invoke("SendToOthers", message).catch(err => console.error(err.toString()));
});
Our JavaScript client is now ready. What we need to do next is apply changes to our .NET client too. We will not be modifying all clients, as both BlazorClient and DotnetClient projects are based on same technologies and use the same libraries. So, we will choose DotnetClient project to modify, as it is more different from the JavaScript client that we have already updated.
Updating .NET Client
In DotnetClient project, open Program.cs file and replace the content of the try block with the following:
await hubConnection.StartAsync();

var running = true;

while (running)
{
    var message = string.Empty;

    Console.WriteLine("Please specify the action:");
    Console.WriteLine("0 - broadcast to all");
    Console.WriteLine("1 - send to others");
    Console.WriteLine("exit - Exit the program");

    var action = Console.ReadLine();

    Console.WriteLine("Please specify the message:");
    message = Console.ReadLine();

    switch (action)
    {
        case "0":
            await hubConnection.SendAsync("BroadcastMessage", message);
            break;
        case "1":
            await hubConnection.SendAsync("SendToOthers", message);
            break;
        case "exit":
            running = false;
            break;
        default:
            Console.WriteLine("Invalid action specified");
            break;
    }
}
So, we now have two actions – our original call to BroadcastMessage hub method and a call to SendToOthers method. You can select the appropriate action by typing either 0 or 1 in the console.
Now, both of our clients are ready. Let’s launch our application and see it in action.
Testing exclusive broadcasting functionality
To now see how sending messages to others works, we will need to launch both SignalR clients. One of the easiest ways of doing so is to execute dotnet run command from both SignalRServer and DotnetClient folder.
Once both of your applications are up and running, you will need to manually connect DotnetClient application to the SignalR hub of SignalRServer. To do so, when prompted by the console, type in the application address, which can be found under applicationUrl entry of launchSettings.json file of SignalRServer project. Then, append learningHub path to the URL. So, if your application URL is https://localhost:7128, the address the you need to specify is https://localhost:7128/learningHub.
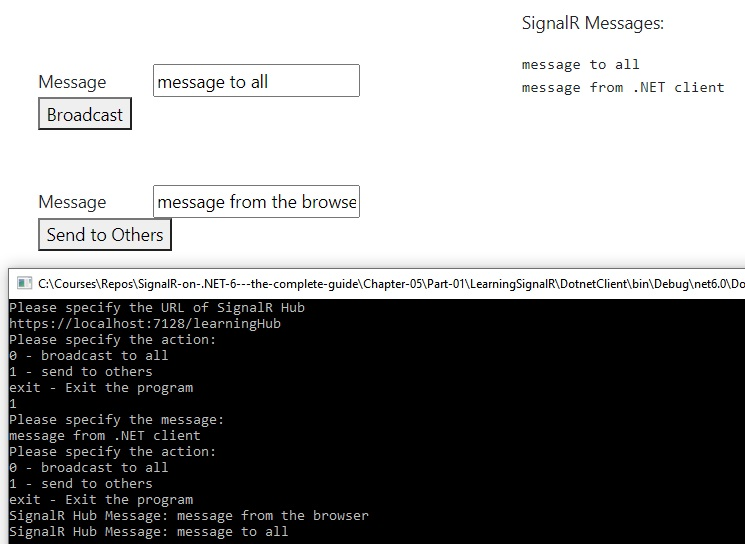
Now, once you open the home page of the web application in your browser and your console app is connected to the SignalR hub, you can test how different SignalR endpoints work. If you select an action that triggers SendToOthers method on the hub, your original client won’t receive the message, but your other client will. If, however, you trigger BroadcastMessage method, both of your clients will receive the message. This can be clearly seen on the following screenshot:
Next, you will learn how to send messages to individual clients and not just broadcast them to all.
Sending messages to specific clients
In the previous section, you have learned how to send SignalR messages to all connected clients except the sender. Now, we will do the opposite. We will send messages only back to the sender. There is an in-built property on the Clients property of the Hub base class that allows us to do this. It’s called Caller.
There are many different reasons why you would want to send message only to the client that has triggered a particular method. For example, any scenario where request-response messaging model is appropriate would utilize this functionality. Let’s now apply this ability, so we can see it in action.
Enabling self-messages
To utilize the Caller property, we will add the following method to the LearningHub class of SignalRServer project:
public async Task SendToCaller(string message)
{
    await Clients.Caller.ReceiveMessage(GetMessageToSend(message));
}
Then, we will add the following markup to the div element with col-md-4 class inside Index.cshtml file in Home folder inside the Views folder:
<div class="control-group">
    <div>
        <label for="self-message">Message</label>
        <input type="text" id="self-message" name="self-message" />
    </div>
    <button id="btn-self-message">Send to Self</button>
</div>
Then, we will add the following click event handler to the site.js file:
$('#btn-self-message').click(function () {
    var message = $('#self-message').val();
    connection.invoke("SendToCaller", message).catch(err => console.error(err.toString()));
});
And finally, we will replace the content of the `while` statement inside Program.cs file of DotnetClient with the following:
var message = string.Empty;

Console.WriteLine("Please specify the action:");
Console.WriteLine("0 - broadcast to all");
Console.WriteLine("1 - send to others");
Console.WriteLine("2 - send to self");
Console.WriteLine("exit - Exit the program");

var action = Console.ReadLine();

Console.WriteLine("Please specify the message:");
message = Console.ReadLine();

switch (action)
{
    case "0":
        await hubConnection.SendAsync("BroadcastMessage", message);
        break;
    case "1":
        await hubConnection.SendAsync("SendToOthers", message);
        break;
    case "2":
        await hubConnection.SendAsync("SendToCaller", message);
        break;
    case "exit":
        running = false;
        break;
    default:
        Console.WriteLine("Invalid action specified");
        break;
}
Now, if we launch the applications and try to utilize the SendToCaller method from either of the clients, we can see that it’s only the client itself that receives the message. The other client doesn’t receive anything, as can be seen in the following screenshot:

But sending message back to itself is not the only way to send messages to individual clients in SignalR hub. You can actually identify a specific client (or multiple clients) and send messages to those. And this is what we will have a look at next.
Sending messages to other clients
SignalR Hub has a property called Context. This property represents the context of the current connection and contains some metadata related to it. For example, if you are connecting as an authenticated user (which we will talk about in a future article), you will be able to get user information from this property.
One of the properties of `Context` is called ConnectionId. And this is the property that contains an auto-generated string that represents a unique identifier of the current client connection. If you know a unique identifier of any specific client connection, then you will be able to send messages to specific clients. And this is what we will do next.
Modifying SignalR hub
We will start by adding the following method to LearningHub class of SignalRServer project:
private string GetMessageToSend(string originalMessage)
{
    return $"User connection id: {Context.ConnectionId}. Message: {originalMessage}";
}
Context.ConnectionId will reveal the connection identifier of the current client, so other clients will be able to send messages to it. Then, we will utilize this method in all of our client calls by replacing all instances of ReceiveMessage(message) with the following:
ReceiveMessage(GetMessageToSend(message))
Then we will add the following method to the hub:
public async Task SendToIndividual(string connectionId, string message)
{
    await Clients.Client(connectionId).ReceiveMessage(GetMessageToSend(message));
}
In this method, we are selecting a specific client by passing a connection id to the Client method of the Clients property. But we could also select more than one client to send the message to. There is also a Clients method on the Clients property. And this method allows you to use either a single connection id string or a collection of them. For example, if we had multiple connection ids that we wanted to send a message to, we could store them in the connectionIds variable that represents a C# collection (for example, List<string>). With this, we could implement the following call:
await Clients.Clients(connectionIds).ReceiveMessage(GetMessageToSend(message));
Now, we will add necessary components to both of our clients.
Modifying the clients
In the markup of Index.cshtml class, we will insert the following markup next to the other control groups:
<div class="control-group">
    <div>
        <label for="individual-message">Message</label>
        <input type="text" id="individual-message" name="individual-message" />
    </div>
    <div>
        <label for="connection-for-message">User connection id:</label>
        <input type="text" id="connection-for-message" name="connection-for-message" />
    </div>
    <button id="btn-individual-message">Send to Specific User</button>
</div>
Then, we will insert the following click event handler to the site.js file:
$('#btn-individual-message').click(function () {
    var message = $('#individual-message').val();
    var connectionId = $('#connection-for-message').val();
    connection.invoke("SendToIndividual", connectionId, message).catch(err => console.error(err.toString()));
});
Finally, we will replace the content of the while statement inside the Program.cs file of DotnetClient with the following:
var message = string.Empty;

Console.WriteLine("Please specify the action:");
Console.WriteLine("0 - broadcast to all");
Console.WriteLine("1 - send to others");
Console.WriteLine("2 - send to self");
Console.WriteLine("3 - send to individual");
Console.WriteLine("exit - Exit the program");

var action = Console.ReadLine();

Console.WriteLine("Please specify the message:");
message = Console.ReadLine();

switch (action)
{
    case "0":
        await hubConnection.SendAsync("BroadcastMessage", message);
        break;
    case "1":
        await hubConnection.SendAsync("SendToOthers", message);
        break;
    case "2":
        await hubConnection.SendAsync("SendToCaller", message);
        break;
    case "3":
        Console.WriteLine("Please specify the connection id:");
        var connectionId = Console.ReadLine();
        await hubConnection.SendAsync("SendToIndividual", connectionId, message);
        break;
    case "exit":
        running = false;
        break;
    default:
        Console.WriteLine("Invalid action specified");
        break;
}
Now, let’s launch our applications to see how they work.
Seeing individual client messages in action
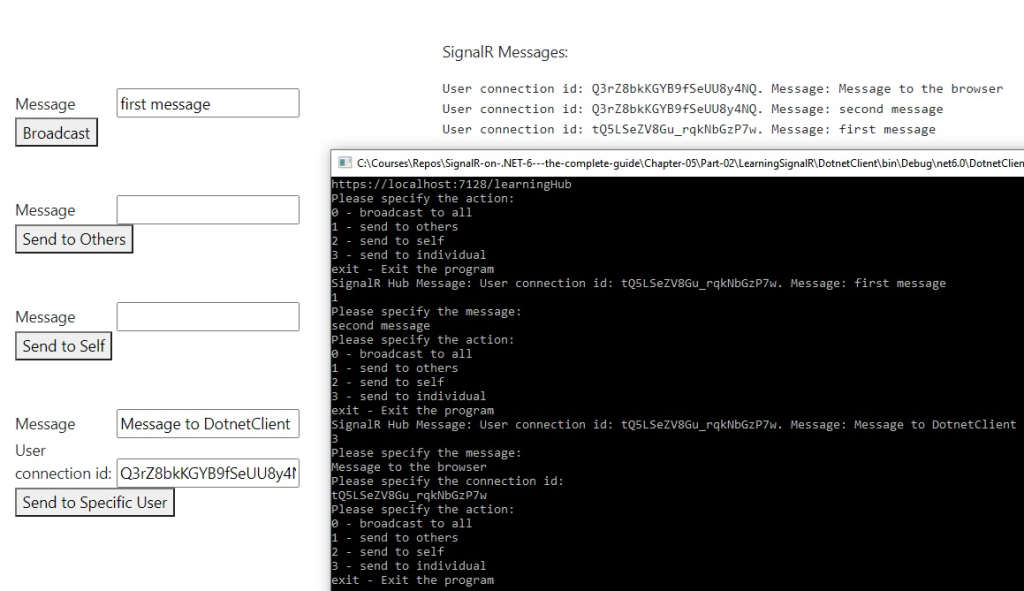
After we launch our applications and connecting the DotnetClient app to the SignalR hub, we can first sent initial message from either of the clients to obtain its connection id. Then, we can send a message from the other client to it by specifying this connection id. This is demonstrated by the following screenshot:
But by now, you have probably noticed a problem with this approach. Even though connection id reliably identifies an individual client, it’s not very convenient to use from the user’s perspective. Plus, if the client disconnects and then reconnects, the connection id would have changed, so you will no longer be able to send messages to the client until you know the updated connection id value.
But there is a solution for that. You can map a connection id with some nice human-readable name. You can use your own dictionary in the back-end of the server, which would be the best solution under certain circumstances. But in many cases, you can just use inbuilt mechanism for this, which is SignalR client groups.
Working with client groups
SignalR Hub has the Groups property, which allows you to add clients to a group and remove clients from it. Each group is a one-to-many relationship between an arbitrary group name and a collection of connection ids. Clients property of the Hub base class has the Group method, which allows you to specify a group name and send a message to all clients in the group.
Groups are useful in many scenarios. You can use them to assign all clients of a specific category to a group. Or you can just associate a group with a specific user. Then, you won’t lose the track of the connected client that represents the user. The user name you will specify will always map to the right connection id, as long as the client is connected. Plus, an individual user may have multiple clients connected simultaneously. For example, you may be using the same social network platform in multiple tabs of your browser, while simultaneously having it open in a mobile app.
So, let’s modify our hub to see how groups can be used.
Using SignalR groups inside the hub
We will start by adding the following methods to the LearningHub class of SignalRServer project:
public async Task SendToGroup(string groupName, string message)
{
    await Clients.Group(groupName).ReceiveMessage(GetMessageToSend(message));
}

public async Task AddUserToGroup(string groupName)
{
    await Groups.AddToGroupAsync(Context.ConnectionId, groupName);
    await Clients.Caller.ReceiveMessage($"Current user added to {groupName} group");
    await Clients.Others.ReceiveMessage($"User {Context.ConnectionId} added to {groupName} group");
}

public async Task RemoveUserFromGroup(string groupName)
{
    await Groups.RemoveFromGroupAsync(Context.ConnectionId, groupName);
    await Clients.Caller.ReceiveMessage($"Current user removed from {groupName} group");
    await Clients.Others.ReceiveMessage($"User {Context.ConnectionId} removed from {groupName} group");
}
In the code above, when we are adding a current client to a specific named group (or removing it from a specific group), we are sending messages about this action to all clients. But the message sent to the calling client will be different from what is sent to other clients.
Now, we will modify our OnConnectedAsync and OnDisconnectedAsync event handlers. We will add every one of our clients to the HubUsers group when it connects and remove it from this group when it disconnects. This is purely to demonstrate how clients can be assigned to groups automatically.
Our hub is now ready. Let’s now modify our clients to be able to use groups.
Enabling SignalR clients to use groups
First, we will add the following control groups to the appropriate section of Index.cshtml class:
<div class="control-group">
    <div>
        <label for="group-message">Message</label>
        <input type="text" id="group-message" name="group-message" />
    </div>
    <div>
        <label for="group-for-message">Group Name</label>
        <input type="text" id="group-for-message" name="group-for-message" />
    </div>
    <button id="btn-group-message">Send to Group</button>
</div>
<div class="control-group">
    <div>
        <label for="group-to-add">Group Name</label>
        <input type="text" id="group-to-add" name="group-to-add" />
    </div>
    <button id="btn-group-add">Add User to Group</button>
</div>
<div class="control-group">
    <div>
        <label for="group-to-remove">Group Name</label>
        <input type="text" id="group-to-remove" name="group-to-remove" />
    </div>
    <button id="btn-group-remove">Remove User from Group</button>
</div>
Then, we will add the following click handlers to site.js file:
$('#btn-group-message').click(function () {
    var message = $('#group-message').val();
    var group = $('#group-for-message').val();
    connection.invoke("SendToGroup", group, message).catch(err => console.error(err.toString()));
});

$('#btn-group-add').click(function () {
    var group = $('#group-to-add').val();
    connection.invoke("AddUserToGroup", group).catch(err => console.error(err.toString()));
});

$('#btn-group-remove').click(function () {
    var group = $('#group-to-remove').val();
    connection.invoke("RemoveUserFromGroup", group).catch(err => console.error(err.toString()));
});
Finally, we will update our Program.cs file of the DotnetClient project. We will replace the content of the while statement with the following:
var message = string.Empty;
var groupName = string.Empty;

Console.WriteLine("Please specify the action:");
Console.WriteLine("0 - broadcast to all");
Console.WriteLine("1 - send to others");
Console.WriteLine("2 - send to self");
Console.WriteLine("3 - send to individual");
Console.WriteLine("4 - send to a group");
Console.WriteLine("5 - add user to a group");
Console.WriteLine("6 - remove user from a group");
Console.WriteLine("exit - Exit the program");

var action = Console.ReadLine();

if (action != "5" && action != "6")
{
    Console.WriteLine("Please specify the message:");
    message = Console.ReadLine();
}

if (action == "4" || action == "5" || action == "6")
{
    Console.WriteLine("Please specify the group name:");
    groupName = Console.ReadLine();
}

switch (action)
{
    case "0":
        await hubConnection.SendAsync("BroadcastMessage", message);
        break;
    case "1":
        await hubConnection.SendAsync("SendToOthers", message);
        break;
    case "2":
        await hubConnection.SendAsync("SendToCaller", message);
        break;
    case "3":
        Console.WriteLine("Please specify the connection id:");
        var connectionId = Console.ReadLine();
        await hubConnection.SendAsync("SendToIndividual", connectionId, message);
        break;
    case "4":
        hubConnection.SendAsync("SendToGroup", groupName, message).Wait();
        break;
    case "5":
        hubConnection.SendAsync("AddUserToGroup", groupName).Wait();
        break;
    case "6":
        hubConnection.SendAsync("RemoveUserFromGroup", groupName).Wait();
        break;
    case "exit":
        running = false;
        break;
    default:
        Console.WriteLine("Invalid action specified");
        break;
}
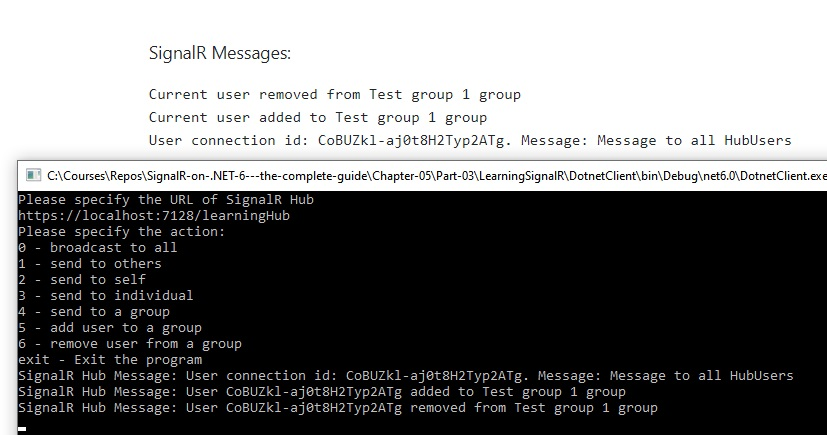
And this is it. Our code is ready. Now, if we launch both SignalRServer and DotnetClient applications, then you will be able to play with the groups. As this screenshot demonstrates, we can add clients to groups, remove them from groups and send messages to specific groups:
And this concludes the article about sending SignalR messages to specific clients. Let’s now summarize what we have learned.
Summary
In this article, you have learned that, when you choose to broadcast a message to all clients, there is a convenient setting in the SignalR hub that allows you to exclude the sender of the message from the list of recipients.
You have also learned that there are multiple ways of sending messages from the SignalR hub to individual users. You can send a message back to the sender. Or you can send messages to a specific client by specifying its connection id. Or you can specify multiple connection ids and send the message to more than one client simultaneously.
But the easiest way to send messages to multiple clients at a time is to explicitly add clients to groups. Unlike connection ids, group names can be easily readable. And you can easily add clients to or remove clients from groups at will.
So far, we have only covered how to send individual messages in every call. In the next article, you will learn how to use streaming in SignalR, which is the way to send multiple messages through an open channel.
Further reading
Manage users and groups in SignalR: https://docs.microsoft.com/en-us/aspnet/core/signalr/groups
Coordinating IoT cluster with SignalR: https://scientificprogrammer.net/2020/10/30/coordinating-iot-cluster-with-signalr
P.S. This article is a chapter from the book SignalR on .NET 6 – the complete guide.