SignalR Hub is only useful if you have clients connected to it. And in this article, you will learn how to connect in-browser clients.
We will start with in-browser clients because they are slightly easier to set up than external clients. For example, you won’t have to create external applications and you will need to apply slightly less configuration to make them work. For example, since your client will already reside in the same web application that hosts your SignalR hub, you won’t have to explicitly specify the base URL.
These types of SignalR clients are useful when you need to build a web application with real-time update capabilities. It could be a chat application, where you instantly see the messages sent to you. It could be auto-updating news feed. Or it could be some dashboard with real-time metrics.
But front-end technologies are no longer limited to HTML, JavaScript and CSS. These days, you can also run compiled code in browsers, which became possible with the invention of WebAssembly. And .NET happens to have its own tool to write code that gets compiled to WebAssembly. This tool is known as Blazor. And, in this article, as well as building a standard JavaScript client, we will build a Blazor client too.
The article covers the following topics:
- Setting up JavaScript client
- Setting up Blazor WebAssembly client
By the end of this article, you will have learned how to call your SignalR hub from the code running in browser. You will have learned different ways of adding SignalR client dependencies to different technology types and then you will have learned how to get your client to establish a persistent connection with your server-side hub.
Prerequisites
This article assumes that you already have set up your development environment. You will need the following:
- A machine with either Windows, Mac OS or Linux operating system
- A suitable IDE or code editor (Visual Studio, JetBrains Rider or VS Code)
- .NET 6 SDK (or newer)
You will also need to clone the solution via the link below. This solution contains a basic ASP.NET Core application with SignalR dependencies set up:
The complete code samples from this article are available from the following location in the GitHub repo, which has separate folders corresponding to individual parts of the article:
https://github.com/fiodarsazanavets/SignalR-on-.NET-6—the-complete-guide/tree/main/Chapter-03
Setting up JavaScript client
The first (and the simplest) SignalR client we will set up is JavaScript client. And even though you can use SignalR client JavaScript library from a stand-alone application, we will use it from our application’s own pages. The client will run in the browser.
But if you later want to set up JavaScript SignalR client in a different type of application (including a stand-alone JavaScript app), the setup process will be very similar. And so will be the code. It is the same client library after all.
So, let’s now go ahead and set up our client.
Adding SignalR client dependencies
There are two ways you can add SignalR library dependencies to the front-end. You can either instantiate it via NPM and copy JavaScript file into your application’s file system, which you will then reference from your front-end HTML, or you can just obtain that file from a publicly accessible URL of a content delivery network (CDN) as a direct reference in your HTML. The former method is more involved, but once completed, this file will be a part of your application forever. The latter method is much easier, but because you are dealing with third-party URL that you have no control over, there is a very slight risk that the file might become unavailable.
But because such a risk is very low, we will have a look at using CDN reference first. Then, if you are still interested in getting your hands dirty and obtaining the library via NPM, this information will be provided too.
Adding SignalR library via CDN
CND is nothing more than a fancy name for a URL that contains the file with the content you are looking for. There are various websites where developers can publish JavaScript library as a file with js extension. And that file will be accessible from the server via a direct link.
And in our case, the best place to put the the reference to a file is via the _Layout.cshtml file, which is located in Shared folder inside Views folder. Just open that file and find the following line:
<script src="~/lib/jquery/dist/jquery.min.js"></script>
All you have to do is place the following line above it:
<script src="https://cdnjs.cloudflare.com/ajax/libs/microsoft-signalr/6.0.1/signalr.min.js"></script>
That’s it. You have now added a reference to the JavaScript SignalR library. The only caveat that you need to remember is that this reference needs to be placed before the script element that has a reference to js/site.js. site.js is the file where we will be using the library. But we can’t use it unless the SignalR client library loaded first. And because script elements load their respective resources in the order that they are placed in, we need to load the dependency before we load the code that uses the dependency.
Adding SignalR library via NPM
As I said earlier, this process is a bit more involved. First of all, you need to make sure that you have NPM installed on your machine. You can obtain it from its official website.
NPM stands for Node Package Manager. And originally it was developed as a system of adding external libraries to Node.js applications, which allow you to run JavaScript directly on the host machine rather than just in a browser. This is why Node.js is primarily used to build applications where JavaScript represents both server-side and client-side code.
But since its inception, NPM became much more than just a library management system for Node.js. It appears to be a convenient way of obtaining external dependencies for client-side applications too. And this is why it became popular with front-end developers who don’t even use Node.js. And this is what we will do too.
Once you have NPM installed and configured, you can open command line terminal inside SignalRServer project folder and execute the following command:
npm init -y
This will instantiate Node.js project inside the folder and create package.json and package.lock.json files. These files are Node.js equivalent of .NET project files with .csproj extension. And we will need them to download JavaScript libraries from NMP. To do so, execute the following command:
npm install @microsoft/signalr
This will create a folder called node_modules. This folder will contain raw code of all the libraries that the original SignalR libraries was using. But we won’t need to worry about any of that. We will simply need to open node_modules folder and then navigate to @microsoft/signalr/dist/browser folder. If you are using Windows, then you would need to use back slashes (\) rather than forward slashes (/) in the folder path. Or just navigate through the folders via the GUI file manager.
What you will need to do then is copy either signalr.js or signalr.min.js from this folder into lib folder that is located under wwwroot folder of your project. It doesn’t matter which file you copy. They work exactly the same. The only difference between them is that signalr.js contains full human-readable code, while signalr.min.js is miniated version of it, where all unnecessary components (new lines, white spaces, etc.) have been removed and all local variable names were made as short as possible. Miniation is a standard practice with front-end resources, such as JavaScript and CSS files. As these resources are downloaded from the network, miniation is done to make the file size as small as possible. But functionally, those files will be identical to the original.
To follow a standard convention, you may also create signalr folder inside the lib folder and move the JavaScript file there. But this doesn’t matter from the functionality perspective.
Now, we can insert the following line into _Layout.cshtml file to reference the SignalR library:
<script src="~/lib/signalr/signalr.js"></script>
Make sure this reference is placed before the script element that contains the reference to site.js. If you have copied signalr.min.js instead of signalr.js or if your file path looks different, then modify the content of the src attribute accordingly.
Our SignalR client library reference has been added. We can now delete node_modules folder along with package.json and package.lock.json files, as we will no longer need them. And we can start adding the actual client functionality.
Adding SignalR client logic
Our SignalR client will operate from a web page, so we will need to create a web page with controls that will allow us to trigger messages from the client. This will be the main page of our application, so we will apply all of our changes to Index.cshtml file, which is located under Home folder of the Views folder. We will simply replace the content of the file with the following:
@{
    ViewData["Title"] = "Home Page";
}

<div class="row" style="padding-top: 50px;">
    <div class="col-md-4">
        <div class="control-group">
            <div>
                <label for="broadcast">Message</label>
                <input type="text" id="broadcast" name="broadcast" />
            </div>
            <button id="btn-broadcast">Broadcast</button>
        </div>
    </div>

    <div class="col-md-7">
        <p>SignalR Messages:</p>
        <pre id="signalr-message-panel"></pre>
    </div>
</div>
We will need to apply some styling to the page to make it usable. To do so, open site.css file, which is located in css folder of wwwroot, and add the following content to it without modifying any existing content:
.body-content {
    padding-left: 15px;
    padding-right: 15px;
}

.control-group {
    padding-top: 50px;
}

label {
    width: 100px;
}

#signalr-message-panel {
    height: calc(100vh - 200px);
}
Finally, we will need to add JavaScript code that will get triggered when the buttons on the page are pressed. We will simply insert the following content into site.js file, which is located inside js folder of wwwroot.
const connection = new signalR.HubConnectionBuilder()
    .withUrl("/learningHub")
    .configureLogging(signalR.LogLevel.Information)
    .build();

connection.on("ReceiveMessage", (message) => {
    $('#signalr-message-panel').prepend($('<div />').text(message));
});

$('#btn-broadcast').click(function () {
    var message = $('#broadcast').val();
    connection.invoke("BroadcastMessage", message).catch(err => console.error(err.toString()));
});

async function start() {
    try {
        await connection.start();
        console.log('connected');
    } catch (err) {
        console.log(err);
        setTimeout(() => start(), 5000);
    }
};

connection.onclose(async () => {
    await start();
});

start();
Let’s now go through this code step-by-step to see what it’s doing.
Overview of JavaScript SignalR client implementation
In the above code, the first thing that we are doing is building an object that represents a SignalR connection. We are doing it via HubConnectionBuilder method of signalR object from the SignalR JavaScript library. We then specify the URL of the SignalR hub via withUrl method. The parameter could be either a relative path or a full URL. We are using relative path, because we are calling the hub from the same application that hosts it. However, if you needed to establish a SignalR connection from an external app, then you would need to use the full URL. We set the default logging level on the connection object, which is optional. And then we build the object.
After this, we are adding an event listener to the connection object. The name of the event is ReceiveMessage, as we have previously defined in the hub. When the server-side code triggers this event, the message that came from it is prepended inside a panel on the screen, which is represented by a HTML element with the id attribute of signalr-message-panel.
We then associate a click event with the HTML button that has the id attribute of btn-broadcast. The message is read from an input box with the id attribute of broadcast. And then, by calling invoke method on the connection object, we trigger BroadcastMessage method in the server-side SignalR hub while passing the message as a parameter. We have also added optional error handler to this invocation.
Then we define start function, which will trigger the SignalR connection to start. There is some logic in it which will attempt to start the connection with retries if, for whatever reason, it couldn’t have been started. Because we expect our SignalR connection to be live for as long as the page is open in the browser, we also associate this function with onclose event on the connection object. Basically, if the connection breaks at any point, it will automatically restart. Then, once we have all of our event handlers defined, we just call the start function to ensure that the connection is started automatically when the page has loaded.
We have now completed the setup of our JavaScript SignalR client. Now, we can launch our application and see it in action.
Launching JavaScript client
We need to build and run our application and then open its main page in the browser. There are multiple ways of doing it, depending on which IDE you are using. But one of the common and the simplest ways of doing it is to simply execute dotnet run command from inside SignalRServer project folder.
Once the console output indicates that the application is running, you can open it in the browser. The address that you will need to navigate to will be listed in launchSettings.json file inside the Properties folder of your project. Any URL listed under applicationUrl entry will be suitable.
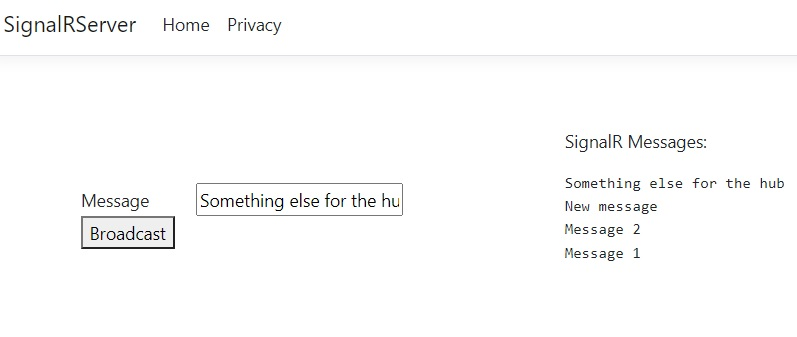
On the home page of the application, you should see a text box and a button. When you enter some text and press the button, you should see the same message appearing under SignalR Messages title. And you can do it as many times as you want. And this demonstrates how SignalR hub on the server can trigger an appropriate event in your client code, as demonstrated by the screenshot below:
And this concludes our overview of a JavaScript SignalR client. It’s very basic at this point, but we will add some more advanced functionality to it in the subsequent articles. But for now, we will set up another browser-based SignalR client based on Blazor WebAssembly.
Setting up Blazor WebAssembly client
Blazor WebAssembly is a .NET implementation of WebAssembly technology. This technology allows you to run compiled code in browser without having any special plugins installed. It’s a common standard that all browser manufacturers support in their products.
A detailed description of Blazor is beyond the scope of this series of articles. But we will go into enough details of it to set up a SignalR client inside it. Also, an important thing to remember is that there are two distinct types of Blazor – WebAssembly and Blazor Server. The former type allows you to compile your code into WebAssembly and run it in browser, which is what we need. The latter type, despite having the same syntax, is set up differently. There’s no compiled code on your web page. Instead, JavaScript is generated from your code when you build your application. And then that JavaScript interacts with the code on your server. The only useful thing to know about Blazor Server in our context is that it actually uses SignalR for this communication.
So, let’s now go ahead and create a Blazor WebAssembly application. We will do so by executing the following command inside the LearningSignalR solution folder:
dotnet new blazorwasm -o BlazorClient
We will then need to add it to our solution by executing the following command:
dotnet sln add BlazorClient\BlazorClient.csproj
Alternatively, you can just create the application from Blazor WebAssembly template via the GUI of your IDE. But just make sure that you don’t select hosted model. Even though we will be hosting our WebAssembly application inside our main web application, the default hosted application template is not what we need. This template will generate the host application for you. But we already have one.
Now, once our application has been created, we will need to apply SignalR client references to it and add our client code.
Setting up SignalR client components
To enable SignalR client components in the Blazor application, we will first need to add a NuGet package that contains them. These components reside in Microsoft.AspNetCore.SignalR.Client NuGet package. And we can add it to our project by executing the following command from inside the BlazorClient project folder:
dotnet add package Microsoft.AspNetCore.SignalR.Client
And now we can start adding our client. The client logic will reside inside Client.razor file that we will create inside the Pages folder. The content of the file will be as follows:
@page "/client"
@using Microsoft.AspNetCore.SignalR.Client
@inject NavigationManager NavigationManager
@implements IAsyncDisposable

<h1>Blazor WebAssembly Client</h1>

<div class="row" style="padding-top: 50px;">
    <div class="col-md-4">
        <div class="control-group">
            <div>
                <label for="broadcastMsg">Message</label>
                <input @bind="message" type="text" id="broadcastMsg" name="broadcastMsg" />
            </div>
            <button @onclick="BroadcastMessage" disabled="@(!IsConnected)" >Broadcast</button>
        </div>
    </div>

    <div class="col-md-7">
        <p>SignalR Messages:</p>
        <pre>
            @foreach (var message in messages)
            {
                @message<br/>
            }
        </pre>
    </div>
</div>
If you look at it carefully then you will see that it has almost identical markup to the page that uses JavaScript client. The only differences are related to syntax differences between the technologies. It’s not pure HTML anymore. It’s a combination between C#, HTML and bespoke Razor syntax, which allows you to write HTML helpers in an easy way.
At the beginning, we define the default path to the page containing this component by utilizing @page directive. In our case, the path is /client. Then we add references to any external namespaces via @using directive. The only one we care about is Microsoft.AspNetCore.SignalR.Client. Then we inject a dependency of NavigationManager by using @inject directive. We will need this object later to construct the URL to the SignalR hub endpoint. Finally, we use @implements directive to say that this component implements IAsyncDisposable interface.
Then, inside the HTML markup, we have some key words that begin with @ character. All of those are related to C# code that we will insert shortly. @bind directive binds the content of an input element to a C# variable called message. Whenever you change the text, the content of the variable will change too. @onclick directive on the button element triggers a C# method called BroadcastMessage. And then there is some logic inside a pre element with the id attribute of signalr-message-panel that populates the element with the content of messages collection.
It will all make more sense when we add the actual C# code. So let’s do it now. Just place this section at the bottom of the file:
@code {
    private HubConnection hubConnection;
    private List<string> messages = new List<string>();
    private string? message;

    protected override async Task OnInitializedAsync()
    {
        hubConnection = new HubConnectionBuilder()
            .WithUrl(NavigationManager.ToAbsoluteUri("/learningHub"))
            .Build();

        hubConnection.On<string>("ReceiveMessage", (message) =>
        {
            messages.Add(message);
            StateHasChanged();
        });

        await hubConnection.StartAsync();
    }

    private async Task BroadcastMessage() =>
       await hubConnection.SendAsync("BroadcastMessage", message);

    public bool IsConnected =>
        hubConnection?.State == HubConnectionState.Connected;

    public async ValueTask DisposeAsync()
    {
        await hubConnection.DisposeAsync();
    }
}
Now, this is pure C#. But the principles are very similar to what we had in our JavaScript client. We are building hubConnection object from HubConnectionBuilder class. Then we register ReceiveMessage event that the server-side hub can trigger. In this event, we add the messages to the collection and call a Blazor-specific StateHasChanged method, which will trigger re-execution of the code defined in the markup. This will make sure that the panel with SignalR messages always gets populated with all messages we have ever received from the server, including the latest message. Then we start our hub.
BroadcastMessage is the method that get triggered when we press the button on the page. It will do so by calling SendAsync method on hubConnection object. This method accepts the name of the method on the SignalR hub, followed by a complete list of input parameters.
We have a read-only property of IsConnected, which ensures that appropriate controls on the page are only shown when the hub is actually connected. With C# SignalR client, the connection management will happen automatically and you won’t have to add any additional logic to deal with occasional disconnections. Then, to make sure that the hubConnection object stops the connection and releases all unmanaged resources when we no longer need them, we dispose of it whenever we dispose of the Blazor object itself. This, for example, will happen when we close the page.
We now have SignalR client logic in our Blazor application. What we need to do now is set it up so it can be hosted in our main web application.
Hosting Blazor application inside an existing ASP.NET Core application
Our current Blazor application is set up as stand-alone self-hosted app, so we need to make some changes to be able to host it in another application. And the first change that we will do is open Program.cs file inside BlazorClient project and remove the following line:
builder.RootComponents.Add<App>("#app");
Next, we will need to add a BlazorClient project reference to the SignalRServer project. You can either do it via the GUI of your IDE, or manually add the following snippet to SignalRServer.csproj file:
<ItemGroup>
  <ProjectReference Include="..\BlazorClient\BlazorClient.csproj" />
</ItemGroup>
Next, we will need to install a NuGet package that will allow our SignalRServer application to act as a server that can host a Blazor WebAssembly application. The NuGet package is called Microsoft.AspNetCore.Components.WebAssembly.Server and you can install it by executing the following command inside SignalRServer project folder:
dotnet add package Microsoft.AspNetCore.Components.WebAssembly.Server
Next, we add a page that will display the Blazor component. We will open HomeController.cs file that’s located inside Controllers folder and add the following method to it:
public IActionResult WebAssemblyClient()
{
    return View();
}
We will now need to add the corresponding view. To do so, add WebAssemblyClient.cshtml to the Home folder inside the Views folder. The content of this file will be as follows:
@{
    ViewData["Title"] = "Home Page";
}

@using BlazorClient.Pages;

<component type="typeof(Client)" render-mode="WebAssemblyPrerendered" />

<script src="_framework/blazor.webassembly.js"></script>
What we have done here is loaded the Client component from the BlazorClient assembly and loaded appropriate JavaScript file that will allow our WebAssembly component to work and interact with the controls on our page. blazor.webassembly.js file comes from the framework. We have already added the necessary framework components by installing Microsoft.AspNetCore.Components.WebAssembly.Server NuGet package. WebAssemblyPrerendered render mode is telling the platform to render the code as WebAssembly. If it cannot render it (for example, if you run it on an old or severely restricted browser), it will generate some JavaScript in the browser, but will host the actual component in on the server. It will, effectively, become equivalent to Blazor Server.
Next, we need to add a navigation link to the view we have just created. We will do so via _Layout.cshtml file, which resides inside Shared folder in the Views folder. We will locate the element that represents the navigation bar. This is ul element with navbar-nav class. Inside this element, we will add the following item:
<li class="nav-item">
  <a class="nav-link text-dark" asp-area="" asp-controller="Home" asp-action="WebAssemblyClient">WebAssembly</a>
</li>
Finally, we just need to make sure that our application middleware gets access to appropriate files. To do so, need to open Program.cs file and add the following line before app.Run() call:
app.UseBlazorFrameworkFiles();
This completes our setup of Blazor SignalR client. Next, we will launch it and see it in action.
Launching Blazor client
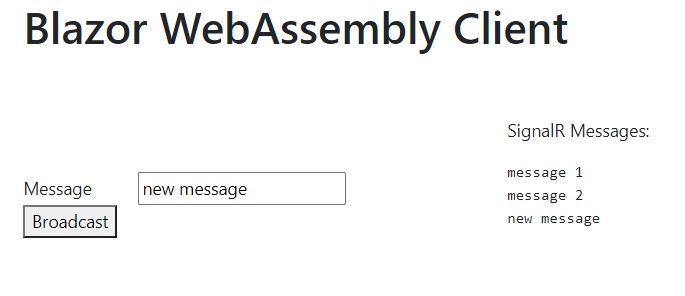
If you launch your application and navigate to the WebAssembly page, you will see that it’s almost identical to the home page of the application. When you type a message and click on the button to send it, the server will return it back to the page, like it’s demonstrated by the following screenshot:
But an interesting thing happens if you open the home page of the application in a separate tab. If you do so, any message you send from either of the clients will appear on both clients, as can be seen from the following screenshot:
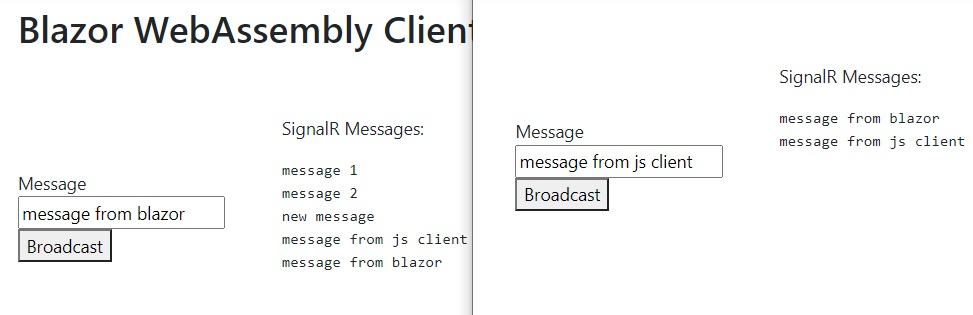
This is because we are broadcasting the message to all clients. Any client that is connected to the hub and has an event handler with the same name as the server expects (which is ReceiveMessage in our case) will receive the message.
And this concludes the article about setting up in-browser SignalR clients. Let’s summarize what we’ve learned.
Summary
Different JavaScript clients work in a similar way. You would first build an object that represents a SignalR connection. Then, you will add event listeners to the object for the calls from the server. Then you will add functions or event handlers that will allow you to invoke server-side methods from the client. Then you will start the actual connection.
To set up a JavaScript SignalR client, you need to reference an appropriate JavaScript file on your page. You can either add CDN link to a published version of this file, or you can set this file up via NPM.
Blazor WebAssembly client is a type of .NET client. It relies on the same NuGet package that you would use in any type of .NET client.
Blazor WebAssembly allows you to run compiled .NET code in your browser. You can make some modifications to your stand-alone Blazor WebAssembly application to be able to host it inside an existent ASP.NET Core application.
If you have multiple SignalR clients active and you broadcast a message from one of them to all clients, each connected client will receive the message. As long as a client has an appropriate event handler, it will process the message.
In the next article, we will have a look at external SignalR client that you would be able to run from stand-alone applications that don’t use browsers.
Further reading
Official documentation on SignalR JavaScript client
JavaScript client API references
Official documentation on SignalR .NET client
P.S. This article is a chapter from the book SignalR on .NET 6 – the complete guide.