
Until this point, we have only covered the use of singular messages in SignalR. But SignalR also supports message streaming.
Streaming is when, instead of sending all data at ones, you send it in chunks. Perhaps, it’s a large object that gets split into smaller parts. Or it could be a collection of object, where each item is sent individually. There are many scenarios where you can use streaming.
The article covers the following topics:
- What is streaming used for
- Client streaming in SignalR
- Server streaming in SignalR
By the end of this article, you will have learned how to use both client-to-server and server-to-client streaming in SignalR.
Prerequisites
This article assumes that you already have set up your development environment:
- A machine with either Windows, Mac OS or Linux operating system
- A suitable IDE or code editor (Visual Studio, JetBrains Rider or VS Code)
- .NET 6 SDK (or newer)
Also, since we are continuing to build on top of the application that we have developed in the previous article, we need the code that we have written previously. If you have skipped the previous article, you can access the complete code from the following location in the GitHub repository:
The complete code samples from this article are available from the following location in the GitHub repo, which has separate folders corresponding to individual parts of the article:
https://github.com/fiodarsazanavets/SignalR-on-.NET-6—the-complete-guide/tree/main/Chapter-06
What is streaming used for
So, why would you even need to use streaming? A more specific question is why would you use streaming in SignalR? After all, it’s not gRPC, where streaming is perhaps the only way to deal with live-processed collections. In SignalR, you can just send an individual item of such a collection as soon as it becomes available. You already have a persistent connection open. Well, there are many real-life scenarios where streaming would still be useful, even in SignalR.
Let’s first have a look at one of the best-known use of streaming, which is the transfer of video data. When you watch a video in your browser, your browser doesn’t wait to download it. If it had to wait for the download to finish, you would have spent a long time waiting before you were able to watch a movie. High-quality movies are gigabytes in size. So, even with a fast internet connection, it would still take a noticeable amount of time to download.
So, instead of downloading the entire video all at once, the app that you use to watch the video on downloads it in small chunks. And, as a viewer, you won’t even notice, as long as the download is happening quicker than the playback. You won’t really care about the part of the video an hour from now. You just need enough data from the video to cover the next minute or so. So the experience of watching the video is completely seamless.
There is also a scenario where there is never such a thing as a complete video. For example, with close-circuit television (CCTV) cameras, the video feed is continuous. So it is with any type of live streaming. The recipients of the data just carry on receiving chunks of data while the camera is filming. In this scenario, streaming is literally the only thing you can do.
Why raw data cannot be sent as individual messages
SignalR streaming functionality allows you to implement features like live streaming. It’s not uncommon to include the ability to do live video calls in chat applications that SignalR was designed to support. Likewise, it’s not uncommon to connect IoT devices to CCTV. A SignalR client can be used on these types of devices to then transfer this data to the server.
So why can’t you just send the chunks of data as individual messages? Well, this is because doing so would be extremely inefficient. Every SignalR message has a JSON envelope. So, if there are many messages that you would need to send within a short period of time (as would be inevitable with live video streaming), there would be excessive amount of data to deal with. You would have to use additional network bandwidth to transfer all this data. Plus, there would be unnecessary computational overhead separating the data from the rest of the JSON envelope. If you are dealing with many of such messages, both the network bandwidth overhead and the computational overhead can accumulate to such an extent that your application will no longer be usable.
Plus, don’t forget that you are dealing with raw bytes. Those collections of bytes will need to be re-assembled into something that the user can consume. They fit each other in a continuous manner. And it will be fairly difficult to figure out which byte arrays are supposed to connect together if they are all dealt by independent event handlers that are intended to handle singular calls.
Streaming greatly simplifies this process. The data is dealt with in the same order as it arrives, so it’s easy to reassemble this data on the other end. And, as long as the streaming channel is open, you won’t have to clog it with any additional metadata.
But what about dealing with collections of complete object? After all, each object can already be read and there’s already a persistent SignalR connection open. So why not just send each one of them individually? Well, it appears that, under certain scenarios, it still makes sense to stream such collections.
Why streaming collections also makes sense in SignalR
Yes, some scenarios under which it would be appropriate to use streaming in gRPC would not warrant for the use of streaming in SignalR. In gRPC, streaming is, for example, the only way to allow the server to send messages to the client without being prompted. But SignalR does it by design.
But there are still scenarios in SignalR where you would want objects to be streamed rather than sent individually. The same principles apply as before. If the objects come in a quick succession and there are many of them, then streaming will save you the overhead of using JSON envelope for every individual message. You will use less network bandwidth and you would be able to deal with the messages much quicker. And, as before, if you use streaming, it would be easier to process the messages in the right order.
So, to summarize, the key benefits of streaming in SignalR are the following:
- Improved performance due to lack of JSON envelope in every message
- Easy to maintain message order
SignalR can stream from the client to the server and from the server to the client. We will have a look at both, starting with client-to-server streaming.
Client streaming in SignalR
In this type of streaming, we open a stream from the client. The client will then carry on sending messages via the stream until it runs out the messages or the stream is closed. The server will receive the messages in the same order as they arrive and within the same call context.
Under normal circumstances, i.e., if there are no failures, it’s the client that controls the stream. Server can forcibly close it if needed, but it’s the client that initiates a normal closure of the stream.
To make it easier to demonstrate client streaming in practice, it’s the clients that we will modify first.
Applying client streaming functionality to JavaScript client
We will not add any new HTML markup to the index page of the SignalRServer web application. Instead, we will modify the existing click handler in JavaScript.
In `site.js` file that is located inside js folder of wwwroot directory, locate the `click` handler for #btn-broadcast selector and replace the code with the following:
$('#btn-broadcast').click(function () {
    var message = $('#broadcast').val();

    if (message.includes(';')) {
        var messages = message.split(';');

        var subject = new signalR.Subject();
        connection.send("BroadcastStream", subject).catch(err => console.error(err.toString()));
        for (var i = 0; i < messages.length; i++) {
            subject.next(messages[i]);
        }

        subject.complete();

    } else {
        connection.invoke("BroadcastMessage", message).catch(err => console.error(err.toString()));
    }
});
So, this is what we are doing here. If the text that we enter doesn’t contain any semicolon (;) characters, we execute a singular call to BroadcastMessage method, as we did before. Otherwise, we split the text into an array, trigger BroadcastStream method on the hub and open a stream to it. We stream all the items from the array until there are no more items left in it. And then we close the stream.
Client-side stream is created by instantiating a Subject type, which is a part of signalR object from the SignalR JavaScript library. Then, we call send method on the object that represents SignalR connection. The parameters of this call are the name of the method on the hub (which we will add shortly) and the subject object that we have created earlier (no pun intended). This object, while it’s active, represents an abstraction of the open stream.
Next, we are placing items on the stream by passing them as parameters into next function of subject object. The server should receive each of these items instantly, not taking into account any network latency. Then, once there are no more items left to send, we close the stream by calling complete function of the subject.
Next, we will apply client streaming functionality to our .NET client.
Applying client streaming functionality to .NET client
We will open Program.cs file of our DotnetClient project and the first thing we will add to it is the following namespace reference:
using System.Threading.Channels;
Then, we need to find the switch statement and replace the case “0” block with the following:
case "0":
    if (message?.Contains(';') ?? false)
    {
        var channel = Channel.CreateBounded<string>(10);
        await hubConnection.SendAsync("BroadcastStream", channel.Reader);

        foreach (var item in message.Split(';'))
        {
            await channel.Writer.WriteAsync(item);
        }

        channel.Writer.Complete();
    }
    else
    {
        hubConnection.SendAsync("BroadcastMessage", message).Wait();
    }
    break;
We are doing a similar thing to what we have been doing in the JavaScript client. We are opening a channel, which is represented by Channel class from System.Threading.Channels namespace. Then we make a call to BroadcastStream method on the hub and pass the reader of the channel to it. This represents a stream it can read from. Then, we write all items of the collection into the stream. And finally, once we are done with it, we close the stream.
When we are calling CreateBounded method on the Channel class, we are specifying string as the data type. This is to tell the channel that we will be placing string messages in it. Otherwise, it could be any data type.
This was done to demonstrate how different client types implement client streaming in SignalR. Now, we need to add an appropriate method to our SignalR hub.
Adding client streaming listener to SignalR hub
In our LearningHub.cs file of SignalRServer project, we will add the following method:
public async Task BroadcastStream(IAsyncEnumerable<string> stream)
{
    await foreach (var item in stream)
    {
        await Clients.Caller.ReceiveMessage($"Server received {item}");
    }
}
The method simply accepts IAsyncEnumerable object as a parameter. The type of the data is string because we are receiving string messages. But the data type could be anything.
IAsyncEnumerable collection allows us to place items into the collection while we iterate through its existing items. It’s similar to reading from a stream. In fact, this is exactly what it represents in this particular case.
Because the iterator of IAsyncEnumerable expects an item to be added to the collection at any time, it awaits for an item to be added instead of just exiting the loop when there are no more items. And this is what await foreach statement represents.
All we do in our method is read all items from the client stream and, for each of these, send the message back to the caller, telling it that we have processed it. Let’s now build and launch our applications to see how client streaming works.
Testing client streaming functionality
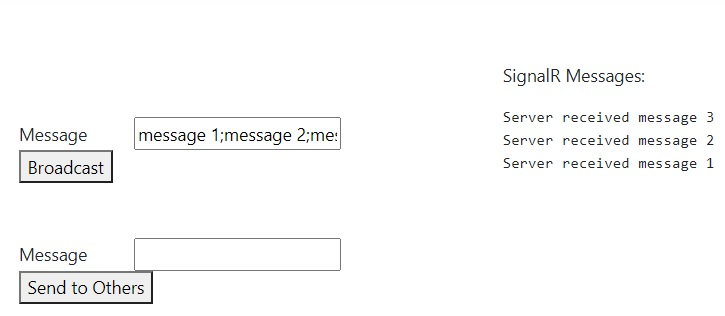
First, we need to launch SignalRServer application. You can either do it from an IDE, or you can execute dotnet run command from inside the project folder. When the application is up and running, you can navigate to its home page in the browser, enter some message into the first input box, insert some semicolons into the message and see the output that you receive from the hub. It should look similar to what’s displayed on the following screenshot:
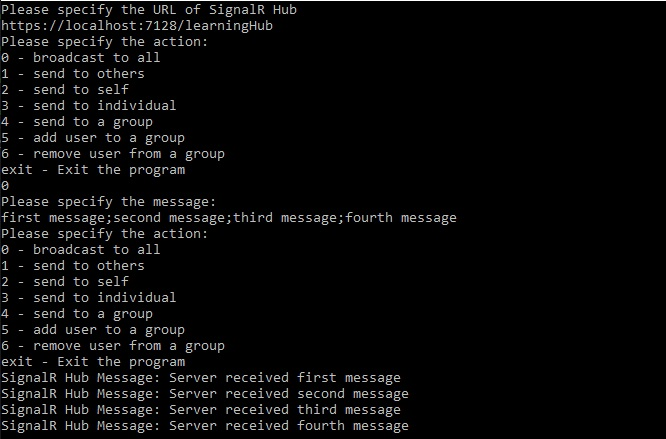
Then, if we launch DotnetClient project, connect the console to the hub endpoint at {base URL}/learningHub, and choose option “0” when prompted, we will be able to enter any arbitrary text with semicolons and view the results of the client stream that was processed by the server. It should look similar to the output shown by the following screenshot:
This concludes our overview of client streaming functionality. Next, we will have a look at server streaming.
Server streaming in SignalR
Server streaming, as the name suggests, works the other way. You still need a client involved. The client needs to trigger a server streaming endpoint on the server. And once it’s triggered, it will then subscribe to the stream and carry on reading messages from it either until there are no more messages left or the server disconnects the stream.
We will now add some server streaming functionality to our clients and the server-side hub. This time, we will start with the server, as it’s the server that controls the stream.
Adding server streaming capabilities to SignalR hub
In LearningHub.cs file inside SignalRServer`
project, we will add the following namespace reference:
using System.Runtime.CompilerServices;
Then, we will add the following method:
public async IAsyncEnumerable<string> TriggerStream(
    int jobsCount,
    [EnumeratorCancellation]
    CancellationToken cancellationToken)
{
    for (var i = 0; i < jobsCount; i++)
    {
        cancellationToken.ThrowIfCancellationRequested();
        yield return $"Job {i} executed successfully";
        await Task.Delay(1000, cancellationToken);
    }
}
In this method, we first receive an integer jobCounts parameter. This is just a normal parameter, like the ones used by any other type of SignalR hub methods. It can be anything.
The next parameter is cancellation token. It has EnumeratorCancellation attribute on it. I won’t delve too deep into details of what it does. But in this case, it allows the method to trigger cancellation if the calling client has issued a cancellation. You can think of it like passing a cancellation token to a method, but doing so remotely over the network.
Then, we look at the jobCount parameter and make as many iterations as this parameter specifies. In each iteration, we write a message into the stream by using yield return statement. And we wait one second between the iterations. The stream will close as soon as we have iterated through all messages.
So, our server is done. Let’s make necessary changes to the clients.
Adding server streaming listener to JavaScript client
We will first add some HTML markup to our Index.cshtml file, which resides inside Home folder of Views folder. We will add the following control group alongside other elements with control-group class:
<div class="control-group">
    <div>
        <label for="number-of-jobs">Number of Jobs</label>
        <input type="text" id="number-of-jobs" name="number-of-jobs" />
    </div>
    <button id="btn-trigger-stream">Trigger Server Stream</button>
</div>
We will then add the following event handler to site.js file in js folder of wwwroot:
$('#btn-trigger-stream').click(function () {
    var numberOfJobs = parseInt($('#number-of-jobs').val(), 10);

    connection.stream("TriggerStream", numberOfJobs)
        .subscribe({
            next: (message) => $('#signalr-message-panel')
                        .prepend($('<div />').text(message))
        });
});
So, here is what we are doing. We are calling stream method on connection object and we are passing the name of the SignalR hub method we want to execute (TriggerStream) and numberOfJobs parameter. Then, we subscribe to the stream and keep outputting the messages that we received from it, until there are no more.
So, our JavaScript client is now done. Let’s move on to the .NET client and make all necessary changes to it.
Adding server streaming listener to .NET client
We will now open Program.cs file of DotnetClient project. We will locate the block of code that puts 6 – remove user from a group on the screen. Then, we insert the following statement in the line below:
Console.WriteLine("7 - trigger a server stream");
Next, we will insert the following case statement into the switch expression:
case "7":
    Console.WriteLine("Please specify the number of jobs to execute.");
    var numberOfJobs = int.Parse(Console.ReadLine() ?? "0");
    var cancellationTokenSource = new CancellationTokenSource();
    var stream = hubConnection.StreamAsync<string>(
        "TriggerStream", numberOfJobs, cancellationTokenSource.Token);

    await foreach (var reply in stream)
    {
        Console.WriteLine(reply);
    }
    break;
So, essentially, we are doing the same thing we’ve done in JavaScript client, but in a different syntax. We are calling StreamAsync method on hubConnection object. In this method, we are specifying the data type of `string`. This represent the data type of each item we expect to receive from the stream. Then, once we have created a stream variable, we just iterate through all of the items in the stream until there are no more. And we write every message we receive into the console.
So, now both of our clients are done. Let’s launch the applications and see how they behave.
Testing server streaming functionality
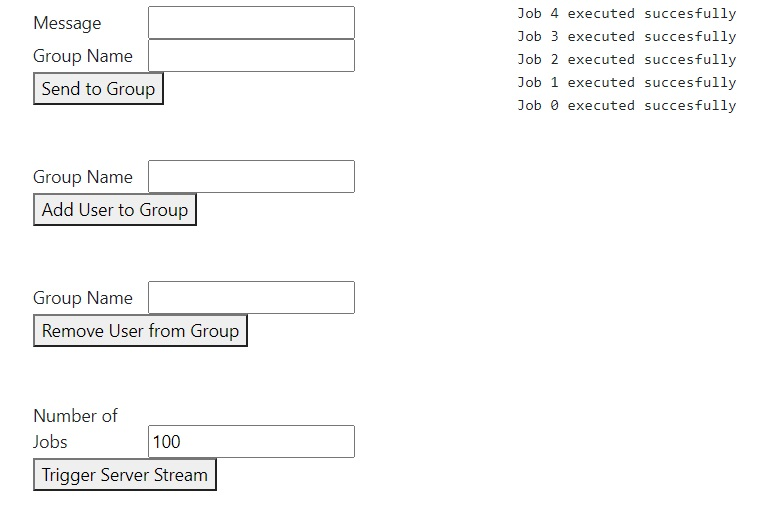
We will first launch our SignalRServer application. Once it’s loaded, we will navigate to its homepage and use the new control group we have created. We will enter an arbitrary number in Number of Jobs field and click on the button next to it.
We should now see our screen being populated with massages with one second interval between them. This is what you should expect your page to look like:
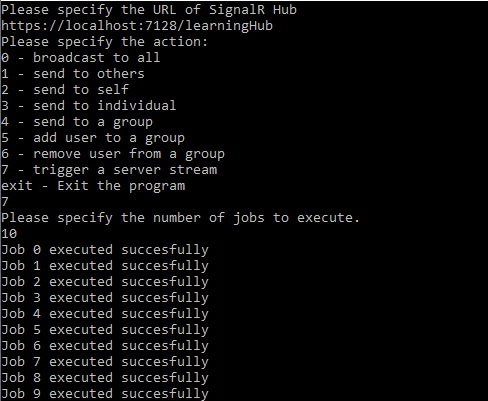
Then, we will launch DotnetClient application. Once it’s up and running, we will connect it to the fully qualified URL of the SignalR hub and select action 7 from the list. After specifying an arbitrary number of jobs to execute, we should be able to see messages appearing in our console with one second interval between them. It should look like this:
And this concludes our overview of streaming functionality in SignalR. Let’s summarize what we have learned in this article.
Summary
In this article, you have learned the importance of streaming in SignalR. You have learned that streaming messages is much more efficient than sending individual messages in terms of computation, code complexity and network bandwidth usage.
You have learned that SignalR supports both client-to-server streaming and server-to-client. In client-to-server streaming, client fully controls the stream. Unless there is a failure, it’s the client that opens the stream, writes data into it and closes the stream.
In server-to-client streaming, client still needs to initiate the streaming process. Client calls a relevant endpoint and subscribes to the streaming channel. And it keeps listening until there are no more messages being sent.
In the next article, you will learn how to configure SignalR both from the server and the client perspective. We will cover how to make the communication process more efficient, how to explicitly select transport mechanism and how to perform other types of fine-tuning on the middleware.
Further reading
Official SignalR streaming documentation: https://docs.microsoft.com/en-us/aspnet/core/signalr/streaming
Low-level documentation on TCP socket streaming: http://etutorials.org/Programming/Pocket+pc+network+programming/Chapter+1.+Winsock/Streaming+TCP+Sockets/
Additional high-level information on streaming: https://www.cloudflare.com/en-gb/learning/video/what-is-streaming/
P.S. This article is a chapter from the book SignalR on .NET 6 — the complete guide.