Previously, in a tutorial presented as a series of articles, we looked at how to use .NET to build an audio player that can run on Windows, Mac, and Linux. This tutorial explains how the open-source NetCoreAudio NuGet package was built.
Today, we will go through an example of how to build a fully functioning audio player application by using the Uno Platform. We have the back-end audio-playback functionality. Now we will integrate it with a user interface.
We will begin by setting up our Uno Platform development environment.
If you get stuck at any point, the complete solution described in this article is available in this repo.
Setting up the Uno Platform
Before we can build an Uno Platform application, we need to make sure that our development machine has all the missing components, including the SDKs, Uno Platform project templates, and other development tools.
Assuming that we already installed the latest version of the .NET SDK on our development machine and we have a suitable IDE, such as Visual Studio, the easiest way to set up the Uno Platform development environment is to use the uno-check CLI tool. This tool is designed to check your environment for all Uno Platform dependencies. It will even allow you to automatically install any dependencies that are missing.
To install this tool, you can execute the following command in your terminal:
dotnet tool install -g uno.check
Once installed, this is the command you can execute to check your environment and install any missing dependencies:
uno-check
For more information on how to use uno-check, you can refer to this official tutorial. You can also install Uno Platform project templates separately by following this instruction.
You may need to enable various components in your IDE too. However, any of the IDEs supporting .NET should be able to automatically detect any missing components for a specific project type and prompt you to enable them.
Now, you should be ready to start building your cross-platform audio player by using the Uno Platform.
Setting up an MVVM project
We will be using a Model-VIew-ViewModel (MVVM) project template. MVVM is an architectural pattern commonly used in desktop and mobile application development. The MVVM dependencies we will be using work with other .NET-based app development frameworks and not just Uno Platform. But, as we will see shortly, they work perfectly well with the Uno Platform.
We chose this pattern because it combines XAML markup with an easy-to-implement back-end logic. Also, if you are already familiar with native application development, you should already be familiar with this pattern, as it’s universally applied across different programming languages and frameworks.
Different IDEs have different ways of creating an Uno Platform MVVM project, but CLI commands are universal across all systems. Therefore, to create your project, you can execute the following terminal command inside the folder you want your project to reside:
dotnet new unoapp -preset blank -presentation mvvm -markup xaml -o AudioPlayer
This should create the AudioPlayer folder with a .NET solution and the following file structure:
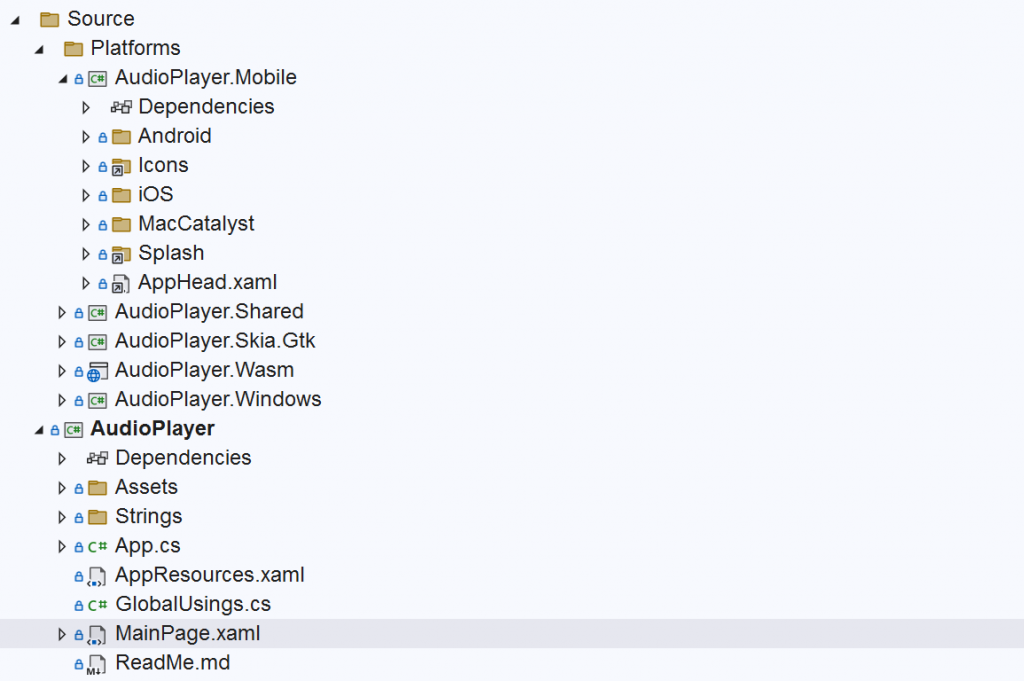
As you may have noticed, all projects inside this folder are prefixed with the AudioPlayer, which is the application name we specified while creating the setup. It’s not just one project that was created, but multiple projects that share dependencies among each other.
For those who are unfamiliar with an Uno Platform project structure, here’s what it consists of:
- The
Platformsfolder contains the code specific to different operation systems, which are as follows:AudioPlayer.Mobilefolder contains platform-specific mobile app code, including the following:- Android
- iOS
- MacCatalyst, which is a platform that allows developers to run iOS apps on a Mac computer
AudioPlayer.Skia.Gtkcontains Linux-specific startup codeAudioPlayer.Wasmallows us to compile Uno Platform code to WebAssembly that can run in the browserAudioPlayer.Windowsfolder contains Windows-specific code
- The
AudioPlayerproject contains shared resources that are intended to run on any of the supported platforms. This is where most of the code usually resides, especially the business logic.
Since NetCoreAudio works on Windows, Mac, and Linux, we only care about the following projects:
AudioPlayer.WindowsAudioPlayer.Skia.GtkMacCatalystfolder inside theAudioPlayer.Mobileproject.
The only project we will make changes to is AudioPlayer, as we are adding shared functionality that is intended to work on all the abovementioned platforms. So, we are now ready to start adding the audio playback functionality.
Adding audio playback functionality
The first thing we need to do is add the NetCoreAudio NuGet reference to the AudioPlayer project. Or, if you want to get more technical, you can build the functionality described in this tutorial directly inside the AudioPlayer project. The project is a standard console library and all dependencies we need are fully supported by .NET Standard, so there won’t be any compatibility issues.
Once we added the required audio module, we can add the ViewModel that will allow us to enable the interaction between the UI and the audio functionality. To do so, we will create a file with the name of MainModel.cs inside the AudioPlayer project folder with the following initial structure:
using CommunityToolkit.Mvvm.ComponentModel;
using CommunityToolkit.Mvvm.Input;
using NetCoreAudio;

namespace AudioPlayer;

internal partial class MainModel : ObservableObject
{
}
Please note that the using statement referencing NetCoreAudio assumes that we added the NetCoreAudio NuGet package. If you decided to build your own audio playback functionality based on the tutorial, you will need to adjust the namespace accordingly.
Let’s now insert the Player property and the constructor into this ViewModel class:
private readonly Player _player;

public MainModel()
{
    _player = new();
}
Next, we will add observable properties that will store values from the UI and control its state:
[ObservableProperty]
private string _fileName = string.Empty;

[ObservableProperty]
private bool _playing = false;

[ObservableProperty]
private bool _paused = false;
Next, we will add commands associated with the play, pause, resume, and stop functionalities:
[RelayCommand]
private async Task Play()
{
    await _player.Play(FileName);
    UpdateStatuses();
}

[RelayCommand]
private async Task Pause()
{
    await _player.Pause();
    UpdateStatuses();
}

[RelayCommand]
private async Task Resume()
{
    await _player.Resume();
    UpdateStatuses();
}

[RelayCommand]
private async Task Stop()
{
    await _player.Stop();
    UpdateStatuses();
}

private void UpdateStatuses()
{
    Playing = _player.Playing;
    Paused = _player.Paused;
}
This completes our ViewModel. To make sure you’ve done everything correctly, the complete class can be found here.
Before we continue, there is one thing that is useful to know, especially if you are completely new to the Uno Platform or any other software development frameworks that use XAML. You may have noticed that our bindable properties have camel case names that start with the underscore (i.e. _fileName, _playing, and _paused). However, in the commands, we use property names that are Pascal case and don’t have the underscore at the beginning (i.e. FileName, Playing, and Paused).
You may wonder, how is it possible and how we aren’t getting a compiler error. Well, here is an explanation. Those Pascal case properties are auto-generated public properties with complex getters and setters. They encapsulate our private properties that are marked with the ObservableProperty attribute. This is done by the framework automatically so we don’t have to repeatedly write boilerplate code representing those getters and setters. This way, our visible code is much less verbose which makes it much more readable.
Let’s now add the user interface to complete our app.
Building the UI
Our main application page is represented by the MainPage.xaml file in the AudioPlayer folder. Before we continue, we will clear any existing elements from the user interface and leave only the root Page element in place. So, at this stage, the content of the file will look like this:
<Page x:Class="AudioPlayer.MainPage"
      xmlns="http://schemas.microsoft.com/winfx/2006/xaml/presentation"
      xmlns:x="http://schemas.microsoft.com/winfx/2006/xaml"
      xmlns:local="using:AudioPlayer"
      Background="{ThemeResource ApplicationPageBackgroundThemeBrush}">

</Page>
Next, we will bind our ViewModel to the page. To do so, we will insert the following element inside the Page element:
<Page.DataContext>
  <local:MainModel />
</Page.DataContext>
Next, we will add a container element called StackPanel that will allow us to arrange our UI elements vertically:
<StackPanel
      HorizontalAlignment="Center"
      VerticalAlignment="Center">

</StackPanel>
Next, inside this StackPanel, we will insert a text input element that will allow the user to enter the path to the audio file name the user will want to play:
<TextBox Margin="12"
     HorizontalAlignment="Center"
     PlaceholderText="Audio File Name"
     Text="{Binding FileName, Mode=TwoWay}"
     TextAlignment="Center" />
We can see that the Text attribute of the TextBox element is bound to the FileName property of the ViewModel.
Finally, we will insert another StackPanel with horizontally arranged play, pause, resume, and stop buttons:
<StackPanel Orientation="Horizontal">
  <Button Margin="12"
      HorizontalAlignment="Center"
      Command="{Binding PlayCommand}"
      Content="Play" />
  <Button Margin="12"
      HorizontalAlignment="Center"
      Command="{Binding PauseCommand}"
      IsEnabled="{Binding Playing}"
      Content="Pause" />
  <Button Margin="12"
      HorizontalAlignment="Center"
      Command="{Binding ResumeCommand}"
      IsEnabled="{Binding Paused}"
      Content="Resume" />
  <Button Margin="12"
      HorizontalAlignment="Center"
      Command="{Binding ResumeCommand}"
      IsEnabled="{Binding Playing}"
      Content="Stop" />
</StackPanel>
We have four buttons here, each being bound to one of the methods in the ViewModel annotated with the RelayCommand attribute. The association between buttons and the methods is done via the Command attribute, such as this:
Command="{Binding PlayCommand}"
The reason we use the curly brackets is that the binding logic inside this attribute may be quite complex. However, if we want a simple binding, all we have to do is insert the word Binding followed by the RelayCommand method we want to bind this element to followed by the Command suffix. Therefore, if the method we want to bind the element to is called Play, we refer to it as PlayCommand.
On some buttons, we also have the IsEnabled attribute bound to one of the Boolean properties of the view model. The logic is as follows:
- When we open the player, only the
Playbutton is enabled. - If the audio is playing, we have the
PauseandStopbuttons enabled. - If we pause the audio, then the
Resumebutton becomes enabled.
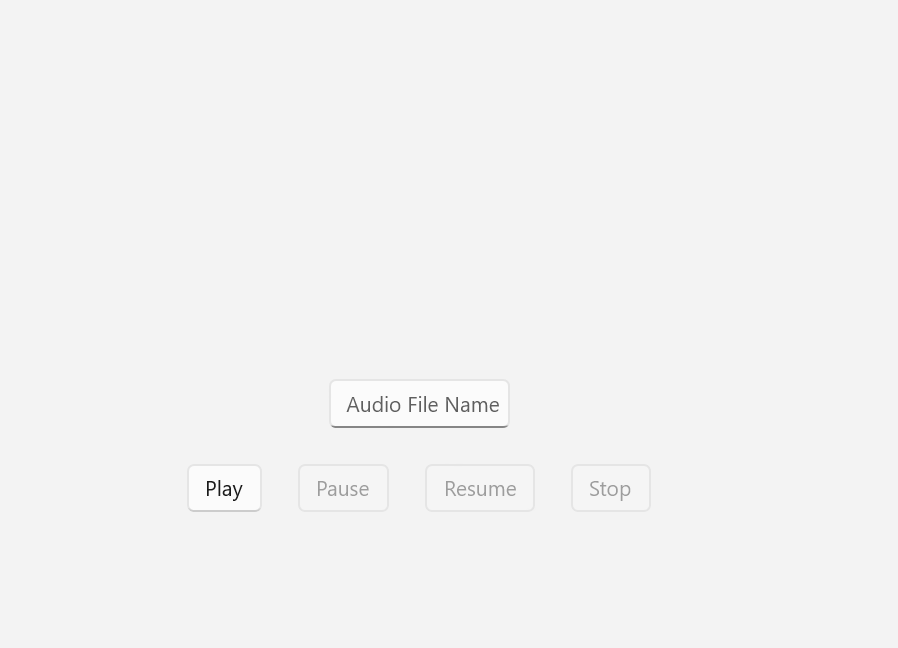
The complete UI markup can be found here. If we build and launch our application, this is what the layout should look like:
Caveats
This setup wasn’t tested on MacCatalyst as I currently don’t have access to a Mac device. There might be some additional steps necessary to make it work. If there are, please let me know in the comments.
Another caveat is that I couldn’t get the PlaybackFinished event from the NetCoreAudio library to be tied to the UI events in a Windows app. I kept receiving an exception without any useful message. Therefore, if you can make this event work, please share how you did it and I will update the instructions accordingly.
The only way to automatically detect if the playback is finished that I currently know of is to create an asynchronous scheduled task that listens to the change in the Playing property of the Player object from true to false, as this is what will happen inside the NetCoreAudio library when the audio playback completes.
Taking it from here
We have built a fully functioning audio player app. However, there are many ways you can improve it.
We can start by improving the layout. There are many ways to style your Uno Platform application. You can visit this video for inspiration.
You may also want to reduce the number of buttons on the screen and, instead of having separate buttons for pause and resume, have one button that changes its label based on the audio playback state. This article will help you with it, as it talks about advanced XAML bindings.
You may also want to replace textual buttons with images of the buttons you would find on any standard audio player. If this is what you want to have a go at, this document will get you there.#
Finally, you may want to add more functionality to the audio player, such as volume control and audio recording. NetCoreLibrary supports both of these and you just need to add the UI.
Happy coding and see you next time!