As great as .NET is for writing software for multiple platforms, it lacks some important capabilities. This applies to those functionalities that would work radically differently on different CPUs and operating systems. One of these is the ability to play sound.
With its predecessor, the .NET Framework, you could play sound easily by using classes like SoundPlayer from the standard class library of the framework itself. Likewise, NuGet packages such as NAudio added many extra audio-processing capabilities.
Unfortunately, NAudio is not fully compatible with the cross-platform capabilities of .NET. Although it uses the latest .NET version, it’s still primarily targeted at Windows.
There is, of course, a reliable way to play sound on .NET on any platform, but it requires quite a few additional dependencies. You will have to install ASP.NET Core components even if you don’t need any web development capabilities, and make it interoperate with Node.js, to get this solution to work.
Therefore, if you want to be able to play audio on .NET in the most efficient way without loading too many additional components, you can write your own library to do so. Fortunately, the process is not prohibitively difficult, as I will show you in this article.
In this post, we will focus on how to get the base library structure set up and how to play audio if it’s installed on Windows. In the following posts, we will introduce Linux and Mac OS compatibilities as well.
Setting up the project structure
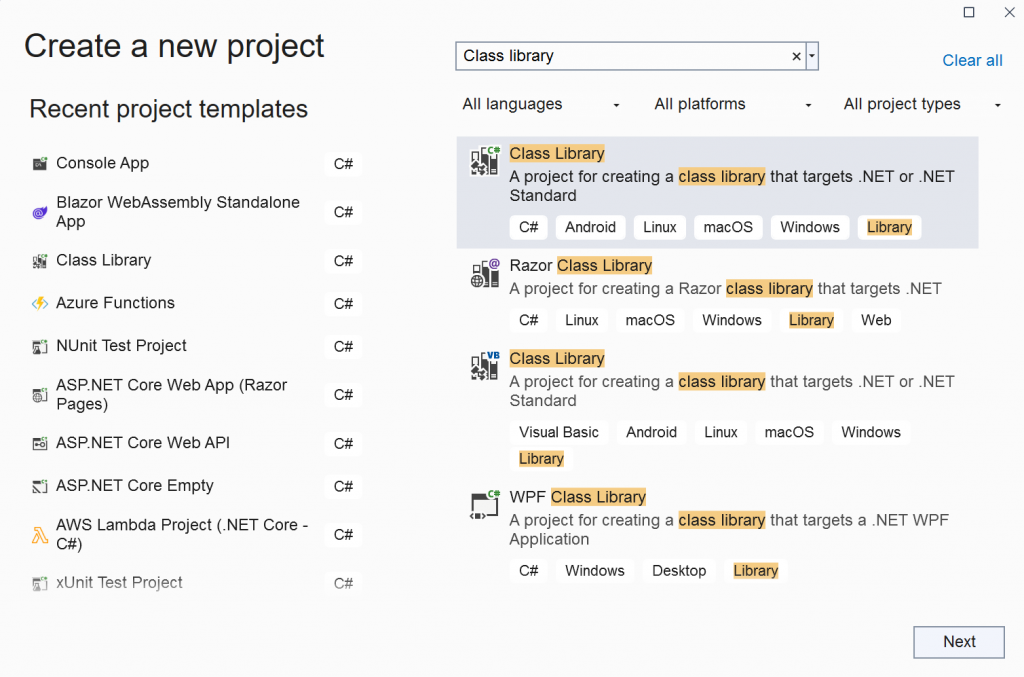
We will want our code to be reusable in other .NET programs. Therefore, the project type that we are building is a standard .NET class library.
Once the project is created, we will need to organize it into an optimal structure for a library with audio playback capabilities. The first thing we will do is create an interface with common audio player methods. As each operating system has a different way of playing audio, there will be one implementation of this interface per OS. Each of those classes will be internal, as the code that will use the library shouldn’t be concerned with which implementation to use. This decision will be handled by the library itself.
The structure of our interface is as follows:
namespace NetCoreAudio.Interfaces;

public interface IPlayer
{
    Task Play(string fileName);
    Task Pause();
    Task Resume();
    Task Stop();
}
Now, we can add the Windows-specific implementation of the interface.
Send commands to MCI on Windows
To play audio on Windows, we will need to use winmm.dll, a native library from the OS, which forms the core part of Windows Multimedia API. The only part of this DLL that we are interested in is the method that can sends audio-specific commands to the API. And, to use it, we need to link to the DLL from our code.
This is achieved by the DLLImport attribute, which allows us to create a method in our managed C# code that maps directly to a method within the native DLL that we are linking to. The method we are interested in is mciSendString. And, to use it, we will need to have the following in our class that implements the IPlayer interface mentioned previously:
[DllImport("winmm.dll")]
private static extern long mciSendString(string command, StringBuilder stringReturn, int returnLength, IntPtr hwndCallback);
The method has several parameters that allow us to control the execution of commands and receive the callbacks. However, for demonstration purposes, all commands that we will send to this method will be in a simple “fire and forget” manner. Therefore, except for the command text itself, we will set all other parameters to nulls, zeroes, and null pointers. If you need something more sophisticated, the detailed documentation is available here.
The method that will receive Windows Multimedia API commands and execute them will be as follows:
private void ExecuteMsiCommand(string commandString)
{
  var result = mciSendString(commandString, null, 0, IntPtr.Zero);

  if (result != 0)
  {
    throw new Exception($"Error executing MSI command. Error code: {result}");
  }
}
The mciSendString method invocation inside of it returns 0 if the command has been executed successfully. Any value other than zero is an error code. This is why we are throwing an exception.
Now, on to the commands that need to be sent to the method. The commands defined below are just standard C# strings. Each of these commands is case-insensitive. However, I have used some capital letters for readability.
First, let’s examine a potential implementation of the Play() method of the IPlayer interface. In our example, we will call the ExecuteMsiCommand() method defined earlier three times.
We will be using the same audio device for all of our operations; therefore, before we start the playback, we will need to close any other media being played by the same device. This can be achieved by sending the following command to ExecuteMsiCommand() function:
Close All
After this, we will need to open a media device and give it a reference to a file that we want to play. It will also be given an alias that will be usable in the commands executed afterward. “myDevice” can be any alias of your choice. The “fileName” parameter either represents an absolute path to the audio file in Windows format (e.g. C:\Temp\audio.mp3) or a path relative to the folder where the application resides.
Open {fileName} Type MPEGVideo Alias myDevice
We assume that an interpolated string is used to insert the fileName parameter into the command, hence the curly brackets.
Next, we will play the file, which is done as follows:
Play myDevice
Pause and resume commands consist of the corresponding verb followed by the device alias so that it will be “Pause myDevice” and “Resume myDevice” respectively. For stopping the playback, either “Close” or “Stop” command can be used followed by the device alias.
This documentation explains how the device alias works. this reference page contains the full list of the commands that can be used.
The good news is that with the playback type being set to MPEGVideo, the commands sent to the mciSendString method can play MP3 and WAV formats, as well as any other format that can be used by MPEG videos.
Something to look out for
As I have been testing the library, I have discovered that the “Open” MCI command doesn’t work very well under some scenarios; inside a multi-threaded application is one of them. In those cases, it will return an error code 266, which is normally returned when a correct codec cannot be found on the system. When this happens, the audio device will not be opened; therefore any attempt to execute any other command against the device alias will fail.
However, there is a workaround for that. It is possible to run most MCI commands directly against a file name instead of an alias. So, if the “Open” command is throwing 266 and you are pulling your hair trying to find out why, you can skip the command and use the following one to start the playback:
Play {fileName}
One thing to note though. the “Close” command doesn’t work with the file name. So, if there is no device alias available, you can perform the following command to stop the playback:
Stop {fileName}
And follow it up with this command:
Close All
Wrapping up
A code repository that uses the principles shown in this short tutorial, NetCoreAudio, is available here. It also has a console app that can be used to see the class library in action.
This is it for part one. In the next article, I will demonstrate the Linux implementation of the IPlayer interface.