
How to Get Started
This article will teach you how to make a timer in Scratch, the free visual programming language. The script we describe here fits perfectly into any Scratch coding project, especially games!
Timers are great for beginner Scratchers that want an easy way to make their Scratch games or projects more interesting.
To follow along, make sure to first do these steps:
- Become a new Scratcher by making an account at the Scratch website, https://scratch.mit.edu.
- Start with a new game project, or create a simple game project with our beginner’s guide to Scratch games tutorial.
Why use timers?
Timers are a simple way to make any type of game more engaging and fun to play. They’re not very difficult to code, and they can add a ton of fun when implemented properly! The main function of a timer is to add stakes to your game. If the player runs out of time while playing, they lose!
This same idea can be used in tons of different ways. Players can try to get as many points as possible before running out of time, or try to solve a challenging puzzle before running out of time. Because of their flexibility, timers are present in some of the most popular games, from Fortnite to Super Mario. They’re also a staple in Scratch projects, such as our Scratch Pearl Collector game.
How to Code a Scratch Countdown Timer
In order to make a timer in Scratch, we’ll need to use a variable. The Scratch Wiki has a great introduction to variables. Check it out if you’re not sure what they are!
After refreshing yourself on variables, create a new variable by navigating to the Variables section of the block menu. The Make a Variable button will take you to a new screen in order to create your new variable.
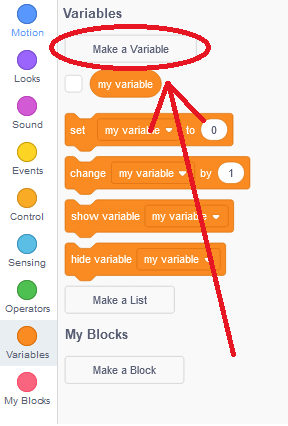
Click “Make a Variable” under the Variables section to create a new variable.
You’ll be prompted to enter a new variable name. The name you put here will be the name that displays on your game screen, so make it something descriptive! We decided to name our timer variable Time Remaining. Additionally, make sure that the For all sprites button is clicked! This will ensure that all sprites in your project can access the timer variable.

Name your variable something descriptive, and check “For all sprites.”
Finally, after creating this variable, check the box to the left of the variable in the block menu. This tells Scratch to display the variable on the stage, making it visible to the player.

Make sure to check the checkbox next to your new variable to make it visible on the stage.
Now that we’ve created our timer variable, let’s write code to make it a functional timer! We can write this code on any sprite — it won’t make a big difference.
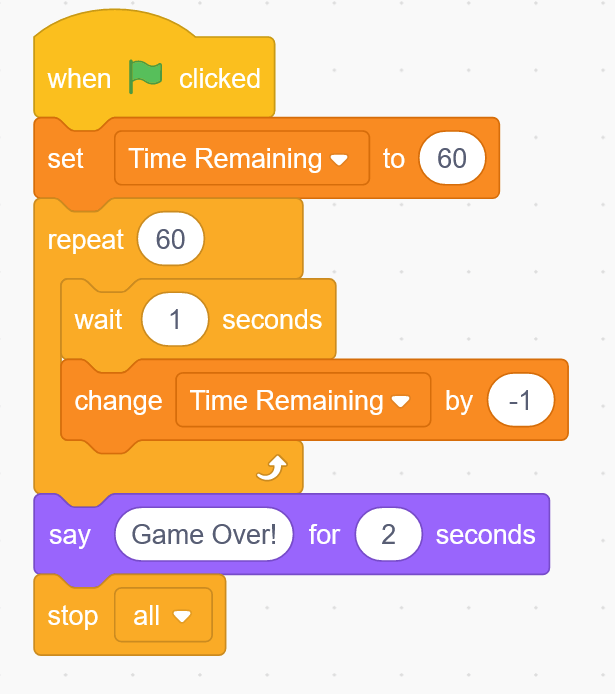
Write this code script for any sprite to set a timer for your Scratch game.
This is a simple Scratch script that creates a functional timer. Here’s a simple explanation of how this works:
- The timer begins running when the green flag is clicked.
- The “Time Remaining” variable keeps track of the amount of time you have left. It starts at 60 seconds, and resets back to 60 whenever the green flag is clicked. You can customize this timer to the number of seconds you’d like! Simply change the 60 to your desired amount of time.
- The actual timer runs in a loop. It repeats 60 times, because we decided that our timer would last for 60 seconds.
- Inside of the loop, we wait 1 second, then change our variable by -1. This means that every second, the Time Remaining variable decreases by one.
- After repeating 60 times, the Time Remaining variable is equal to 0! This means that we are out of time, and the loop finished.
- When the timer ends, the script moves on to say Game Over for 2 seconds.
- Finally, the stop all block brings the rest of your game to a halt when time runs out.
That’s pretty simple, right? We set a variable to 60, then decrease it until the value of the timer reaches zero. Once that happens, the timer stops and time is up!
Test It Out Yourself
In our step-by-step article on how to make a game on Scratch, we made a simple game about collecting pearls. We can add a timer to this in order to make it more engaging!
Check out our Advanced Pearl Collector game project to see what it looks like with a timer. Play the game and see how much a timer adds to it!
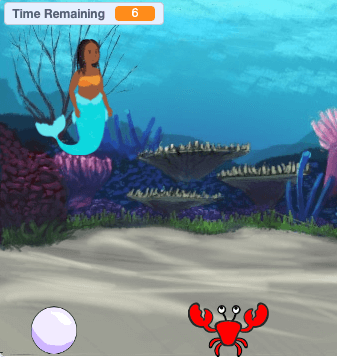
Our advanced mermaid game is a good example of how timers can be added to Scratch games.
A Different Timer: The Built-in Scratch Timer
In addition to the script we just wrote, Scratch also offers a built-in timer variable under the Sensing tab.
However, this timer behaves rather strangely — it’s not usually what we want to use for our games. Instead of a countdown timer like above, the built-in Timer block acts like a stopwatch. It can be used to keep track of how long the game has been running for, and is super accurate!
The way the timer works can be confusing. It begins at 0, and starts counting upwards as soon as you open your Scratch project. To see this timer displayed on your screen, navigate to the Sensing category in the block menu and check the box next to the timer variable. Now, it should show up in the stage next to the other variables in your project.
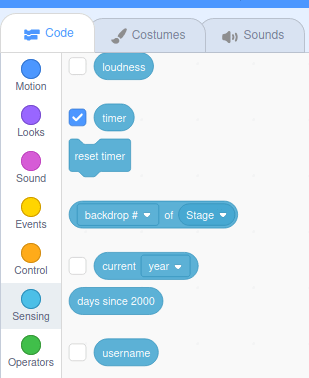
Find the timer variable in the Sensing category, and check the box to add it to your stage.
The reset timer block will reset the timer back to 0 seconds. To keep track of how long the player has been playing, we reset the timer to 0 when the green flag is clicked.
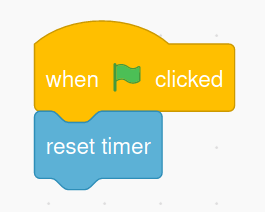
This script lets you use the built-in Scratch timer as a stopwatch in projects.
Now, we can use this timer to keep track of exactly how long the player has been playing the game! While this might not be as useful as our countdown timer script, it still has informative and creative applications in Scratch projects.
What’s Next: More Scratch Tutorials
Adding a timer is a great bonus feature to add to any kind of game! It adds an extra layer of challenge for players to test their skills and get even more immersed.
Some other ways to make your games more fun are adding more mechanics, or improving on ones you already have. Check out these tutorials to spice up your projects:
- How to make a simple game in Scratch
- How to make a Scratch sprite jump (another essential game mechanic)
- How to make Scratch sprites move smoothly (a better way to move)
- How to make game levels in Scratch
Additionally, stay tuned for our step-by-step Scratch coding tutorials on how to make specific types of games in Scratch.
Scratch Coding Classes for Kids
Juni Learning offers project-based Scratch coding courses for kids 8-11 to get started with coding. Our Scratch curriculum prepares students with full mastery of the Scratch environment, and prepares them to advance into coding with more advanced, text-based coding languages like Python.

A Juni Instructor teaches Scratch to a student.
- Game Superstar (Scratch Level 1 course): introduces computer science fundamentals such and teaches students how to build and design their own Scratch games.
- Game Master (Scratch Level 2 course): covers more complex concepts like nested loops, complex conditionals, cloning and more in preparation for learning more advanced coding languages.
Check out our online courses for kids coding, or contact our admissions team to learn which course is best for your student!
This article originally appeared on junilearning.com.