
As a software-building platform, .NET Core has already reached a sufficient level of maturity and can do many of the things that its predecessor – .NET Framework, can. Microsoft has even recommended to use it instead of .NET Framework, unless it’s absolutely necessary to do otherwise.
.NET Core has many advantages over .NET Framework. One of such advantages is the SDK-type project file. If the content of any project file needs to be edited, a new SDK-type project file doesn’t have to be unloaded, unlike a project file that uses classic .NET Framework format. The latter are also way less verbose than the former, which makes it easier to read and edit.
Unfortunately, despite all of its advantages, there are still many real-life situations where .NET Core cannot be used. There are many .NET Framework features that simply don’t exist on .NET Core. Some of these features, such as playing audio, can be implemented by using third party libraries, while others, such as the ability to build full feature native GUI apps, isn’t available on .NET Core at all (or, at least, not fully available yet).
However, even if you are stuck with .NET Framework, you don’t have to be stuck with its ugly and awkward project file format. Even though it’s not obvious how to apply SDK projects to .NET Framework, it’s not difficult at all. And this trick will significantly improve your productivity.
Setting up your project
We will use a basic Console app as an example; however the concept can be easily applied to any other application types.
The first step is to create a new .NET Core Console application project.
So, instead of this:

the project file in our new application will look like this:
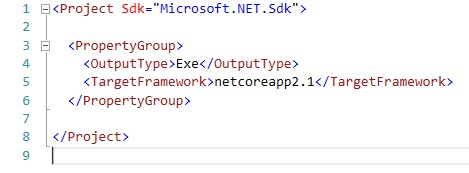
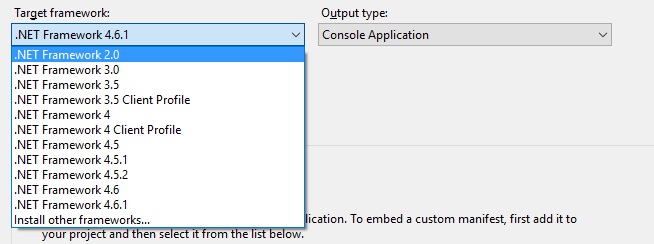
Our project has “netcoreapp” followed by the version number as the value of “TargetFramework” element. If we right-click on the project and click on its properties to access a more user-friendly way to edit the project, we can see that its framework can only be changed to various versions of .NET Core, depending on what SDK versions are installed on a given development machines.
It seems that changing the project type to .NET Framework isn’t possible. However, all you need to do is to open the project file and change “netcoreapp” to “net”. The version number that follows is the .NET Framework version that you will need, but with decimal points removed. For example, if you would need to use .NET Framework 4.6.1, you would type it as “net461”.
That’s it. If you open the project properties now, you will see the following:
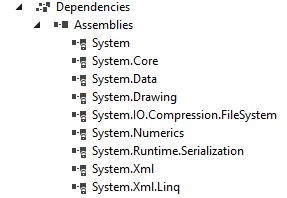
And instead of old style dependencies:

The dependencies will be organised in .NET Core style:
And, on top of all of these, you will not have to unload the project to edit it. All you’ll have to do is right-click on your project and chose the “edit” option.

Some effective solutions are often simple
After following these steps, you will not want to ever use the classic project file format again.
Of course, there are still certain project files where this technique isn’t applicable, for example, an Azure Service Fabric application project cannot be created in SDK format. Likewise, there are several other project types that just can’t be created in .NET Core to start with. However, there are still many real-life situations where the trick from this article can be applied.
Where this technique can be used, it will significantly improve your productivity. As well as making it easier to navigate your MSBuild script and giving you the ability to edit your project file at the same time as looking at the code inside the project, it will make make it much easier to perform code reviews. After all, it is always far easier to examine changes in a file that has fewer items in it.