
In the previous article, we discussed enabling single sign-on authentication in .NET Aspire. Today, you will learn how to do it using a Keycloak container. The material presented in this article serves two purposes:
- Teaching you how to host Docker containers inside a distributed .NET App
- Introduce you to Keycloak (if you aren’t familiar with it already)
The sample solution we will be talking about is available here.
In order to be able to follow this article, you would need to know what Docker containers and Keycloak are. Some of you may not know these concepts, so we will start with a quick overview. If you are already familiar with those, you can skip right to the Initial Setup section.
Docker Containers Overview
Docker is a technology that allows executable applications to be isolated into so-called containers.

Docker containers are a lightweight, portable, and isolated environment that allows developers to run applications consistently across different environments. They encapsulate an application along with all its dependencies (like libraries, binaries, and configuration files) into a single package. This ensures that the application will run the same way regardless of where it is deployed, whether on a developer’s local machine, in a test environment, or production.
Because containers run in their own isolated environments, they don’t interfere with other containers or the host system. This isolation is achieved through kernel-level features like namespaces and groups in Linux.
Unlike traditional virtual machines, Docker containers share the host system’s OS kernel, making them much more lightweight. They don’t require a full OS installation for each container, leading to faster startup times and lower resource usage.
Containers can run on any system that has Docker installed, making it easy to move applications between different environments (e.g., from development to production) without worrying about compatibility issues.
Docker images are the building blocks used to create Docker containers. They are essentially snapshots or templates that contain everything needed to run an application, including the application code, libraries, dependencies, environment variables, and configuration files. When you create a container, you are instantiating a Docker image.
The Docker Hub website has a very wide collection of Docker images. They include popular software packages, such as SQL Server, RabbitMQ, the abovementioned Keycloak, Grafana, etc. All of these images can be used directly to launch containers, but they can also be used as base images for other images if any new functionality needs to be added.
More information on Docker can be found here.
Keycloak Overview
Keycloak is an open-source identity and access management solution that provides authentication and authorization services to applications and services. It is designed to make it easy to secure applications with minimal effort, offering features like single sign-on (SSO), identity brokering, user federation, and more. Keycloak acts as an identity provider (IdP) and allows developers to integrate security features into their applications without needing to write extensive custom code for authentication and authorization.

While Keycloak is an open-source software freely available in a Docker container, it’s frequently used by real commercial enterprises for SSO and identity management. This is because it’s relatively simple to set up and contains pretty much any feature that an IdP solution needs, such as easily customizable login pages that can include any type of company branding.
Keycloak also supports many modern-day security features, such as multi-factor authentication. Any features that aren’t natively supported by Keycloak can be enabled via numerous plugins available in its ecosystem. Moreover, developers can write their own custom plugins.
Each KEycloak instance supports multiple domains, which, in Keycloak terminology, are known as realms. One thing that makes Keycloak easy to set up is that each realm can be easily exported as a JSON file. When we then set up a new instance of it, the JSON file can be imported, which will repopulate this instance with OIDC client applications, users, roles, and other settings. We will see an example of this in this article.
More information about Keycloak can be found here.
Now, we are ready to start learning how a Keycloak Docker container can be hosted inside an Aspire app.
Initial Setup
As before, our setup is based on the starter Aspire project. This is done to make it easier for you to see what components have changed compared to the original setup.
Besides the Aspire host application, we have the following apps:
- An app with the name webfrontend, which is a front-end Blazor application
- An app with the name apiservice, which is a Web API ASP.NET Core application
- Keycloak Docker container with the name idp.
If we launch our Aspire host, our dashboard will look like this:
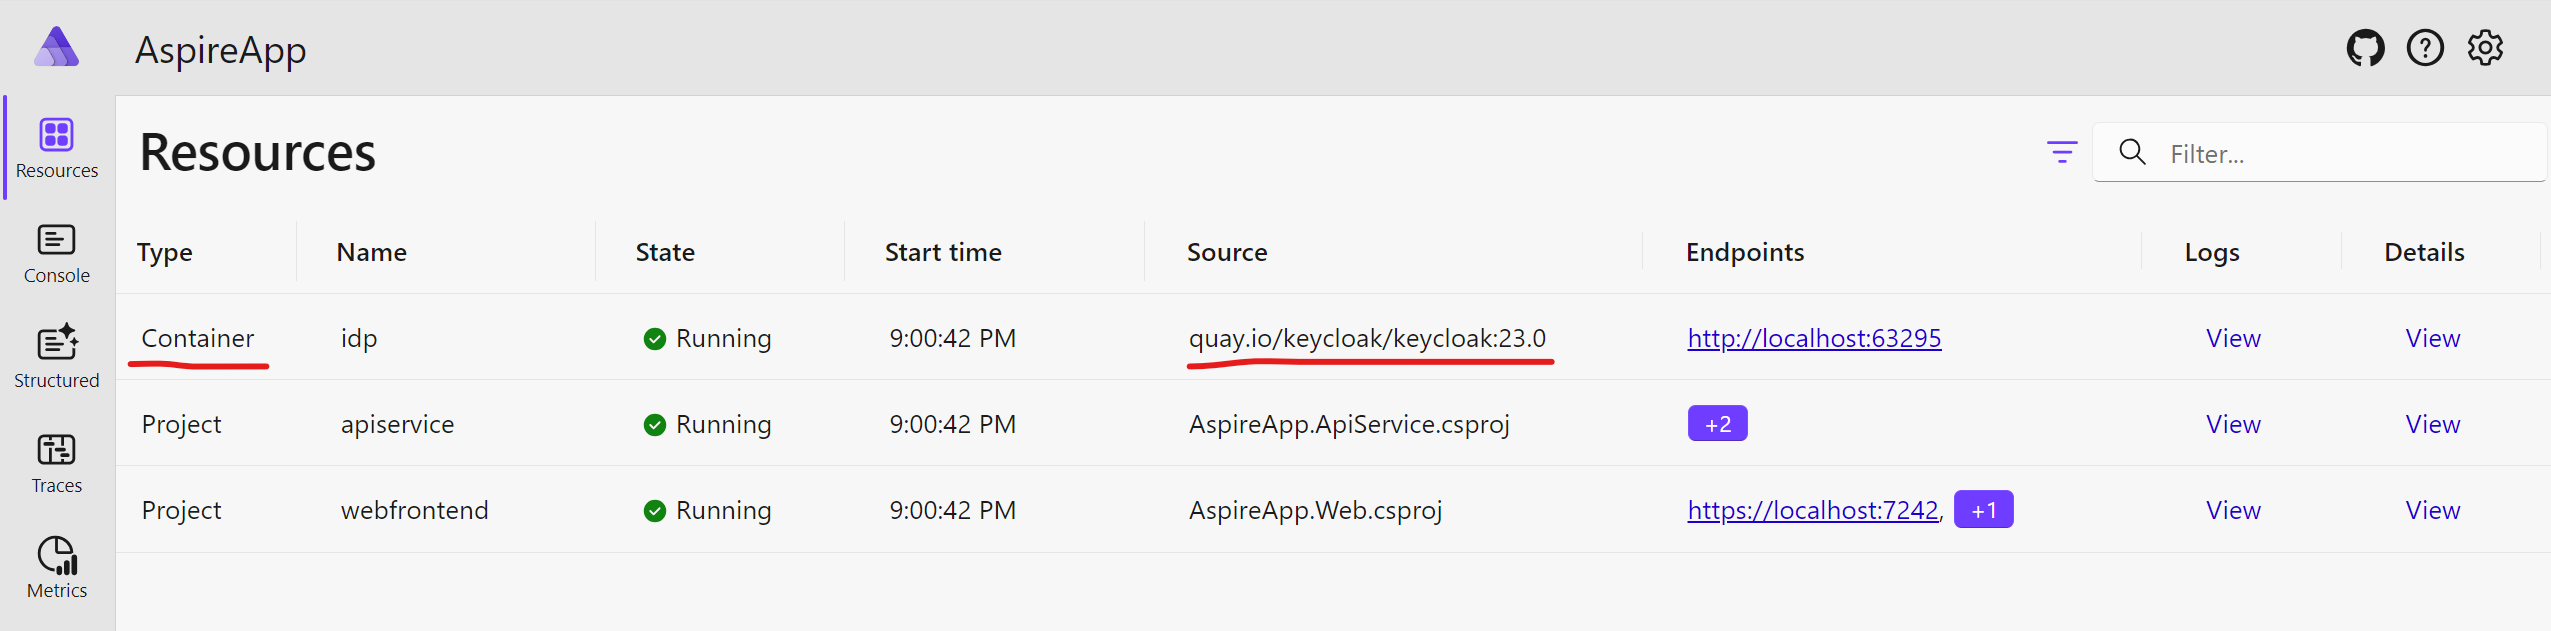
We see that the idp resource has Container as its Type and its Source is quay.io/keycloak/keycloak, which is the fully qualified name of the official Keycloak Docker image.
If we click on its endpoint URL, we will see the following page:
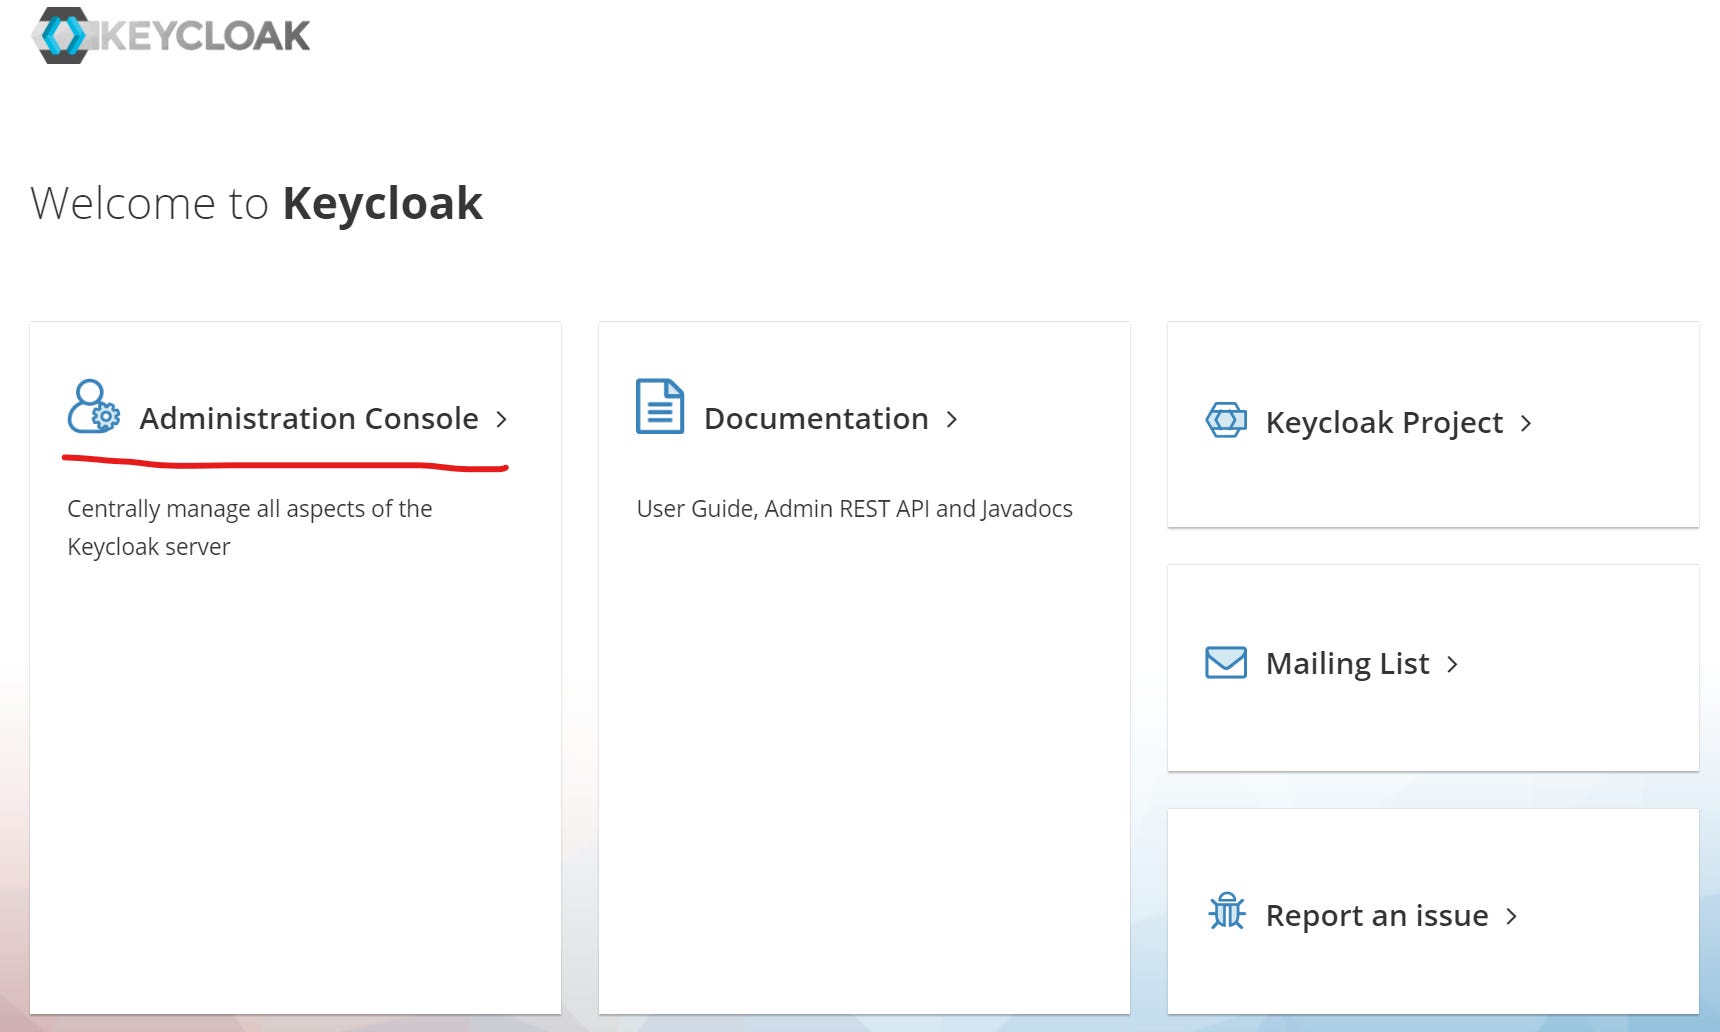
On this page, we can click on the Administration Console option. This will take us to the login page for our admin account. By default, both the username and password are admin.

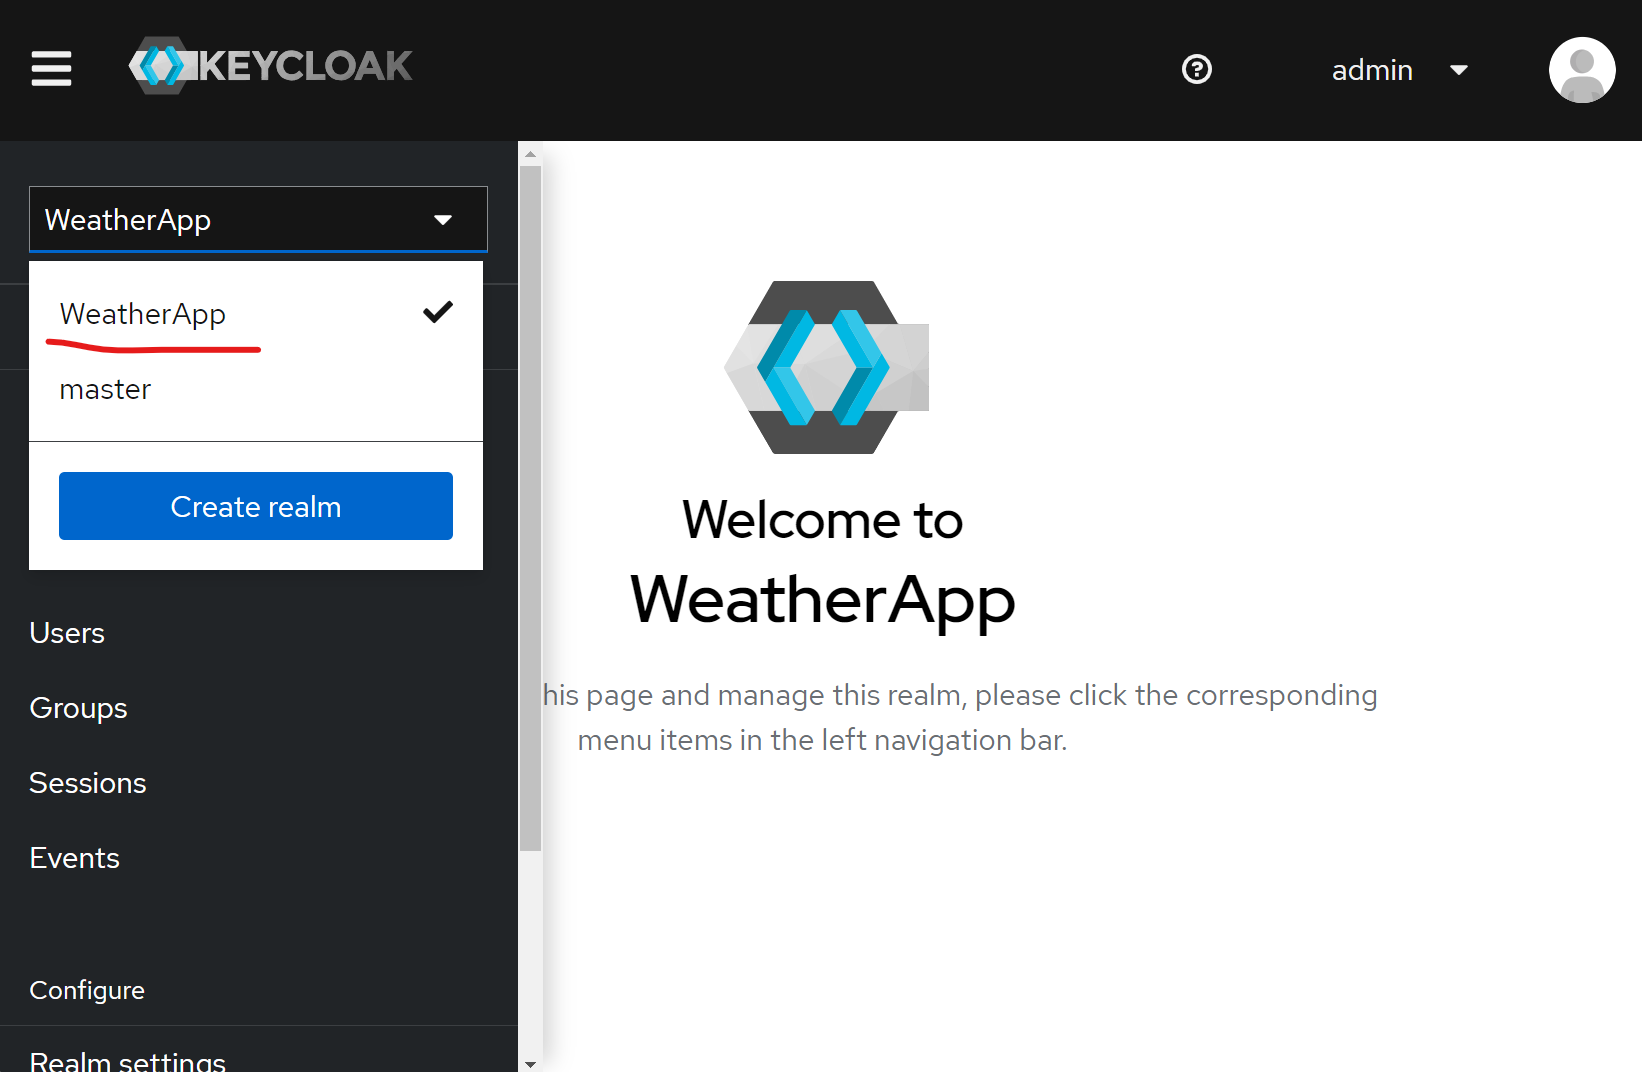
Once logged in, we can select the WeatherApp realm from the drop-down list in the top-left corner, as the following screenshot demonstrates:
If we then navigate the the Users section, we will be able to see a user with the test@example.com username:
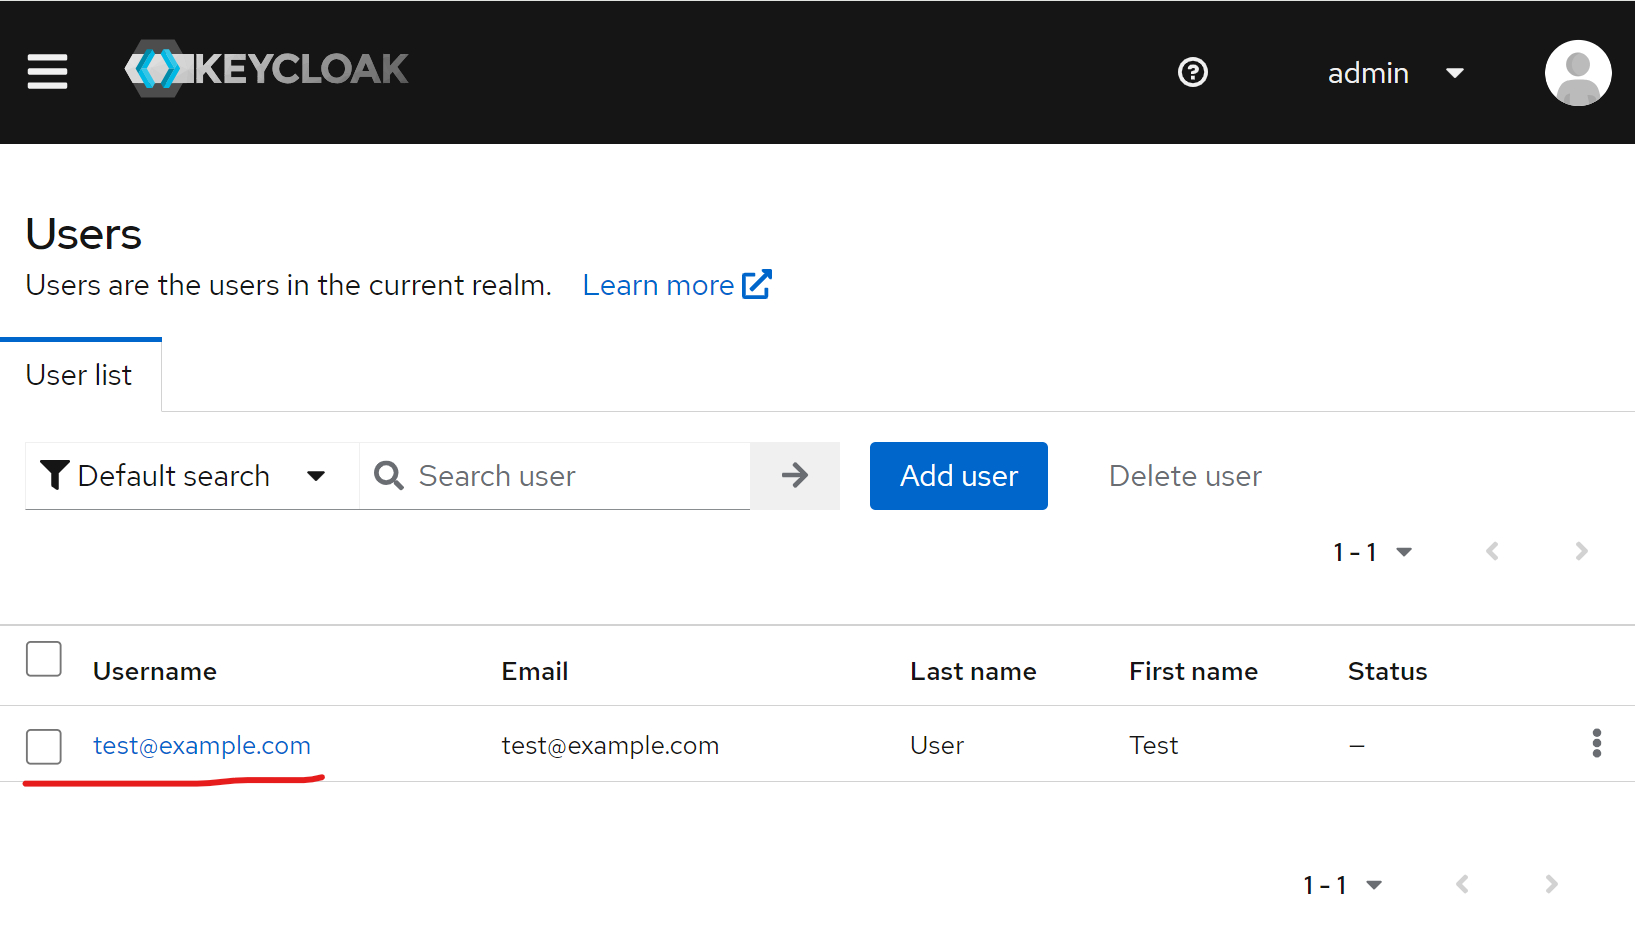
This is the user we can use to log into our Blazor front-end app. The password for the user is P@$$w0rd1.
If we navigate back to the Aspire dashboard and click on the endpoint address of the webfrontend app, we will be redirected to the Keycloak login page. This is where we can use the above username and password to log in. Upon successful login, we will be redirected back to the Blazor UI page.
We are now familiar with how our authentication works. Let’s now see the code that enables it.
Adding a Keycloak Container to Aspire Host
Our implementation of the Keycloak integration mechanism is based on the GitHub lab created by Damian Edwards. We start by putting a file with extension methods into the Extensions folder of the AspireApp.AppHost project. The file is called KeycloakHostingExtensions.cs. It contains the following internal class that represents an abstraction of a Keycloak container:
internal class KeycloakResource(string name) : ContainerResource(name), IResourceWithServiceDiscovery
{
    public string? ClientSecret { get; set; }
}
Please note that it inherits from the ContainerResource class, which is used as an abstraction for any Docker container resources. It also implements the IResourceWithServiceDiscovery interface, which forces it to use common methods used by Aspire-hosted services.
In the same file, we also have the KeycloakHostingExtensions class that contains various extension methods. The following method allows us to pass a service reference and the name of the environment variable that will contain the Keycloak client application secret:
public static IResourceBuilder<TResource> WithReference<TResource>(this IResourceBuilder<TResource> builder,
    IResourceBuilder<KeycloakResource> keycloakBuilder,
    string env)
    where TResource : IResourceWithEnvironment
{
    builder.WithReference(keycloakBuilder);
    builder.WithEnvironment(env, keycloakBuilder.Resource.ClientSecret);

    return builder;
}
Then, we have the following extension method that allows us to launch a Keycloak Docker container inside our app:
public static IResourceBuilder<KeycloakResource> AddKeycloakContainer(
    this IDistributedApplicationBuilder builder,
    string name,
    int? port = null,
    string? tag = null)
{
    var keycloakContainer = new KeycloakResource(name)
    {
        ClientSecret = "some_secret"
    };

    var keycloak = builder
        .AddResource(keycloakContainer)
        .WithAnnotation(new ContainerImageAnnotation
        {
            Registry = "quay.io",
            Image = "keycloak/keycloak",
            Tag = tag ?? "latest"
         })
        .WithHttpEndpoint(port: port, targetPort: DefaultContainerPort)
        .WithEnvironment("KEYCLOAK_ADMIN", "admin")
        .WithEnvironment("KEYCLOAK_ADMIN_PASSWORD", "admin")
        .WithEnvironment("WEBAPP_CLIENT_SECRET",
            keycloakContainer.ClientSecret);

    if (builder.ExecutionContext.IsRunMode)
    {
        keycloak.WithArgs("start-dev");
    }
    else
    {
        keycloak.WithArgs("start");
    }

    return keycloak;
}
There’s quite a lot to take in, so let’s go through the code step-by-step.
First, we are creating a new instance of the KeycloakResource class we created earlier. Because this class has a property that stores the client’s secret, this allows us to assign any arbitrary value to this property and pass it into both the client and the Keycloak configuration via environment variables.
Then, we register this instance via the AddResource() method. It’s similar to the AddProject() method we use to register .NET projects as applications hosted by .NET Aspire, but this method is more generic. It allows us to register any type of resource as a hosted service.
For containers, we could use RegisterContainer() instead, but it gives us less control of the process.
The next method, WithAnnotation(), is used for specifying the details of the Docker image we want to build the container from. Please note that specifying a tag is optional. However, it’s a good practice to use a specific version in the tag. Otherwise, the system will pull the latest version of the image with the latest tag. This version may contain some breaking changes that will make it incompatible with our application and such an issue may not be easy to debug.
Then, we set some environment variable values. In particular, we set the username and password of the admin account and the secret of a specific client app. Finally, we pass some command line arguments to the container launch command.
Our final extension method is as follows:
public static IResourceBuilder<KeycloakResource> ImportRealms(this IResourceBuilder<KeycloakResource> builder, string source)
{
    builder
        .WithBindMount(source, "/opt/keycloak/data/import")
        .WithAnnotation(new CommandLineArgsCallbackAnnotation(args =>
        {
            args.Clear();
            if (builder.ApplicationBuilder.ExecutionContext.IsRunMode)
            {
                args.Add("start-dev");
            }
            else
            {
                args.Add("start");
            }
            args.Add("--import-realm");
        }));

    return builder;
}
This method allows us to bind-mount a specific folder to the /opt/keycloak/data/import folder inside the Docker container. This is the directory where Keycloak looks during the initial launch. If it contains JSON files with exported realm information it will import those files and set up those realms. We also use it to demonstrate how bind mounts are set up in Aspire.
Now, we can see where these extension methods are used by opening the Program.cs file in the same project. This is how we create our IdP container:
var idp = builder.AddKeycloakContainer("idp", tag: "23.0")
    .ImportRealms("Keycloak")
    .WithExternalHttpEndpoints();
Please note that we have the ImportRealms() method pointing to the Keycloak folder. This folder contains the import.json file that contains all the realm information. We don’t need to go into details of how the content of this file is set up. However, what’s useful to know is that some values are hardcoded, while other values are extracted from environment variables that we saw being referenced before.
This is how we pass the container reference to our API app:
var apiService = builder
    .AddProject<Projects.AspireApp_ApiService>("apiservice")
    .WithReference(idp);
This is how we pass the container reference into our front-end app:
var webFrontend = builder.AddProject<Projects.AspireApp_Web>("webfrontend")
    .WithExternalHttpEndpoints()
    .WithReference(apiService)
    .WithReference(idp, env: "Identity__ClientSecret");
Please note that we are using the version of the WithReference() method that uses the client secret, as we need to set up this client secret in the UI app for the implementation of the OIDC flow.
Finally, we need to pass the endpoint URLs of the web front-end app into the Keycloak container and this is how we do it:
var webAppHttp = webFrontend.GetEndpoint("http");
var webAppHttps = webFrontend.GetEndpoint("https");

idp.WithEnvironment("WEBAPP_HTTP_CONTAINERHOST",
    webAppHttp);
idp.WithEnvironment("WEBAPP_HTTP",
    () => $"{webAppHttp.Scheme}://{webAppHttp.Host}:{webAppHttp.Port}");

if (webAppHttps.Exists)
{
    idp.WithEnvironment("WEBAPP_HTTP_CONTAINERHOST", webAppHttps);
    idp.WithEnvironment("WEBAPP_HTTPS",
        () => $"{webAppHttps.Scheme}://{webAppHttps.Host}:{webAppHttps.Port}");
}
else
{
    idp.WithEnvironment("WEBAPP_HTTP_CONTAINERHOST", webAppHttp);
    idp.WithEnvironment("WEBAPP_HTTP",
        () => $"{webAppHttp.Scheme}://{webAppHttp.Host}:{webAppHttp.Port}");
}
Now, let’s see how authentication and authorization are configured on the client app. We can use the same principles we described in the previous article. However, there are several different ways of configuring authentication. This time, we will connect to the IdP endpoint via an HttpClient instance that relies on .NET Aspire service discovery.
Configuring Web Front-End App
Keycloak realms become part of its URL. Therefore, if we want our OIDC-enabled applications to use well-known endpoints, we will need to first point at an appropriate real in the address path.
To do so, we added this helper method to the Extensions.cs file that can be found inside the shared AspireApp.ServiceDefaults project:
public static Uri GetIdpAuthorityUri(this HttpClient httpClient)
{
    var idpBaseUri = httpClient.BaseAddress
        ?? throw new InvalidOperationException(
            $"HttpClient instance does not have a BaseAddress configured.");
    return new Uri(idpBaseUri, "realms/WeatherApp/");
}
Here, we are appending the realms/WeatherApp/ path to the base URL that points to the Keycloak IdP. The realms part is a standard way to refer to the area containing different realms. WeatherApp is the name of our realm. Please note that it’s case-sensitive.
We then register our HttpClient instance in the Program.cs file of the AspireApp.Web project:
builder.Services.AddHttpClient(
    Constants.OidcBackchannel, o => o.BaseAddress = new("http://idp"));
Because we passed a reference of a service named idp into the API service, the idp path will allow us to resolve the endpoint address via the HttpClient.
Because we are using a registered HttpClient instance, we will need to resolve it via an implementation of the IHttpClientFactory. One way of resolving it is to use an extension method for our AuthenticationBuilder. We can find this method in the AuthExtensions.cs file in the AspireApp.Web project and it looks like this:
public static void ConfigureWebAppOpenIdConnect(this AuthenticationBuilder authentication)
{
    // Named options
    authentication.Services
        .AddOptions<OpenIdConnectOptions>(
            OpenIdConnectDefaults.AuthenticationScheme)
        .Configure<
            IConfiguration, IHttpClientFactory, IHostEnvironment>(Configure);

    // Unnamed options
    authentication.Services.AddOptions<OpenIdConnectOptions>()
        .Configure<IConfiguration, IHttpClientFactory, IHostEnvironment>(Configure);

    static void Configure(
        OpenIdConnectOptions options,
        IConfiguration configuration,
        IHttpClientFactory httpClientFactory,
        IHostEnvironment hostEnvironment)
    {
        var backchannelHttpClient =
            httpClientFactory.CreateClient(Constants.OidcBackchannel);

        options.Backchannel = backchannelHttpClient;
        options.Authority =
            backchannelHttpClient.GetIdpAuthorityUri().ToString();
        options.ClientId = "webapp";
        options.ClientSecret =
            Environment.GetEnvironmentVariable("Identity__ClientSecret");
        options.ResponseType = OpenIdConnectResponseType.Code;
        options.SaveTokens = true;
        options.RequireHttpsMetadata = !hostEnvironment.IsDevelopment();
        options.MapInboundClaims = false;
    }
}
We register the Configure() method and map it to the authentication options. Inside this method, we resolve a named HttpClient instance we registered previously by invoking the CreateClient() method on the IHttpClientFactory instance. We then pass this client to the Backchannel property of the authentication options. We also extract the base address from this client and construct the IdP authority URL that we pass to the Authority property.
Because we are using a backchannel, our authority URL doesn’t have to be the same as the publicly accessible address of the IdP. It can be the address that is used inside our internal network. This optimizes the usage of the network bandwidth and allows us to restrict public access to particular IdP endpoints.
If we go back to the Program.cs file, this is how we invoke this extension method:
builder.Services.AddAuthentication(options =>
{
    options.DefaultScheme =
        CookieAuthenticationDefaults.AuthenticationScheme;
    options.DefaultChallengeScheme =
        OpenIdConnectDefaults.AuthenticationScheme;
})
.AddCookie(CookieAuthenticationDefaults.AuthenticationScheme)
.AddOpenIdConnect()
.ConfigureWebAppOpenIdConnect();
Our OIDC setup is now complete. However, in our system, it’s not only the web front-end app that requires authentication. The API endpoint is protected too. So, let’s go ahead and ensure the API app has the right configuration.
Configuring API Service
Our AspireApp.ApiService project also has the AuthExtensions.cs file with the extension method for authentication configuration. Because we are relying on a Bearer token authentication rather than OICD, our settings are slightly different. However, similar principles apply. This is what the main extension method looks like:
public static void ConfigureApiJwt(this AuthenticationBuilder authentication)
{
    // Named options
    authentication.Services
        .AddOptions<JwtBearerOptions>(
           JwtBearerDefaults.AuthenticationScheme)
        .Configure<
            IConfiguration, IHttpClientFactory, IHostEnvironment>(Configure);

    // Unnamed options
    authentication.Services.AddOptions<JwtBearerOptions>()
        .Configure<
            IConfiguration, IHttpClientFactory, IHostEnvironment>(Configure);

    static void Configure(
        JwtBearerOptions options,
        IConfiguration configuration,
        IHttpClientFactory httpClientFactory,
        IHostEnvironment hostEnvironment)
    {
        var backchannelHttpClient =
            httpClientFactory.CreateClient(Constants.OidcBackchannel);

        options.Backchannel = backchannelHttpClient;
        options.Authority =
             backchannelHttpClient.GetIdpAuthorityUri().ToString();
        options.RequireHttpsMetadata = !hostEnvironment.IsDevelopment();
        options.MapInboundClaims = false;
        options.TokenValidationParameters = new TokenValidationParameters
        {
            ValidateAudience = false
        };
    }
}
As we can see, we are also using the HttpClient for the backchannel access of the IdP instance. We are still relying on the authority URL that contains the Keycloak realm information in the path.
This is how we invoke this extension method in the Program.cs file:
builder.Services.AddAuthentication(options =>
{
    options.DefaultAuthenticateScheme =
        JwtBearerDefaults.AuthenticationScheme;
    options.DefaultChallengeScheme =
        JwtBearerDefaults.AuthenticationScheme;

})
.AddJwtBearer()
.ConfigureApiJwt();
Our setup is not fully complete. But before we go, let’s briefly mention other ways services can be registered in .NET Aspire.
Other Service Types Aspire Can Host
As well as hosting internal Docker containers, Aspire can connect to Docker containers hosted externally. This is the API we can use to add an external container reference to the Aspire host:
IDistributedApplicationBuilder
    .AddExternalContainer(
        "<resource-name>", "<external-container-name-or-id>");
In this case, IDistributedApplicationBuilder is the type of the builder variable in the Program.cs file of the Aspire host project. For more details, you can refer to this great article written by Anthony Simmon.
Another way to host a service in .NET Aspire is to refer directly to an executable. This is the API for registering executables:
IDistributedApplicationBuilder.AddExecutable("<name>", "<command>", "working directory", "<params>");
Wrapping Up
After reading this article, you should have a fairly good understanding of how to work with Docker containers in .NET Aspire. However, we also covered other useful topics, such as working with Keycloak and using backchannels for connecting to an IdP.
Next time, we will talk about using relational databases in Aspire. You will learn how to do it via Aspire components.
P.S. If you want me to help you improve your software development skills, you can check out my courses and my books. You can also book me for one-on-one mentorship.