
If you publish a web application and make it publicly accessible, you will want to make sure only authorized users can access it, unless, of course, your application is just a trivial website.
Applications orchestrated by .NET Aspire are no exception. Because .NET Aspire is a platform for building complex distributed applications, chances are that you aren’t using it to build trivial websites. Therefore, knowing how to secure your orchestrated application is a must.
Of course, if you use an external authentication provider, like Google or Okta, you won’t have to do anything special in your Aspire setup. There will be a fixed endpoint outside of your system that you will need to connect and you will just need to apply appropriate configuration in an appropriate place.
However, not all application types can use an external provider. There are many situations where you would need to manage all the security internally. For example, in a certain industry, such as banking or defense, there may be a compliance requirement for you to do so.
If you want to use an internal authentication mechanism on .NET Aspire while taking advantage of all its features, such as service discovery, you will need to take particular steps. In this article, I will show you what these steps are.
Also, while using .NET Aspire, you will want to know how to secure your dashboard. After all, you don’t want to allow anyone to manage your applications and view their internal logs. There is a separate mechanism for securing the dashboard and this is what we will also cover today.
A Brief Introduction to Single Sign-on
Before we talk about how Aspire applications can be secured, let’s briefly talk about how single sign-on works.
Single sign-on (SSO) is a technology that allows the user to authenticate into the whole ecosystem of applications if he or she authenticated into one application. For example, if you logged into your Chrome browser via your Google account, you can reuse your credentials and log into any website that has the Sign in with Google option.
This mechanism is typically enabled by storing the users’ credentials in its own dedicated service known as Identity Provider (IdP). The services that require authentication for access can communicate with this service and verify that the user is indeed authenticated.
The process normally works as follows. Although it’s a very simplified description, it still gives a good high-level overview of the process.
- A user tries to access a secure resource while not being logged in.
- The application doesn’t detect any login information and redirects the user to the login page managed by the IdP.
- The user authenticates by entering the username and password (and, maybe, providing a single-use code from an authenticator app).
- Upon successful login, the user is redirected back to the original page, which is now accessible to the user.
- While the redirect happens, a special token is sent in the redirection request, containing details of the user and confirming that the user is authenticated.
- The token is stored in a temporary storage (such as a browser cookie) and, while the token is present, the user is authenticated and can access the page without having to log in.
- The token eventually expires and the user has to log in again. However, if the user keeps accessing the page before its expiry, the token keeps refreshing.
Several popular protocols enable this type of authentication. Perhaps, the most popular among them are OpenID Connect (OIDC) and OAuth. These two protocols work together.
The OIDC part is responsible for authentication, which is when the users prove that they are who they say they are by providing secret information only known to them, such as password and single-use code. The OAuth part is responsible for authorization, which is the mechanism that determines whether or not the user is allowed to access the resource they are trying to access. For example, certain pages may only be accessible to people with the admin role.
We don’t need to know in detail how either of these protocols works. A high level of understanding will be sufficient to be able to follow this tutorial on how to enable them in .NET Aspire.
Solution Setup
We have a sample solution available via the following link:
https://github.com/fiodarsazanavets/dotnet-aspire-examples/tree/main/AspireWithSso/AspireApp
This solution is based on the Aspire starter project with an authentication mechanism enabled. It consists of the following projects:
- AspireApp.AppHost is the Aspire host application
- AspireApp.Web is a web front-end application
- AspireApp.ApiService is a REST API application that the web front-end app retrieves its data from
- OpenIdConnectProvider is the IdP application that manages user credentials
If we launch the host application, we will see the following:

A service with the name identityprovider is our IdP.
If we try to navigate to the web front-end app, we will be redirected to a different page that looks like this:

We will not be able to access the web front-end until we register a user and log in as that user (which happens automatically when we register a new user). Once we’ve done this, we will be redirected back to the web front-end app and will be able to see its pages.
The REST API endpoint is also secured, but we don’t have to do anything special to access it. Once we log into the web front end, our credentials are reused when the web front end makes an HTTP request to the REST API.
Let’s now see how it’s all set up.
Using Service Discovery in Single Sign-on
To make SSO work via the OIDC, we will need to set up the following:
- The application that uses IdP for authentication needs to know a publicly accessible address of the IdP
- Each application that can redirect to the IdP login page needs to be registered with the IdP
- For each such application, the IdP needs to know the publicly accessible redirect address of the application
In .NET Aspire, we can apply a mechanism that allows us to resolve the addresses of the applications during the service registration. It’s not the same mechanism that the Aspire starter project uses for discovering API Service endpoints in the web front-end application.
Simply passing one service reference into another via the WithReference() method and using an address like https+http://apiservice won’t work. We need to do something different. We need to use the same fully qualified URLs of the services we would use in the browser.
If we open the Program.cs file in the AspireApp.AppHost project, we will see how these addresses are resolved. Firstly, we will register all our applications, which is done like this:
var identityProvider = builder
    .AddProject<Projects.OpenIdConnectProvider>("identityprovider")
    .WithExternalHttpEndpoints();

var apiService = builder
    .AddProject<Projects.AspireApp_ApiService>("apiservice");

var webFrontend = builder
    .AddProject<Projects.AspireApp_Web>("webfrontend")
    .WithExternalHttpEndpoints()
    .WithReference(apiService);
Please note that both identityprovider and webfrontend apps are registered with the use of the WithExternalHttpEndpoints() method. This is because we will need to have both these applications accessible by the user, while the apiservice app can remain accessible via the internal Aspire network only.
We don’t have to expose it to an external network, such as the public internet. This is a good security practice. We are only giving the application as little exposure as absolutely necessary, which minimizes its surface area for a potential attack.
The next thing we do is extract both secure HTTPS and insecure HTTP endpoints from the web front-end app:
var webAppHttp = webFrontend.GetEndpoint("http");
var webAppHttps = webFrontend.GetEndpoint("https");
Then, we do the following:
if (webAppHttps.Exists)
{
    identityProvider.WithEnvironment("WEBAPP_HTTP",
        () => $"{webAppHttps.Scheme}://{webAppHttps.Host}:{webAppHttps.Port}");
}
else
{
    identityProvider.WithEnvironment("WEBAPP_HTTP",
        () => $"{webAppHttp.Scheme}://{webAppHttp.Host}:{webAppHttp.Port}");
}
Here, we check if the HTTPS endpoint exists. If so, we assign the URL extracted from this endpoint to the WEBAPP_HTTP environment variable. If this endpoint doesn’t exist, then we pass the URL of the unsecured HTTP endpoint instead.
In a real production environment, we will not be able to use unsecured HTTP endpoint for authentication. But it’s acceptable in a development environment.
Also, the environmental variable name is completely arbitrary. We just need a mechanism to pass the value to the service. Using an environmental variable is a convenient way of doing so because this value will then be accessible to any code in this service. The name of the variable just needs to be something that will make sense to us.
Next, we extract the endpoint of the IdP service:
var idpAppHttp = identityProvider.GetEndpoint("http");
var idpAppHttps = identityProvider.GetEndpoint("https");
We then pass the URL to the IDP_HTTP environment variable in both the web front-end and the API services:
if (idpAppHttps.Exists)
{
    webFrontend.WithEnvironment("IDP_HTTP",
        () => $"{idpAppHttps.Scheme}://{idpAppHttps.Host}:{idpAppHttps.Port}");
    apiService.WithEnvironment("IDP_HTTP",
        () => $"{idpAppHttps.Scheme}://{idpAppHttps.Host}:{idpAppHttps.Port}");
}
else
{
    webFrontend.WithEnvironment("IDP_HTTP",
        () => $"{idpAppHttp.Scheme}://{idpAppHttp.Host}:{idpAppHttp.Port}");
    apiService.WithEnvironment("IDP_HTTP",
        () => $"{idpAppHttp.Scheme}://{idpAppHttp.Host}:{idpAppHttp.Port}");
}
Now, the URL of the web front-end can be accessed from the IdP service. The URL of the IdP service can be accessed by both the web front-end and the API. We just need to configure all these services to enable the authentication mechanism and enforce the authentication.
Enforcing UI Authentication
In the AspireApp.Web project, authentication is configured via the Microsoft.AspNetCore.Authentication.OpenIdConnect NuGet package, which is the standard NuGet package provided by Microsoft for enabling OIDC authentication in ASP.NET Core applications.
If we open the Program.cs file, this is how authentication is configured:
builder.Services.AddAuthentication(options =>
{
    options.DefaultScheme =
        CookieAuthenticationDefaults.AuthenticationScheme;
    options.DefaultChallengeScheme =
        OpenIdConnectDefaults.AuthenticationScheme;
})
.AddCookie(CookieAuthenticationDefaults.AuthenticationScheme)
.AddOpenIdConnect(OpenIdConnectDefaults.AuthenticationScheme, options =>
{
    options.SignInScheme = "Cookies";
    options.Authority = Environment.GetEnvironmentVariable("IDP_HTTP");
    options.ClientId = "aspNetCoreAuth";
    options.ClientSecret = "some_secret";
    options.ResponseType = "code";
    options.UsePkce = true;
    options.SaveTokens = true;
    options.CallbackPath = "/signin-oidc";
    options.SignedOutCallbackPath = "/signout-callback-oidc";
    options.RequireHttpsMetadata = false;
    options.GetClaimsFromUserInfoEndpoint = true;
});
Here is a brief explanation of what this code does. If you are already familiar with OIDC, you can skip this part to the next section.
builder.Services.AddAuthentication()
This method adds authentication services to the dependency injection container. It configures the authentication options that the application will use.
options.DefaultScheme and options.DefaultChallengeScheme
DefaultScheme is set to the cookie authentication scheme, meaning that cookies will be used to store authentication information.
DefaultChallengeScheme is set to the OIDC scheme. This tells the application to use OIDC to challenge (redirect) unauthenticated users when they attempt to access a protected resource.
AddCookie()
This method adds the cookie authentication scheme to the authentication services. The scheme name is defined by CookieAuthenticationDefaults.AuthenticationScheme, which is a constant with the value of “Cookies”. This scheme will be responsible for managing and validating authentication cookies.
AddOpenIdConnect()
This method adds the OIDC authentication scheme. It configures various options for how the application will interact with an OIDC identity provider (IdP).
options.SignInScheme
Specifies that the authentication result from OIDC should be stored using the cookie authentication scheme. This essentially ties the OIDC login flow to cookie-based authentication.
options.Authority
options.Authority sets the authority (issuer) URL of the identity provider (IdP). The value is retrieved from an environment variable IDP_HTTP. This is the environment variable we previously set in the startup code of the Aspire host application.
options.ClientId and options.ClientSecret
ClientId and ClientSecret are used to identify the application when communicating with the OIDC provider. These values should be registered with the IdP and used to authenticate the application, as we will see later.
options.ResponseType
Specifies the response type as “code”, meaning the application will use the authorization code flow, a secure way to obtain an access token via a server-side exchange of a code for tokens.
options.UsePkce
Enables Proof Key for Code Exchange (PKCE), an additional layer of security for the authorization code flow, making it more secure, especially for public clients.
options.SaveTokenn
Instructs the application to save the tokens (such as the access token, refresh token, and ID token) received from the IdP. These tokens can be used for subsequent requests or access to user information.
options.CallbackPath
Specifies the callback path that the IdP will redirect to after the user has authenticated. This is the endpoint in the application that will handle the OIDC response.
options.SignedOutCallbackPath
Specifies the path to handle sign-out callbacks from the IdP. After signing out, the IdP can redirect to this path to confirm that the sign-out process is complete.
options.RequireHttpsMetadata
Setting this to false allows the application to accept non-HTTPS metadata endpoints, which might be useful for development but not recommended in production.
options.GetClaimsFromUserInfoEndpoint
Instructs the application to retrieve additional claims (user information) from the UserInfo endpoint after authentication. This can provide more detailed user information than what is available in the ID token alone.
Once we configured our authentication mechanism, we will need to add it to the middleware via the following:
app.UseAuthentication();
app.UseAuthorization();

app.MapBlazorHub().RequireAuthorization();
Finally, we will add the following Razor attribute to all our Razor pages, which can be found in the Pages folder inside the Components folder:
@attribute [Authorize]
This attribute ensures that only authenticated users can access this page. If a user tries to access any page marked with this attribute without being logged in, the user will be redirected to the login page provided by the IdP. The address of the IdP is found via the Authority setting configured earlier and the authentication middleware handles the whole process automatically. Therefore, we don’t have to write any code to redirect the user to the login page.
Enforcing API Authentication
Next, we will enforce authentication in the AspireApp.ApiService app. Because it’s an API app without a user interface, we use a different way to authenticate the request. The client that calls the API must already be authenticated and it needs to pass a valid JSON Web Token (JWT) in the header of the HTTP request. To handle this, the NuGet package we would use is Microsoft.AspNetCore.Authentication.JwtBearer.
In our Program.cs file, we can find the following configuration:
builder.Services.AddAuthentication(options =>
{
    options.DefaultAuthenticateScheme =
        JwtBearerDefaults.AuthenticationScheme;
    options.DefaultChallengeScheme =
        JwtBearerDefaults.AuthenticationScheme;

}).AddJwtBearer(options =>
{
    options.Authority = Environment.GetEnvironmentVariable(
        "IDP_HTTP");
    options.RequireHttpsMetadata = false;
    options.TokenValidationParameters = new TokenValidationParameters
    {
        ValidateAudience = false
    };
});
This is similar to what we have seen before, but it’s simpler. We use a different authentication scheme because there is no redirect to the IdP login page. We still use the same IdP address as the Authority setting. This is still required because the API, upon receiving the authentication token, will send a request to the IdP to check whether the token is valid.
A different setting that we have here is ValidateAudience option in TokenValidationParameters. Because the original token would have been issued to the calling client rather than the API application, the token will have the Audience (aud) field set to the address of the calling client, which will be different from the address of the API. This is why we don’t validate it.
In this case, we will also need to add the following invocation to register the authorization components:
builder.Services.AddAuthorization();
We then add authentication and authorization steps to the middleware:
app.UseAuthentication();
app.UseAuthorization();
Finally, we append the RequireAuthorization() invocation to our endpoint:
app.MapGet("/weatherforecast", () =>
{
    var forecast = Enumerable.Range(1, 5).Select(index =>
        new WeatherForecast
        (
            DateOnly.FromDateTime(DateTime.Now.AddDays(index)),
            Random.Shared.Next(-20, 55),
            summaries[Random.Shared.Next(summaries.Length)]
        ))
        .ToArray();
    return forecast;
}).RequireAuthorization();
This will now prevent any clients from being able to invoke this endpoint if no valid JWT was supplied in the request.
Now, let’s see how JWT is passed to the API.
Passing JWT To API
If we go back to the AspireApp.Web project, we can find a class there called WeatherApiClient. This is the class that makes an HTTP request to the API. Inside its GetWeatherAsync() method, we can find the following code:
var accessToken = await accessor
    .HttpContext?.GetTokenAsync("access_token");

httpClient.DefaultRequestHeaders.Authorization =
        new AuthenticationHeaderValue("Bearer", accessToken);
First, we extract the access token from the HTTP context. The token will only be there if the user has successfully logged in. Because we already enforced authentication on all pages, this code will not be invoked if the user isn’t logged in.
Then, we pass this token into the Authorization header of the request. This is the so-called bearer token. This is why we specify the authorization type as Bearer.
There are several ways we can extract the token we can pass to the API. The method we used relies on an object of the IHttpContextAccessor type that we inject into the constructor of the class. The following code in the Program.cs file registers this dependency:
builder.Services.AddHttpContextAccessor();
Now, let’s look at how our IdP is configured.
Configuring Identity Provider
Our IdP application is represented by the OpenIdConnectProvider project.
For this example, we used a simple IdP that stores all of its data in an SQLite database. It’s not the type of an IdP we would use in production, but it’s good enough for demonstration purposes. We have built our OIDC-compliant IdP by using the OpenIddict NuGet packages.
While this IdP is relatively simple, its source code would still require multiple articles to fully explain. Therefore, we will only focus on the important parts.
In the DataSeed folder of the project, we can locate the InitialDataSeed class that will populate the IdP database with the initial data. The following code is used to register our web front-end client application if it hasn’t been registered already:
if (await manager.FindByClientIdAsync(
    "aspNetCoreAuth", cancellationToken) == null)
{
    await manager.CreateAsync(new OpenIddictApplicationDescriptor
    {
        ClientId = "aspNetCoreAuth",
        ClientSecret = "some_secret",
        ConsentType = ConsentTypes.Explicit,
        DisplayName = "Blazor WebAssembly client application",
        RedirectUris =
        {
            new Uri(Environment.GetEnvironmentVariable(
                "WEBAPP_HTTP") + "/signin-oidc")
        },
        PostLogoutRedirectUris =
        {
            new Uri(Environment.GetEnvironmentVariable(
                "WEBAPP_HTTP") + "/signout-callback-oidc")
        },
        Permissions =
        {
            Permissions.Endpoints.Authorization,
            Permissions.Endpoints.Logout,
            Permissions.Endpoints.Token,
            Permissions.GrantTypes.AuthorizationCode,
            Permissions.ResponseTypes.Code,
            Permissions.Scopes.Email,
            Permissions.Scopes.Profile,
            Permissions.Scopes.Roles
        },
        Requirements =
        {
            Requirements.Features.ProofKeyForCodeExchange
        }
    }, cancellationToken);
}
Please note that the client id and the client secret match what we have defined in the web front-end application. The redirect URLs are extracted from the WEBAPP_HTTP environment variable we passed into this application during the Aspire host startup. This environment variable contains the base URL of the web front-end app. We are extracting this base URL and appending a fully qualified path to it to point it at the special redirect and pos log-out redirect endpoints configured in the OIDC middleware of the web front-end application.
Once we configured the basic client app information, we define the full set of permissions the app can take advantage of. Now, our web front-end is registered as one of the client apps in the IdP and we can start using the authentication mechanism.
Securing Aspire Dashboard
So far, we learned how to secure distributed applications hosted by Aspire. However, as you can imagine, being able to secure the Aspire dashboard is just as important. Fortunetely, it’s not very difficult.
There are many ways Aspire dashboards can be secured. This is done inside the following section in the appsettings.json file:
{
  "Dashboard": {
    "Frontend": {
      "AuthMode": "<Define authentication mode>"
    }
  }
}
The AuthMode setting in the Frontend section of the Dashboard block allows us to define what kind of authentication mechanism we can use. There will be additional settings we can define under the Frontend section depending on what authentication mode we specified. For example, if we specify OpenIdConnect as our AuthMode, we will be able to define OIDC settings similar to what we specified in the web front-end client before.
Note: If you choose to secure the Aspire dashboard via OIDC, you should probably use IdP that is hosted outside of Aspire. Otherwise, you will not be able to log into your dashboard if the IdP is down.
if you want to completely disable the security, you can set the AuthMode to Unsecured. You should never do it outside of a development environment.
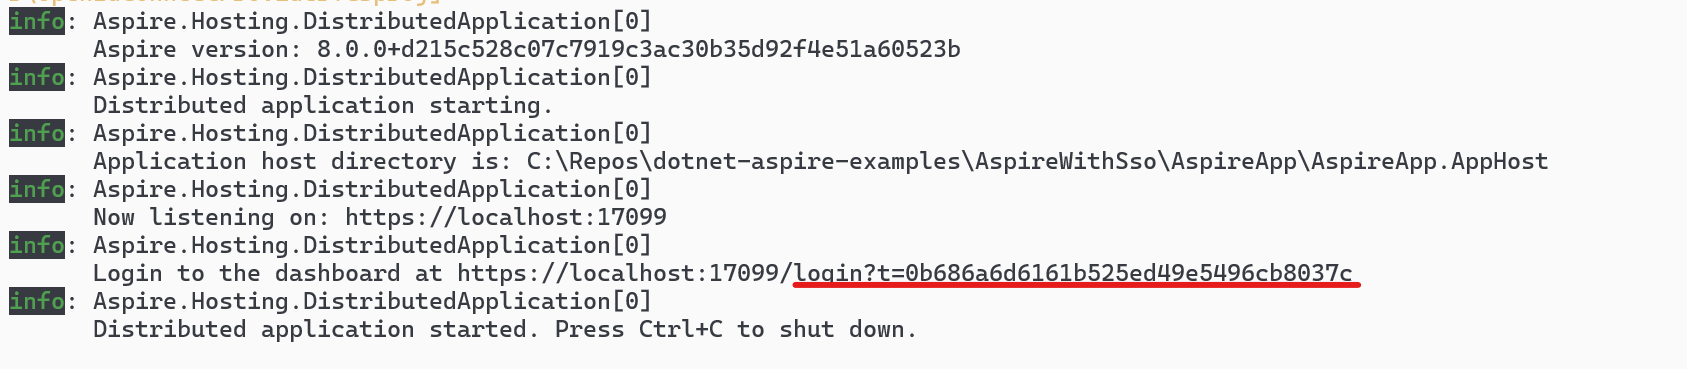
By default, the BrowserToken option is used as the AuthMode. This means that, unless you launch your host app from Visual Studio or a similar environment, you will have to provide a special token in the request to access it. For example, if you launch the application by simply executing the dotnet run CLI command and then navigate to its base URL, you will be presented with the following dialog:
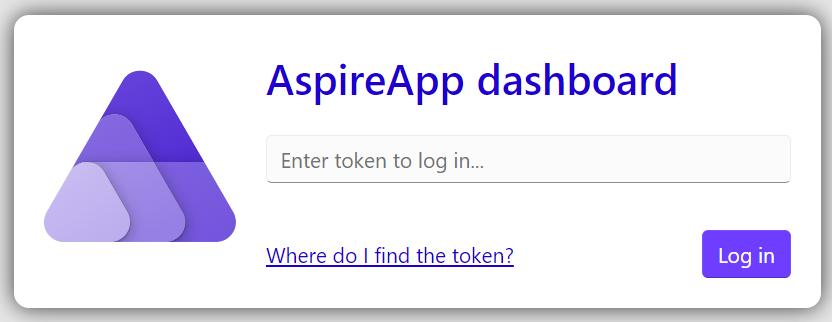
The token can be obtained from the console that’s running the app. This is where you can find it:
For all the options you can use to secure the Aspire dashboard, you can have a look at the following documentation:
Learning More About Security
In this article, we only covered authentication at a very high level. If you want to learn more about how OIDC and OAuth work and how to use them in an ASP.NET Core application, you can enroll in this fully interactive course for free.
Another good news is that the platform that hosts this course, Educative, contains a very large library of all sorts of programming courses. A small monthly subscription fee will give you unlimited access to all these courses. While the subscription is already cheap, enrolling via this link will give you a further discount, so don’t miss this opportunity!
Wrapping Up
Today, we covered how we can use Aspire’s service discovery feature to secure our hosted applications by using an internally hosted identity provider. Next time, we will talk about how to do it with Keycloak, which is a proper IdP that is popular in the industry.
In our setup, Keycloak will be hosted inside a Docker container. So, not only we will continue our conversation about security, but we will also learn how to host containers in an Aspire app.
P.S. If you want me to help you improve your software development skills, you can check out my courses and my books. You can also book me for one-on-one mentorship.


