This article is a chapter from the book SignalR on .NET 6 – the Complete Guide
In the previous chapter, we have covered the basic of using in-browser clients to connect to a SignalR hub. Even though these clients are suitable to cover a wide range of SignalR use cases, they aren’t sufficient to cover them all. Not all of your clients will be running in the browser. And not all your clients will be a part of the same web application.
In this chapter, we will cover external SignalR clients. All of these can be set up from a stand-alone application of any type. The SignalR client can be set up in some background service running on an IoT device. Or it can be in the back-end of a mobile app.
The chapter consists of the following topics:
- Setting up .NET client
- Setting up Java client
- Setting up a raw WebSocket client
By the end of this chapter, you will have learned how to use officially supported SignalR clients in stand-alone application. But, on top of this, you will have learned how to get a bare WebSocket to communicate with a SignalR server. This knowledge will give you the ability to write your own SignalR client in any language that isn’t officially supported.
Prerequisites
This chapter assumes that you already have set up your development environment, as described in chapter 1. You will need the following:
- A machine with either Windows, Mac OS or Linux operating system
- A suitable IDE or code editor (Visual Studio, JetBrains Rider or VS Code)
- .NET 6 SDK (or newer)
Also, since we are continuing to build on top of the application that we have developed in the previous chapter, we need the code that we have written previously. If you have skipped the previous chapter, you can access the complete code from the following location in the GitHub repository:
The complete code samples from this chapter are available from the following location in the GitHub repo, which has separate folders corresponding to individual parts of the chapter:
https://github.com/fiodarsazanavets/SignalR-on-.NET-6—the-complete-guide/tree/main/Chapter-04
Setting up .NET client
In chapter 3, we have already set up .NET SignalR client inside of a Blazor WebAssembly application. The process that we will go through now will be similar. For example, we will rely on the same NuGet package. But this time, we will set the client up inside a stand-alone console application.
Setting up .NET console app as a SignalR client
The first thing that we will need to do is to create our console application. Because this would be a stand-alone application without any dependencies shared with the other projects in your solution, it’s up to you whether you create it inside the solution folder and add it to the solution. Keeping the new project inside the solution may make it easier to manage, but it isn’t strictly necessary.
Once you have selected the folder that you will create the console application in, execute the following command inside that folder to instantiate the project:
dotnet new console -o DotnetClient
Now, we will need to add a SignalR NuGet package to it. To do it, open your command line terminal inside the project folder and execute the following command:
dotnet add package Microsoft.AspNetCore.SignalR.Client
Next, we will apply some SignalR client logic to our `Program.cs` file inside of the project. To do so, we will delete all existing content from this file. Then, we will add the following statement to reference the namespace of SignalR client library:
using Microsoft.AspNetCore.SignalR.Client;
Next, we will add a prompt for the full SignalR hub URL and will create a hubConnection object based on it:
Console.WriteLine("Please specify the URL of SignalR Hub");

var url = Console.ReadLine();

var hubConnection = new HubConnectionBuilder()
                         .WithUrl(url)
                         .Build();
Next, we will map ReceiveMessage event to the hubConnection object. Every time the server-side hub would trigger this event, the message sent from the server would be written in the console:
hubConnection.On<string>("ReceiveMessage",
    message => Console.WriteLine($"SignalR Hub Message: {message}"));
After this, we will add a loop that will allow us to carry on using the client until we explicitly type `exit`. Every message that we type will be sent as a parameter to BroadcastMessage method on the SignalR hub:
try
{
    await hubConnection.StartAsync();

    while (true)
    {
        var message = string.Empty;

        Console.WriteLine("Please specify the action:");
        Console.WriteLine("0 - broadcast to all");
        Console.WriteLine("exit - Exit the program");

        var action = Console.ReadLine();

        Console.WriteLine("Please specify the message:");
        message = Console.ReadLine();

        if (action == "exit")
            break;

        await hubConnection.SendAsync("BroadcastMessage", message);
    }
}
catch (Exception ex)
{
    Console.WriteLine(ex.Message);
    Console.WriteLine("Press any key to exit...");
    Console.ReadKey();
    return;
}
The above code consist of our SignalR logic and basic error handling, which is always a good idea to do to prevent our application from crashing unexpectedly.
Now, we can launch our application and see it in action.
Testing our .NET client
First, we will need to launch our SignalR server application. We can do so by executing dotnet run command from SignalRServer project folder. Then, once the application is up and running, we can launch the SignalR client console application by executing dotnet run command from DotnetClient project folder.
When we are prompted to enter the SignalR hub URL, we can enter the URL listed in applicationUrl section of launchSettings.josn file of SignalRServer project followed by /learningHub. So, for example, if your base application URL is https://localhost:7128, then the URL you need to enter is https://localhost:7128/learningHub.
For the testing purposes, we may want to open the home page of our web application to get JavaScript client running in the browser. Because both applications have been set up to broadcast message to all connected SignalR clients, what you will see is that whenever you enter a message in your console application, in-browser application will receive it. Likewise, if you send a message from your in-browser application, your console application will receive it. This can be seen on the following screenshot:
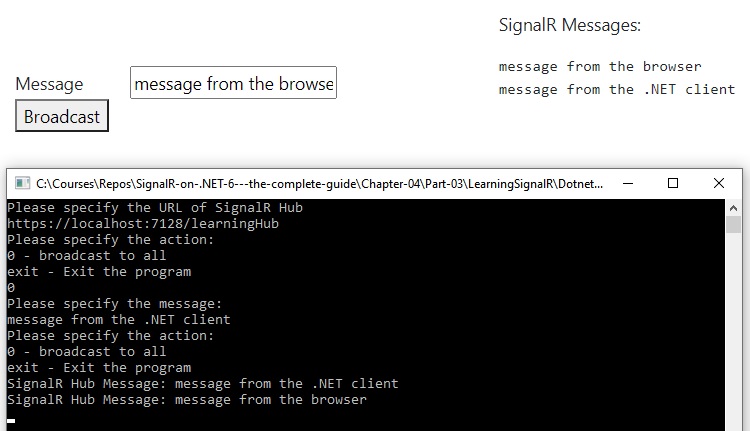
And this demonstrates the basics of running SignalR client inside a stand-alone .NET application. Next, we will cover another supported client type – Java client. If you are not a Java developer and you never intend to build a Java client, you can skip this section. But because Java is a widely used and universal language, this information will still be useful.
Setting up Java client
Just like .NET 6, Java is a universal language that can be used on any of the popular operating systems. To use it, you will first need to install Java SDK. There are multiple ways you can do it. But if you already have .NET environment set up, perhaps the easiest way to do it is to download it via VS Code extension pack. Although there are several Java IDEs, VS Code is more than adequate as a code editor.
Once you have installed Java SDK, you will need to install one of its build tools. The most popular of these are Gradle and Maven. They work differently, but the outcome will be roughly the same. You will end up with the same Java code. And you will be able to compile and run your application either way.
We will be using Maven package repository to download our SignalR client library from. But Gradle can access it too. So it doesn’t matter which build tool you use. It’s outside the scope of this book to provide a detailed instruction on how to install and use either Gradle or Maven. But referenced to detailed user manuals are available in the further reading section of this chapter.
Setting up Java project
Once you have your build tool set up, we need to instantiate a Java project. This process will be different depending on whether you are using Gradle or Maven.
Generating a project template with Gradle
If you are using Gradle, you need to run the following command inside any folder of your choice:
gradle init
Then, you will be asked to provide various parameters to your project. You can select anything for most of the options (or just use defaults), but do make sure that the language that you have selected is Java and the project type is application. With these options selected, it will instantiate your project with some code already being inside.
The SignalR package will work with other languages, such as Kotlin. After all, it’s a JVM language, just like Java. But since Java has been out there for much longer, this is the language that you will see the samples in.
Generating a project template with Maven
With Maven, you need to generate a project from a so-called archetype. It’s equivalent to .NET project template. And perhaps one of the simplest archetypes is `maven-archetype-quickstart`. To generate a project from it, you can use the following command:
mvn archetype:generate -DarchetypeGroupId=org.apache.maven.archetypes -DarchetypeArtifactId=maven-archetype-quickstart -DarchetypeVersion=1.4
Whether you have used Gradle or Maven, you should now have a folder structure that contains App.java file in it with main method. This is equivalent to Program.cs in C#. And this is the file we will be adding SignalR client to. But first we will need to add a reference to a relevant dependency.
Adding SignalR client Java dependency
You will first need to visit the following page and verify what is the latest version of SignalR package is:
https://search.maven.org/artifact/com.microsoft.signalr/signalr
Then you will need to click on that version number to open the page, which will provide you dependency insertion syntax for various build manager types. For example, assuming that the latest version of the version package is 6.0.0, this is the markup you will need to insert into the dependencies section of the pom.xml file if you are using Maven:
<dependency>
  <groupId>com.microsoft.signalr</groupId>
  <artifactId>signalr</artifactId>
  <version>6.0.0</version>
</dependency>
This would be the entry you would need to insert into `dependencies` section of `gradle.build` file if you have used Groovy DSL during project setup:
implementation 'com.microsoft.signalr:signalr:6.0.0'
This would be the entry you would need to insert into dependencies section of gradle.build.kts file if you have used Kotlin DSL during project setup:
implementation("com.microsoft.signalr:signalr:6.0.0")
And there are quite a few other options, as Maven and Gradle are far from being the only build tools for Java.
Once you have added the dependencies, you may want to remove the default tests (if you have any), as those would cause the build to break after you’ve changed the content of App.java file. And now we are ready to start modifying the code.
Adding SignalR client code to Java application
We will open our App.java file and ensure that we have all of the following import statements in it:
import com.microsoft.signalr.HubConnection;
import com.microsoft.signalr.HubConnectionBuilder;
import java.util.Scanner;
We will then need to ensure that the signature of the main method looks like follows:
public static void main(String[] args) throws Exception {
Inside this method, we prompt the user to enter the URL of the SignalR hub:
System.out.println("Please specify the URL of SignalR Hub");
Scanner reader = new Scanner(System.in);
String input = reader.nextLine();
We can’t read textual input from the console directly, like we can in C#. Therefore we are using Scanner class for it. Then we build our hubConection object and map a ReceiveMessage event to it:
HubConnection hubConnection = HubConnectionBuilder.create(input)
        .build();

hubConnection.on("ReceiveMessage", (message) -> {
    System.out.println(message);
}, String.class);
Then we start the connection and getting the application to send any messages that we type to BroadcastMessage method on the SignalR hub. At any point, we can type exit and this will stop the connection:
hubConnection.start().blockingAwait();

while (!input.equals("exit")){
    input = reader.nextLine();
    hubConnection.send("BroadcastMessage", input);
    }

hubConnection.stop();
reader object (which is an instance of Scanner) that we have created earlier just keeps reading the messages from the console. And this completes the setup of our Java application. We can now launch it to see it in action.
Launching Java SignalR client
To launch our SignalRServer application, all we have to do is execute dotnet run command from its project folder. But with a Java application, building and launching it will depend on the build manager that you use. It could be as simple as executing gradle run command. But it could be more complicated if you use any other build tools. So please check the documentation of your build tool for the exact command that you need to execute.
Another caveat is that, depending on configuration, Java HTTP client may not work with development HTTPS certificate. If this is the case, then the easiest way to resolve it is to remove the HTTPS URL from applicationUrl entry of launchSetting.json file of your SignalRServer application.
Once you launch the application, you can verify that it can send and receive messages. The following screenshot shows an example of the application that was set up with Kotlin DSL on Gradle. The launch command was gradle run -q –console=plain, which makes it run as a plain console.
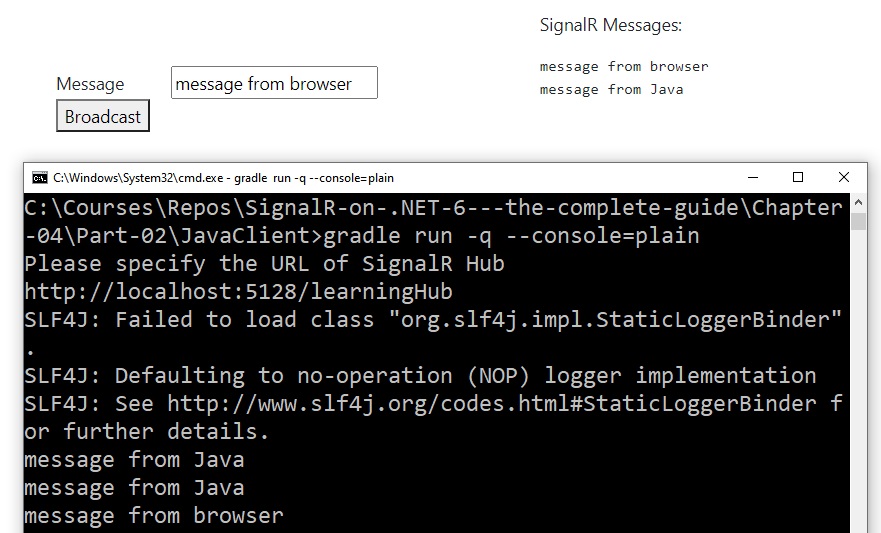
You can safely ignore any errors related to slf4j. These errors simply mean that no default logging provider was found. You will need to enable an additional third-party package to make these errors disappear.
And this concludes our overview of Java client, which, at the time of writing, is the only client that is supported outside of .NET. But the good news is that SignalR supports raw WebSockets too, which can be written in any language. And this is what we will have a look at next.
Setting up a raw WebSocket client
We have now covered all SignalR client types that Microsoft officially supports. But what if the technology you want to use is not on the list? Also, what if there is no way to actually write a SignalR client and you need to connect an existing WebSocket client to it?
Well, the good news is that you can connect a raw WebSocket to SignalR hub. And once it is connected, you can easily see the structure of the messages that are being exchanged. This will allow you to write your own SignalR client implementation in any language of your choice, as WebSocket is a standard protocol which you can write code for in any language. But today we will focus on .NET implementation of it.
Setting up WebSocket client
We will create another project and call it WebSocketClient. You may choose to include this project in an existing solution. But you don’t have to, as it will not share any direct dependencies with any of the projects inside your solution.
The project will be based on .NET Console Application template. To initiate the project, execute the following command in a folder of your choice:
dotnet new console -o WebSocketClient
You won’t need to add any external dependencies to the project at all. WebSocket library is already included in .NET System library.
The first thing we will need to do in the new project is delete all existing content from the Program.cs file. Then, we will add references to WebSocket and text processing namespaces. To do so, add the following using statements:
using System.Net.WebSockets;
using System.Text;
Next, we will add some code to prompt the user to enter WS protocol URL pointing at the SignalR hub endpoint:
Console.WriteLine("Please specify the URL of SignalR Hub with WS/WSS protocol");
var url = Console.ReadLine();
WebSocket uses WS instead of HTTP in the URLs (and WSS instead of HTTPS). But otherwise, it uses the same TCP/IP protocol as HTTP. Therefore you will be able to point it at the same addresses and ports. So, your SignalR hub endpoint URL will hardly change. Instead of being https://{base URL}/learningHub, it will become wss://{base URL}/learningHub.
Next, we will connect our WebSocket and send the initial request to SignalR hub. Our request is nothing more than a handshake in JSON format that SignalR hub expects. It defines the protocol and the version.
try
{
    var ws = new ClientWebSocket();

    await ws.ConnectAsync(new Uri(url), CancellationToken.None);

    var handshake = new List<byte>(Encoding.UTF8.GetBytes(@"{""protocol"":""json"", ""version"":1}"))
                {
                    0x1e
                };

    await ws.SendAsync(new ArraySegment<byte>(handshake.ToArray()), WebSocketMessageType.Text, true, CancellationToken.None);

    Console.WriteLine("WebSockets connection established");
    await ReceiveAsync(ws);
}
catch (Exception ex)
{
    Console.WriteLine(ex.Message);
    Console.WriteLine("Press any key to exit...");
    Console.ReadKey();
    return;
}
As you can see, we cannot just send human-readable text over WebSocket. We need to convert it to bytes. So, as this example clearly shows, SignalR makes your job much easier compared to raw WebSocket programming.
The last statement that we have entered inside the try block is a call to ReceiveAsync method. We will add this method now:
static async Task ReceiveAsync(ClientWebSocket ws)
{
    var buffer = new byte[4096];

    try
    {
        while (true)
        {
            var result = await ws.ReceiveAsync(new ArraySegment<byte>(buffer), CancellationToken.None);
            if (result.MessageType == WebSocketMessageType.Close)
            {
                await ws.CloseOutputAsync(WebSocketCloseStatus.NormalClosure, string.Empty, CancellationToken.None);
                break;
            }
            else
            {
                Console.WriteLine(Encoding.Default.GetString(Decode(buffer)));
                buffer = new byte[4096];
            }
        }
    }
    catch (Exception ex)
    {
        Console.WriteLine(ex.Message);
        Console.WriteLine("Press any key to exit...");
        Console.ReadKey();
        return;
    }
}
In this method, we are using a byte buffer of a fixed size. We then just carry on listening on WebSocket connection, while populating this buffer with bytes that we receive from it. Every time we receive some data, we reset the buffer and start again. We do this until WebSocket gets closed by the server.
Before we can actually convert bytes to human-readable message, we use Decode method. And this is what this method consists of:
static byte[] Decode(byte[] packet)
{
    var i = packet.Length - 1;
    while (i >= 0 && packet[i] == 0)
    {
        --i;
    }

    var temp = new byte[i + 1];
    Array.Copy(packet, temp, i + 1);
    return temp;
}
This method is necessary, because we use buffer of a fixed size, which will inevitably contain empty bytes. If we just attempt to convert it into text as is, the empty bytes will be converted too. There is actually a textual symbol that represents them. And this would make our message less readable. To prevent this from happening, we are removing all empty bytes from our message before we process it.
And this concludes the basic setup of WebSocket client. Even though we have only added the most basic WebSocket functionality, the code that we have written is already fairly complicated. This is why you shouldn’t use raw WebSocket client unless you absolutely have to. Because SignalR exists, writing raw WebAssembly is almost like writing a web application in Assembler.
Now, we can launch our WebSocket application and see it in action.
Launching WebSocket client
We will now launch our SignalRServer project by executing dotnet run command in the project directory. Then we will execute the same command inside WebSocketClient project directory.
When our WebSocket client application launches, it will ask us to provide the URL to the SignalR endpoint. But remember that we are dealing with WebSocket protocol here and not with HTTP. Therefore, although we can use our original Hub URL, we will need to replace https prefix with wss (or, if you are using http URL, replace it with ws).
We don’t have any listeners in the WeBSocket client. But we still receive the messages. And, if the connection was successful, what you will notice right away is that we have received an empty object from the server. This was a normal part of the handshake.
But interesting things will start to happen when we start broadcasting messages from the home page of our SignalR Server application. Our WebSocket client will pick them up, but it won’t be just the content of the message itself. It will come as a JSON with some other fields, like it can be seen from the following screenshot:
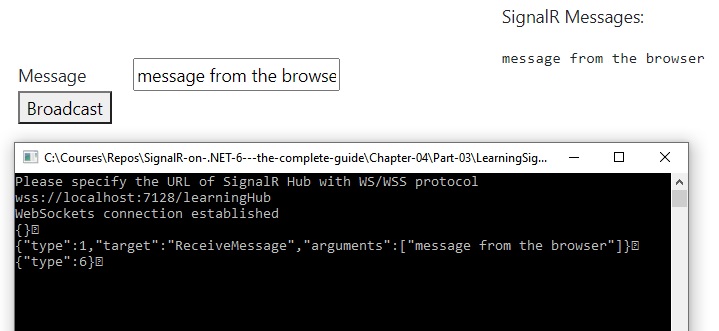
In this JSON object, we have type field, which is set to 1. Then we have target field, which is set to the name of the event handler. And then we have arguments field, containing a collection of parameters. And this is how SignalR middleware knows what events to trigger and what parameters to apply. It’s a simple format. And if you get familiar with it, you will be able to write your own SignalR client implementation in any language of your choice.
But another interesting thing happens when you leave the application running for a while. You will start occasionally receiving a JSON message that has nothing in it except type field with the value of 6. Well, this is a heartbeat message. And its purpose is to ensure that the connection is still operational. type field tells the system what kind of message it is. It’s 1 for a standard message and 6 for heartbeat. There are some more values, but you will need to study the code of the library to learn them. After all, it’s open source and publicly available.
And this completes our overview of SignalR clients. Let’s summarize what we have learned.
Summary
In this chapter, you have learned how to set up a SignalR client inside a stand-alone .NET application. To do so, you will need to install a NuGet package with the SignalR client library. It’s the same process for all .NET client types, including Blazor WebAssembly or a mobile app.
We have covered how to set up a Java client. To do so, you will need to install SignalR client package from Maven central package repository. Once done, you will be able to set up SignalR hub connection in any type of Java application back-end.
Finally, we have covered the use of raw WebSocket as a SignalR client. Even though we only had a look at .NET example, the overall principles of WebSocket programming will be the same in any language. And, as we so, SignalR messages are nothing more than nicely formatted JSON, we can use WebSocket programming to write a client library for it in any language that isn’t officially supported.
In the next chapter, we will start adding some complexity to our SignalR clients. You will learn how to group clients together and how to send messages from the server-side hub to specific clients and not just broadcast them to all.
Test yourself
- Which SignalR client types are officially supported?
A. JavaScript
B. .NET
C. Java
D. All of the above - What data can you read from SignalR messages if you connect a raw WebSocket to it?
A. You cannot, as all data in encrypted
B. Only the name of event handlers
C. Message type, the name of the event handlers and full message payload
D. Detailed message metadata, including the headers - If you write a SignalR client in Java, which type of build tool can you use?
A. Gradle
B. Maven
C. Neither of the above
D. Both of the above
Further reading
Official documentation of SignalR Java client: https://docs.microsoft.com/en-us/aspnet/core/signalr/java-client
Java client API references: https://docs.microsoft.com/en-us/java/api/com.microsoft.signalr
Gradle user manual: https://docs.gradle.org/current/userguide/userguide.html
Maven documentation: https://maven.apache.org/guides/
.NET WebSocket programming: https://docs.microsoft.com/en-us/aspnet/core/fundamentals/websockets