When you work with distributed applications, you will almost certainly encounter the need to use distributed caching and locking at some point. In this article, you will learn how to apply both of these mechanisms in .NET Aspire.
The content of this article is taken from my book, .NET Aspire Made Easy, which is available in early access. The book is almost completed with 11 chapters out of 15 published. Also, while it’s in early access, it’s available for a very low price. So, if you want to gain a good understanding of .NET Aspire and learn some information about it that isn’t easily available online, check it out.
Let’s go back to the subject of hosting distributed Redis cache in .NET Aspire. Let’s start by going through a quick recap of what distributed caching and locking are.
Overview of Distributed Cache and Lock
Distributed caching is a mechanism for storing frequently accessed data in a shared, high-performance data store that spans multiple servers or nodes. This type of caching is typically used to improve application performance and scalability in distributed systems.
When we use cache, we store data in random-access memory (RAM) rather than a disk. Reading data from RAM is much faster than interacting with storage disks; therefore caches significantly improve application performance, which is especially important while dealing with large volumes of data.
When we use a tool like Redis, the same cache can be shared between separate applications and even separate physical machines. If one application populates the cache, other applications can access it too. This is why such a cache is referred to as distributed.
Distributed locking is a technique used to manage concurrent access to shared resources in a distributed system. It ensures that only one process (or thread) can access a resource at a time, preventing race conditions and ensuring consistency.
Distributed lock uses a distributed cache. It’s just a special data structure within the cache that is used for locking. Again, because it’s distributed, it can be used to lock resources not only for separate threads within the same applications but also for completely separate applications.
Sample Project
To demonstrate how both these mechanisms can be applied in applications hosted by .NET Aspire, we will use the following setup:
This solution represents a simplified e-commerce app that allows the shop admins to manage product information and prices. It consists of the following projects:
- EcommercePlatform.AppHost: Aspire host application.
- EcommercePlatform.ServiceDefaults: The shared components.
- EcommercePlatform.ApiService: The API back-end for data management.
- EcommercePlatform.Web: The front end of the product management system.
Next, we will add the necessary dependencies to the Aspire host to make it host a Redis component.
Installing a Redis Component
Redis component is installed by adding the following NuGet package to the Aspire host application:
Aspire.Hosting.Redis
It’s the same package we used in one of the previous articles to demonstrate the output caching. The component will contain a Redis instance, just like we did before. Only that we will be using it for a different purpose.
The code inside our Program.cs file will look as follows:
var builder =
   DistributedApplication.CreateBuilder(args);

var cache = builder.AddRedis("cache")
   .WithRedisCommander();

var apiService = builder
   .AddProject<Projects.EcommercePlatform_ApiService>(
      "apiservice")
   .WithReference(cache);

builder.AddProject<Projects.EcommercePlatform_Web>(
   "webfrontend")
   .WithExternalHttpEndpoints()
   .WithReference(apiService);

builder.Build().Run();
We are creating a Redis component instance and passing its reference to the API application. However, please note the invocation of WithRedisCommander(). This call will create an instance of another container with the service called Redis Commander. We will be able to use this service from the Aspire dashboard to manage data inside Redis directly via the browser. We will cover this later.
Next, we will go to the API application and install the Redis client that will allow us to do distributed caching.
Installing Redis Client For Distributed Caching
The NuGet package we will need to install to enable distributed caching in Redis is as follows:
Aspire.StackExchange.Redis.DistributedCaching
Then, we will have the following invocation inside the Program.cs file to instantiate the Redis cache client and make it connect to the Redis container hosted by Aspire:
builder.AddRedisDistributedCache(connectionName: "cache");
Please note that the connectionName parameter matches the name of the Redis resource we registered in the Aspire host. In our example, it’s cache.
Inside the shared class library project, EcommercePlatform.ServiceDefaults, we will create a Product record, which will represent a single product entity:
namespace EcommercePlatform.ServiceDefaults.Dtos;

public record Product(
   int Id,
   string Name,
   decimal Price);
After this, we will go back to the Program.cs file of the API application and create the following list of products. It will mimic a database table:
List<Product> products = new()
{
   new(1, "Mouse", 9.99M),
   new(2, "Keyboard", 15.99M),
   new(3, "Printer", 199.99M),
   new(4, "PC Monitor", 399.99M),
   new(5, "Laptop Computer", 899.99M),
   new(6, "Gaming PC", 1699.99M),
};
The next step would be to add an endpoint that returns all products. It will look as follows:
app.MapGet("/api/products/", () =>
{
   return Results.Ok(products);
});
We now have a basic application setup. Next, we will add the distributed cache.
Using a Distributed Cache
We will add the following endpoint that will return a single product to the calling client:
app.MapGet("/api/products/{productId}",
   async (int productId, IDistributedCache cache) =>
{
   if (!products.Any(p => p.Id == productId))
   {
       return Results.NotFound(
           $"Product {productId} not found");
   }

   string cacheKey = $"Product_{productId}";
   string? cachedProduct =
       await cache.GetStringAsync(cacheKey);

   if (cachedProduct is not null)
   {
       return Results.Ok(
           JsonSerializer.Deserialize<Product>(
               cachedProduct));
   }

   // Simulate a database call
   Product product =
       await GetProductFromDatabaseAsync(productId);
   string serializedProduct =
       JsonSerializer.Serialize(product);

   // Store product in Redis with a 5-minute expiration
   await cache.SetStringAsync(
       cacheKey,
       serializedProduct,
       new DistributedCacheEntryOptions
       {
           AbsoluteExpirationRelativeToNow =
               TimeSpan.FromMinutes(5)
       });

   return Results.Ok(product);
});
Here, we are injecting an object of the type IDistributedCache, which we registered when we invoked the AddRedisDistributedCache() method on the application builder. Here, we use two methods of this object:
GetStringAsync(), which attempts to pull a value from the cache via the key that contains the product id. If there is no item in the cache that matches this key, it returns null.SetStringAsync(), which adds an item to the cache and assigns a key to it.
So, here’s what’s happening in this method:
- A request comes to retrieve a product based on its id.
- We check the cache and there is no information on it.
- We pull the product information from the database, which can be potentially slow.
- The product data is serialized as a JSON string and is placed into the cache.
- When the next request comes, we retrieve the product information from the cache right away.
This endpoint method simulates a slow database call by invoking the following method:
async Task<Product> GetProductFromDatabaseAsync(
  int productId)
{
   // Simulate database access
   await Task.Delay(2000); // Simulated delay
   return products.Single(p => p.Id == productId);
}
Please note that it takes two seconds to retrieve the product directly from the database. While this is a simulated delay, it was inserted to demonstrate why we may need to use a cache. Retrieving data from the cache is much faster than retrieving data from a database.
Also, we can scale out the API application (i.e. run multiple instances of it to manage a large volume of requests) and we will still be able to take full advantage of the caching mechanism, regardless of which specific instance of the service is hit by the request.
Using a Distributed Lock
In our example, distributed locking is used to make sure nothing interferes with a product update while it is in progress. If one thread is doing an update, no other threads (or services) will even attempt to do it until the update has been completed.
To demonstrate how this works, we will add the following endpoint method to the Program.cs file of the API application:
app.MapPut("/api/products/{productId}",
   async (int productId,
       Product updatedProduct,
       IDistributedCache cache,
       IConnectionMultiplexer redis) =>
{
   if (!products.Any(p => p.Id == productId))
   {
       return Results.NotFound(
           $"Product {productId} not found");
   }

   string lockKey = $"ProductLock_{productId}";
   var db = redis.GetDatabase();

   bool lockAcquired =
       await db.LockTakeAsync(
           lockKey,
           Environment.MachineName,
           TimeSpan.FromSeconds(10));

   if (!lockAcquired)
   {
      // Locked by another process
       return Results.StatusCode(423);
   }

   try
   {
       // Perform the update (e.g., database update)
       await UpdateProductInDatabaseAsync(
           productId, updatedProduct);

       // Invalidate the cache
       string cacheKey = $"Product_{productId}";
       await cache.RemoveAsync(cacheKey);

       return Results.NoContent();
   }
   finally
   {
       // Release the lock
       await db.LockReleaseAsync(
           lockKey, Environment.MachineName);
   }
});
Here, as well as injecting an instance of the IDistributedCache type, we are also injecting an instance of the IConnectionMultiplexer type, which is registered in the same way and is also related to the same Redis connection. To use the lock, we will need to invoke the GetDatabase() method on this newly added object to create an abstraction of the Redis database.
We are using the following code on this database object to attempt to acquire the lock:
bool lockAcquired =
    await db.LockTakeAsync(
        lockKey,
        Environment.MachineName,
        TimeSpan.FromSeconds(10));
The LockTakeAsync() method will create a lock in a Redis database. We are using three parameters, which are the following:
- The lock key, which can be any string. We just need to make sure it’s tied to the entity we want to lock. In our example, it contains the specific product id.
- The lock value. This can be anything.
- The lock expiry time. It’s needed in case the application that can remove the lock fails. Expiry time prevents the resource from being locked indefinitely.
This method returns a Boolean value. It will return true if the lock was placed successfully. This will only happen if there isn’t another lock in place with the same key. If the lock already exists, it will return false. In our example, if the lock is in place while we attempt to apply the lock, we exit early and return the 423 HTTP status code to the client, which is the status code being used to indicate that the requested resource is locked.
To remove the lock, we use the LockReleaseAsync() method on the Redis database object. We use it inside the finally block to make sure we release the lock regardless of whether the update operation succeeds or fails.
Please also note the RemoveAsync() method on the cache object which is being invoked once the update operation is completed. This method removed the entry with the specific key from the cache.
Because the data for a product has changed, any existing data we store for this product in the cache will no longer be relevant. This is why we are invalidating the cache by removing the entry from it.
Below, we have a simulated database call that updates the product:
async Task UpdateProductInDatabaseAsync(
   int productId, Product updatedProduct)
{
   await Task.Delay(2000);
   var oldProduct =
       products.Single(
           p => p.Id == productId);

   products.Remove(oldProduct);
   products.Add(updatedProduct);
   products = products
       .OrderBy(p => p.Id).ToList();
}
Please note that we have an artificial delay of two seconds that allows us to observe how distributed lock works.
Next, we will apply some changes to the front-end application that allows us to call the API endpoints.
Calling the API
If we open our front end project, we will see the ProductsApiClient class, wich acts as the client that makes the HTTP requests to the REST API. It consists of the following code:
using EcommercePlatform.ServiceDefaults.Dtos;

namespace EcommercePlatform.Web;

public class ProductsApiClient(
   HttpClient httpClient)
{
   public async Task<Product[]>
       GetProductsAsync(
           int maxItems = 10,
           CancellationToken cancellationToken = default)
   {
       List<Product>? products = null;

       await foreach (var product in
           httpClient.GetFromJsonAsAsyncEnumerable<Product>(
               "/api/products", cancellationToken))
       {
           if (products?.Count >= maxItems)
           {
               break;
           }
           if (product is not null)
           {
               products ??= [];
               products.Add(product);
           }
       }

       return products?.ToArray() ?? [];
   }

   public async Task<Product?> GetProductAsync(
       int productId,
       CancellationToken cancellationToken = default)
   {
       return await httpClient
           .GetFromJsonAsync<Product>(
               $"/api/products/{productId}",
               cancellationToken);
   }

   public async Task<HttpResponseMessage>
       UpdateProduct(
           int productId,Product product)
   {
       return await httpClient
           .PutAsJsonAsync(
               $"/api/products/{productId}",
               product);
   }
}
The homepage of the application consists of the following Razor code:
@page "/"
@using EcommercePlatform.ServiceDefaults.Dtos
@attribute [StreamRendering(true)]
@attribute [OutputCache(Duration = 5)]

@inject ProductsApiClient ProductsApi

<PageTitle>Products</PageTitle>

<h1>Products</h1>

<p>Here is the full list of products available.</p>

@if (products == null)
{
   <p><em>Loading...</em></p>
}
else
{
   <table class="table">
       <thead>
           <tr>
               <th>Id</th>
               <th>Name</th>
               <th>Price ($)</th>
           </tr>
       </thead>
       <tbody>
           @foreach (var product in products)
           {
               <tr>
                   <td>@product.Id</td>
                   <td>
                       <a href=
                           "/update-product/@product.Id">
                           @product.Name</a>
                   </td>
                   <td>@product.Price</td>
               </tr>
           }
       </tbody>
   </table>
}

@code {
   private Product[]? products;

   protected override async Task
       OnInitializedAsync()
   {
       products = await ProductsApi
           .GetProductsAsync();
   }
}
We also have the UpdateProduct Razor view. This view is opened when one of the product rows on the homepage is clicked. The role of this view is to load the details of an individual product, which the user can then update. This is what the view consists of:
@page "/update-product/{ProductId:int}"
@rendermode InteractiveServer

@using System.Net.Http.Json
@using EcommercePlatform.ServiceDefaults.Dtos

@inject ProductsApiClient ProductsApi
@inject NavigationManager Navigation

<h3>Update Product</h3>

@if (IsLoading)
{
   <p>Loading product details...</p>
}
else if (ErrorMessage != null)
{
   <p style="color:red">@ErrorMessage</p>
}
else
{
   <div class="
       card shadow-sm p-4 mb-4 bg-white rounded">
       <div class="card-body">
           <form>
               <div class="mb-3">
                   <label for="productName"
                       class="form-label">
                       Product Name</label>
                   <input type="text"
                       id="productName"
                       class="form-control"
                       @bind="ProductName"
                       placeholder="Enter product name" />
               </div>

               <div class="mb-3">
                   <label for="productPrice"
                       class="form-label">Price</label>
                   <input type="number"
                       id="productPrice"
                       class="form-control"
                       @bind="ProductPrice" step="0.01"
                       placeholder="Enter price" />
               </div>

               <button
                   type="button"
                   class="btn btn-primary"
                   @onclick="UpdateDetails">
                   Update Product</button>
           </form>
       </div>
   </div>

   @if (UpdateMessage != null)
   {
       <div class="
           alert alert-success mt-3" role="alert">
           @UpdateMessage
       </div>
   }
}
The code section of this view looks as follows:
@code {
   [Parameter]
   public int ProductId { get; set; }

   private string ProductName { get; set; }
   private decimal ProductPrice { get; set; }
   private string UpdateMessage { get; set; }
   private string ErrorMessage { get; set; }
   private bool IsLoading { get; set; } = true;

   protected override async Task OnInitializedAsync()
   {
       await LoadProduct();
   }

   private async Task LoadProduct()
   {
       try
       {
           var product =
               await ProductsApi
                   .GetProductAsync(ProductId);

           if (product is not null)
           {
               ProductName = product.Name;
               ProductPrice = product.Price;
           }
           else
           {
               ErrorMessage = "Product not found.";
           }
       }
       catch (Exception ex)
       {
           ErrorMessage =
               $"Error loading product: {ex.Message}";
       }
       finally
       {
           IsLoading = false;
       }
   }

   private async Task UpdateDetails()
   {
       if (string.IsNullOrWhiteSpace(ProductName)
           || ProductPrice <= 0)
       {
           UpdateMessage =
               "Please enter valid product details.";
           return;
       }

       var updatedProduct =
           new Product(
               ProductId,
               ProductName,
               ProductPrice);

       var response =
           await ProductsApi
               .UpdateProduct(
                   ProductId,
                   updatedProduct);

       if (response.IsSuccessStatusCode)
       {
           Navigation.NavigateTo("/");
       }
       else if (response.StatusCode ==
           System.Net.HttpStatusCode.Locked)
       {
           UpdateMessage =
               "Resource is locked by another process.";
       }
       else
       {
           UpdateMessage =
               $"Error updating product: {response.ReasonPhrase}";
       }
   }
}
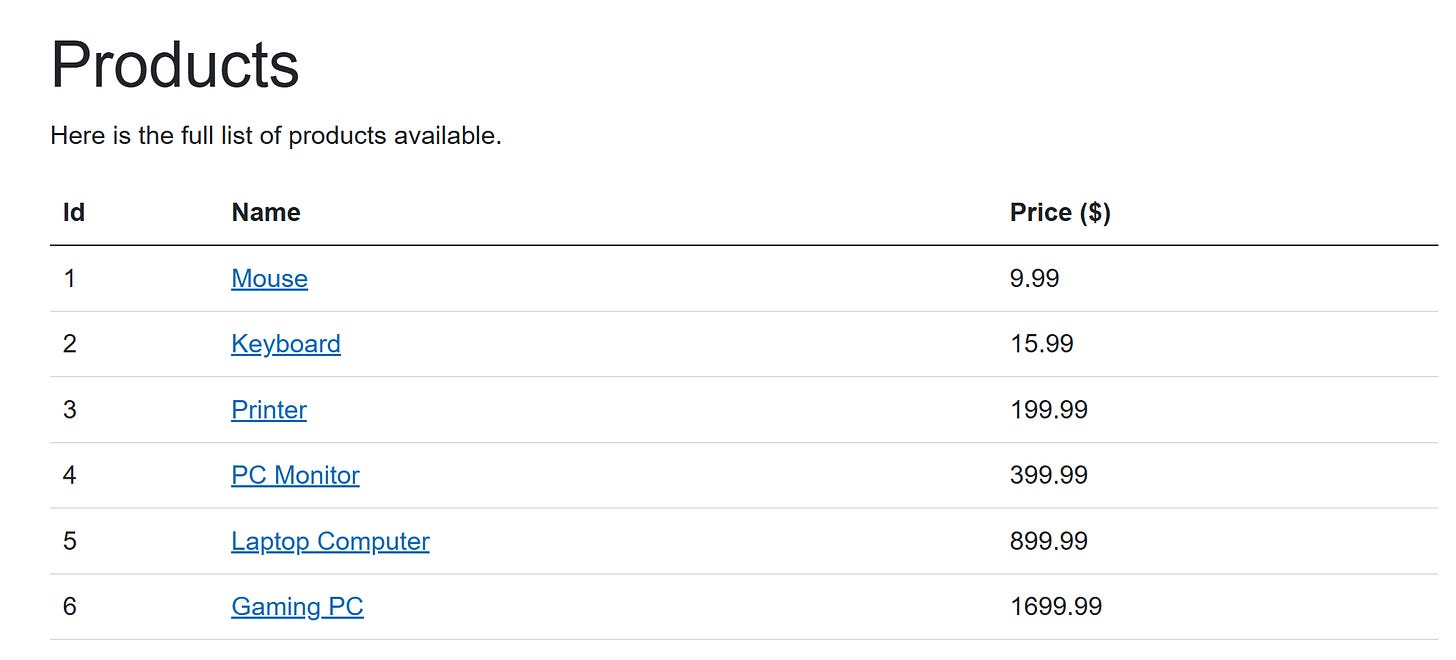
Our application is now completed. We can launch it and navigate to the homepage of the web front-end application. It will show us the product list extracted from the API. It should look similar to the screenshot below:

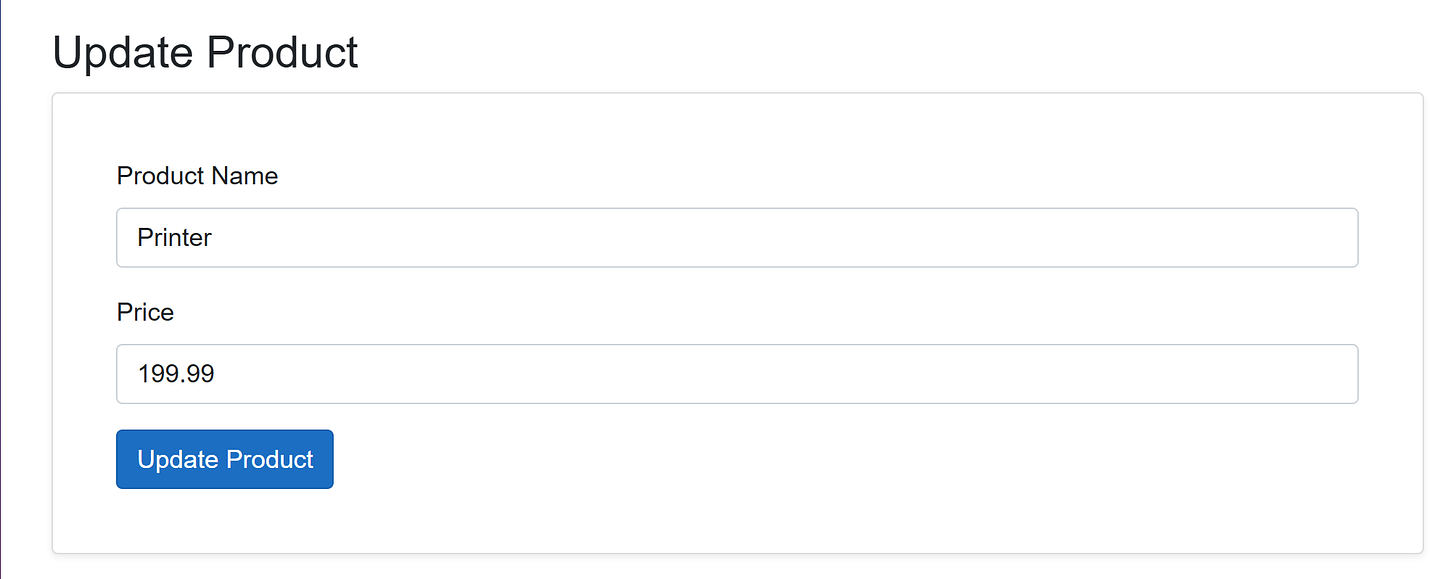
Then, if we select any of the products, it will open its details page, as shown below:

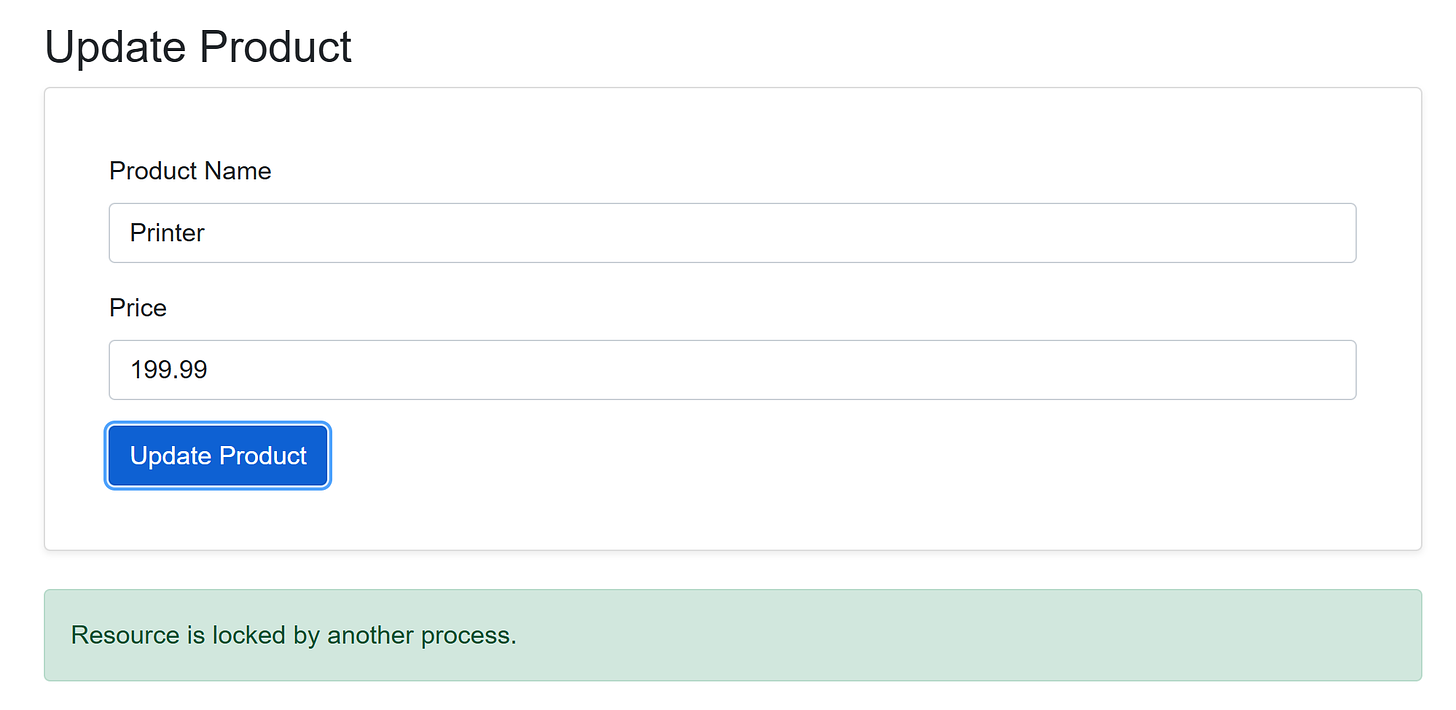
We can modify the product details and click the update button. The update process may take some time, as there is a delay. While we are waiting for the update to occur, we should receive the Resource is locked by another process error message, as shown below:

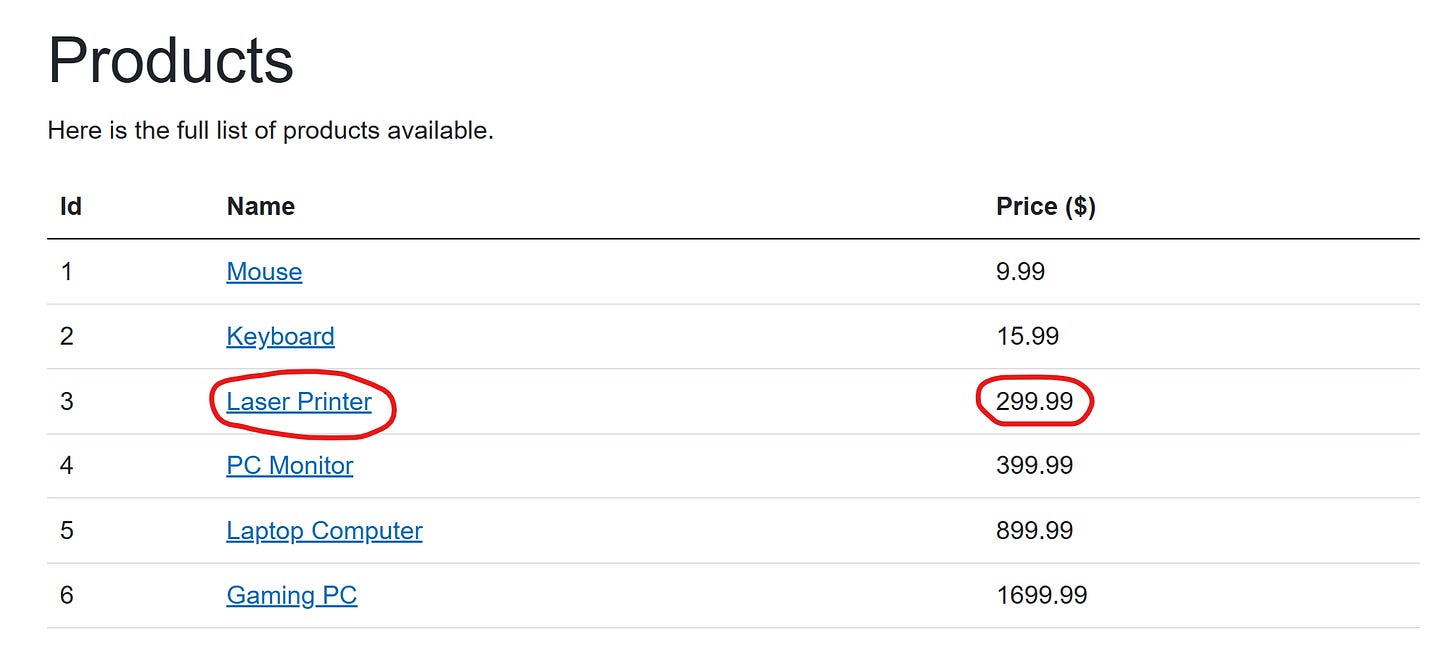
Once the update eventually completes, we will be redirected to the homepage, which will show the updated product data:

Another thing we can now try is to navigate to the details page of the same products twice. We should see that it will take some time to open the page the first time you do it and virtually no time at all when you do it the second time. This is because we simulate a slow database query when we do it for the first time while we are retrieving it from the fast Redis cache the second time.
Wrapping Up
Today, we looked at using distributed Redis cache and locks in applications hosted in .NET Aspire. Next time, we will dive into the IoT space and discuss how SignalR can be used for coordinating clusters of IoT devices.
In the meantime, if you want to learn more about .NET Aspire, including expanded information on distributed caching, you may find my book useful.
P.S. If you want me to help you improve your software development skills, you can check out my courses and my books. You can also book me for one-on-one mentorship.


