Before the code your wrote can go out of the door and get released, it needs to be sufficiently tested. And unit tests are something that will validate that the smallest atomic units of your code work correctly.
Of course, unit tests are limited in their scope, but they are extremely important nonetheless. It’s almost impossible to write a good quality code in a complex application without them.
In this article, you will find out what unit tests are and why they are crucial for keeping the quality of your code high. The examples will be shown in C#, but the fundamental concepts will be equally applicable to other languages from C family, such as Java, JavaScript and C++.
The purpose of unit tests
For those who aren’t yet familiar with what unit tests are, they are special methods in the code that exist solely to test the behavior of individual methods in the actual working code.
Unit tests are only ever applicable to the smallest atomic working units of your code – the methods that are accessible to other classes. This is what the scope of the unit tests is limited to. So, if you write your automated test in such a way that it ends up testing several components of the system or even the whole system, you have not written a valid unit test.
Essentially, the scope of a unit test will be limited to only two things:
- Validate that the code inside a particular method produces expected outputs for specific inputs.
- Validate that the code inside the particular method calls specific methods on specific low-level dependencies a specific number of times.
That’s all there is to it. For example, testing that the behavior of the code inside the method of a low-level dependency is not responsibility of a unit test. You can choose to make these validations as vague or as thorough as appropriate in any given situation. But if your unit test is validating something other than the things listed, it’s not really a unit test.
Because of their limited scope, unit tests never get executed on the actual deployed software. Instead, they are performed on the code that has been built into a library. So, the process of unit testing usually happens inside a CI/CD pipeline as soon as the code is built but well before it is deployed.
One important thing about unit tests to remember is that they are always located in modules separate from the code itself, so you don’t ship them with your code. In .NET code, for example, it will be an entirely different project.
What unit tests consist of

In most programming languages, the fundamental component of unit test is an assertion statement.
Assertion statement is a statement that compares one of the output value against the expected value. If the output value is what is expected, then the assertion statement will pass. If the value is different, then the test will fail.
It is easy to follow these basic principles and write unit tests from scratch by getting your code to throw exceptions with specific error messages if your tests fail. However, this will not be necessary, as all popular programming languages already have unit testing frameworks either available as a part of the language itself, or as a widely accepted third-party dependency. In .NET, for example, you can choose to use Visual Studio’s own unit testing framework called MSTest, or you can choose one of the popular third-party framework, such as NUnit and xUnit.
Unit tests are simply methods in your code, just like any other methods. But the unit testing frameworks will enable you to easily add assertion statements into those methods. Also, you will be able to add all necessary attributes to mark your methods with that will make them recognizable as unit tests to any external system, such as a CI/CD pipeline.
Another component of unit tests is ability to mock any low-level dependencies that have been inserted as an interface (as all dependencies in object oriented programming should be inserted as). We are only testing the code inside a single method, remember? So, we don’t need the exact implementations of the low-level dependencies. We merely need to see how our code reacts if the methods that we call on our dependencies return specific values .
And this is where mocking comes into play. You tell the mocking framework to create a temporary implementation of your dependency, which lives only for the duration of the test. The implementation has only the minimal viable logic inside of the dependency’s accessible methods. And you set up specific methods to return specific values for specific scenarios to see how your code will react to it.
For example, your class may take a dependency on an interface for a text processor class. This interface has a method that accepts some input text, modifies it and returns the modified text as the output. Your class that is calling this method is meant to verify whether the text has been modified and return a Boolean value of either true or false accordingly.
The code inside this method doesn’t care what logic was used to perform the conversion. It doesn’t care what the conversion rules are. All it cares about is whether the output text differs from the input text.
So, in this case, you can create two unit tests with a different setup. In the first one, you set the method up to return the value that is identical to the input and in the second one you set it up to return a random string of characters. In the first one, you assert that the method under test returns false and in the second one you assert that it returns true.
In this specific scenario, just based on the setup and verification of the return value, we can tell that the method on the dependency has been called. But sometimes you need to call a method on a dependency that doesn’t affect your output. Likewise, sometimes you need to test methods that don’t even have a return value, such as void or Task. How do you apply your unit tests then?
Fortunately, mocking frameworks allow you to verify how many times any particular method on any particular dependency has been called while the code was running. It can even allow you to verify that the method was called with parameters set to specific values that other internally-called methods have returned. So, this will allow you to do assertions on parts of the code that aren’t directly accessible to your unit tests.
The benefits of high code coverage
Code coverage is the percentage of your code that is covered by unit tests. And it is beneficial to have as high code coverage as possible.
An application is a collection of small moving parts and it’s in your interest to make sure that you can easily check that each of these moving parts is working correctly. Of course, testing the application as a whole is also important, but you may get blind-sided by some subtle bugs cropping into your code if you don’t have unit tests in place.
In complex distributed applications, it’s not always possible to foresee ahead of time what all the possible scenarios are for every piece of functionality within the application. So, quite naturally, there will be some pieces of a lower priority functionality that won’t be sufficiently covered by high-level tests. And this lower priority functionality is something that, over time, may collect a number of defects, which may, one day, affect the end user.
On the other hand, there may be some parts of functionality that will be fully covered by higher-level tests, but there still would be some subtle bug inside of it that will only manifest itself under certain conditions that are impossible to test for. For example, a specific thing may stop working only after a particular service was kept running for several days.
Unit tests are the things that will help you to prevent these bugs creeping in. For example, you can write unit tests for a given method in parallel with writing the method itself, so every single possible outcome of the method will be represented as a test while the knowledge of how the method is supposed to work is still fresh in your head. This way, it’s possible to apply the maximum possible test coverage regardless of how many methods there are in your application in total.
And then, if your unit tests are truly representative of all the possible ways the method will be used in the wild, changing the logic inside the method will cause the unit tests to fail, even when you haven’t made any changes to the method signature. This will warm you early of any potential unforeseen consequences of the changes. And this will force you to think what the appropriate response should be. You can either merely make changes to the tests to make them relevant once again, revert your code changes or make further updates to your code to eliminate any potential issues.
Another enormous benefit of using unit tests is that they will force you to make your code clean. Useful unit tests are very difficult to apply to a badly written method, so unit tests will force you to refactor your code until it’s sufficiently well written. And well written code will not only give you an ability to write useful unit tests for it. It will also benefit other developers, who will be able to read it easily.
So, if your code is so clean that the logic inside it is obvious and your code gets reviewed by other developers anyway, you may still ask, why even bother with unit tests? Well, there is still a good case for unit tests.
Unit tests will show you which components of the code may potentially introduce unforeseen changes of behavior into your overall application. They will detect any meaningful changes in behavior, even when the code remains well-written and easily readable after the changes.
Well-written code will almost always pass the code review, even when it introduces a bug. Unit tests, however, don’t care how beautiful your code is. But they will spot a potential bug before it becomes a real problem.
Of course, maximum possible code coverage will not provide a full guarantee that some subtle bugs will not creep into your code. For example, a wrong decision can still be made after seeing failed unit tests. But nonetheless, it will significantly reduce the possibility of unintentional defects being introduced.
Test Driven Development – red, green, refactor
With unit tests being accepted as an industry-standard practice, a whole new methodology of software development was born – Test Driven Development, or TDD.
Instead of writing your code first and then writing tests for it, you write your tests for the expected behavior first and then write your code to enable this behavior. First, you make your code pass your test. Then, you make your code a bit more readable. And this is where the term “red, green, refactor” comes from.
“Red” is a common way to refer to failed unit tests, because any unit test GUI will display the results of those tests with red crosses next to them. This is the first stage of writing tests according to TDD. Remember, the code that is being tested doesn’t even exist yet, so all tests will initially fail. It may even be the case that the classes and the methods don’t yet exist, so your tests won’t even compile.
“Green” is the next step. Passed unit tests are usually marked with green ticks. So, your goal for this this step is to write enough code into your methods that will make all the unit tests pass. Don’t worry about the exact particularities of how it’s done at this stage. As long as the tests pass, we are good.
Refactoring is the process of making your code better structured and more readable without changing any output behavior of it. And this is what you do as the final stage of the TDD process. You ensure that your code is as well structured as you can make it without making any of the tests fail.
In TDD, you would usually have one test class per each class of your code. So, you would usually write all the tests you can think of for a single class, move it from “red” to “refactored” and start the process all over again for the next class.
The basics of TDD in .NET
Visual Studio has in-built tooling to support TDD in C# and .NET. For example, you can write all the tests you want without even having the class itself written yet.
If you choose this approach, your compiler will initially display error messages telling you that the class doesn’t yet exits. However, you can, at any point, just hover over the class and let the IDE generate it for you as a new type in the right project.

But if you dislike seeing all of these red underlines and error messages in your code or a using a different IDE, where auto-generating a class is not as straight-forward, there is an alternative way of enabling TDD in .NET.
You can create a class even before you start writing your unit tests, but all it will have at this stage are empty methods that don’t have any implementation yet. If any method is supposed to return a value, you just make it throw an instance of NotImplementedException.

This way, your unit tests will still compile, because they will be referring to an existing class and calling existing methods with the correct signatures. However, they will fail at this stage, as the methods will not yet have any behavior defined. So, the workflow of red, green, refactor will still be adhered to and it will still be classed as TDD.
A concrete C# example
And now, we will have a look at a real-life example of unit tests in C#. We will be using xUnit for this demonstration.
Imagine that we have an application that reads text from a specified file, modifies the text and saves the output into a different file. We have one class responsible for file management, which implements IFileProcessor interface. We have another class that processes the text, which implements ITextProcessor interface. And then we have a class that coordinates the work of these two classes and returns the status object. We will call it TextConversionCoordinator.
The status that TextConversionCoordinator returns will be represented by the following class:
public class ConversionStatus
    {
        public bool TextExtractedFromFile { get; set; }
        public bool TextConverted { get; set; }
        public bool OutputFileSaved { get; set; }

        public List<string> Errors { get; set; } = new List<string>();
    }
And the code of TextConversionCoordinator will be as follows:
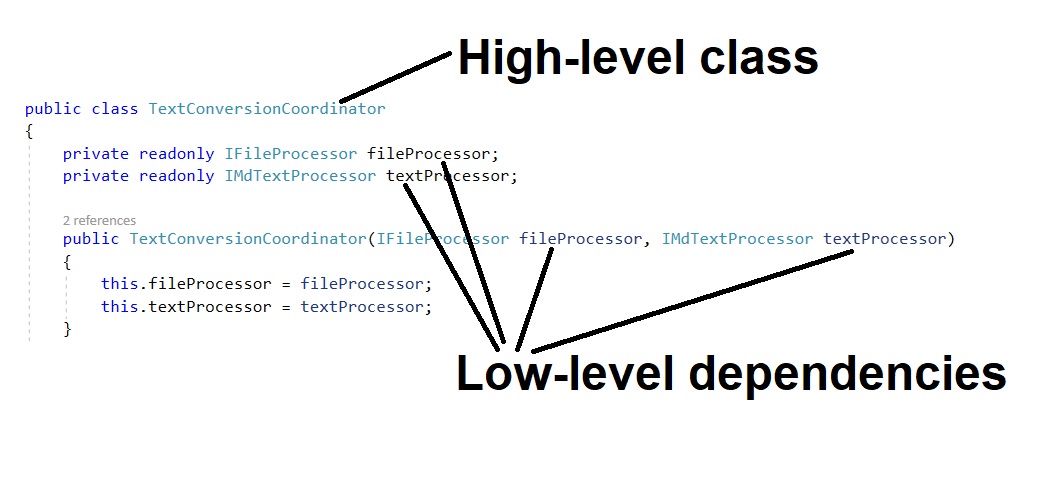
public class TextConversionCoordinator
    {
        private readonly IFileProcessor fileProcessor;
        private readonly ITextProcessor textProcessor;

        public TextConversionCoordinator(IFileProcessor fileProcessor, ITextProcessor textProcessor)
        {
            this.fileProcessor = fileProcessor;
            this.textProcessor = textProcessor;
        }

        public ConversionStatus ConvertText()
        {
            var status = new ConversionStatus();
            string inputText;
            try
            {
                inputText = fileProcessor.ReadAllText();
                status.TextExtractedFromFile = true;
            }
            catch (Exception ex)
            {
                status.Errors.Add(ex.Message);
                return status;
            }

            string outputText;
            try
            {
                outputText = textProcessor.ConvertText(inputText);

                if (outputText != inputText)
                    status.TextConverted = true;
            }
            catch (Exception ex)
            {
                status.Errors.Add(ex.Message);
                return status;
            }

            try
            {
                fileProcessor.WriteToFile(outputText);
                status.OutputFileSaved = true;
            }
            catch (Exception ex)
            {
                status.Errors.Add(ex.Message);
                return status;
            }

            return status;
        }
    }
As you can see, we pass IFileProcessor and ITextProcessor by interfaces, because TextConversionCoordinator doesn’t really care about the details of how the input text is obtained and how it’s processed. All it cares about are the following:
- IFileProcessor returns some text.
- ITextProcesor attempts to convert the text.
- The method on IFileProcessor to write the text into a new file is called successfully.
- The output text is different from the input text.
- Any exceptions thrown by any of low-level dependencies are handled in an expected way.
So, first of all, let’s create our test class and mock up the low-level dependencies. We will be using Moq framework to mock those dependencies.
public class TextConversionCoordinatorTests
    {
        private readonly TextConversionCoordinator coordinator;
        private readonly Mock<IFileProcessor> fileProcessorMoq;
        private readonly Mock<IMdTextProcessor> textProcessorMoq;

        public TextConversionCoordinatorTests()
        {
            fileProcessorMoq = new Mock<IFileProcessor>();
            textProcessorMoq = new Mock<IMdTextProcessor>();
            coordinator = new TextConversionCoordinator(fileProcessorMoq.Object, textProcessorMoq.Object);
        }
When we are using Moq on any particular interface, we create a short-lived class that implements this interface and returns default values from its methods. To make those methods return the values we need, we set them up on per-test basis.
The first test that we will add will verify the behavior of the code under normal circumstances. Input text is obtained successfully, the output is different from the input, the output is sent out and none of the methods throw any exceptions.
        [Fact]
        public void CanProcessText()
        {
            fileProcessorMoq.Setup(p => p.ReadAllText()).Returns("input");
            textProcessorMoq.Setup(p => p.ConvertText("input")).Returns("altered input");

            var status = coordinator.ConvertText();

            Assert.True(status.TextExtractedFromFile);
            Assert.True(status.TextConverted);
            Assert.True(status.OutputFileSaved);
            Assert.Empty(status.Errors);
        }
The next scenario will check that the text has not been changes by the conversion process, but no exceptions were thrown.
        [Fact]
        public void CanDetectUnconvertedText()
        {
            fileProcessorMoq.Setup(p => p.ReadAllText()).Returns("input");
            textProcessorMoq.Setup(p => p.ConvertText("input")).Returns("input");

            var status = coordinator.ConvertText();

            Assert.True(status.TextExtractedFromFile);
            Assert.False(status.TextConverted);
            Assert.True(status.OutputFileSaved);
            Assert.Empty(status.Errors);
        }
Next, we will verify that the code correctly handles the situation where the attempt to read the input text has thrown an exception. Remember that exceptional conditions should be covered by unit tests too.
        [Fact]
        public void CanDetectUnsuccessfulRead()
        {
            fileProcessorMoq.Setup(p => p.ReadAllText()).Throws(new Exception("Read error occurred."));

            var status = coordinator.ConvertText();

            Assert.False(status.TextExtractedFromFile);
            Assert.False(status.TextConverted);
            Assert.False(status.OutputFileSaved);
            Assert.Single(status.Errors);
            Assert.Equal("Read error occurred.", status.Errors.First());
        }
Next, we will verify that the code correctly handles the situation where the attempt to convert the text throws an exception.
        [Fact]
        public void CanDetectUnsuccessfulConvert()
        {
            fileProcessorMoq.Setup(p => p.ReadAllText()).Returns("input");
            textProcessorMoq.Setup(p => p.ConvertText("input")).Throws(new Exception("Convert error occurred."));

            var status = coordinator.ConvertText();

            Assert.True(status.TextExtractedFromFile);
            Assert.False(status.TextConverted);
            Assert.False(status.OutputFileSaved);
            Assert.Single(status.Errors);
            Assert.Equal("Convert error occurred.", status.Errors.First());
        }
Finally, we verify that the code correctly handles the scenario where only the attempt to save the output throws an exception.
        [Fact]
        public void CanDetectUnsuccessfulSave()
        {
            fileProcessorMoq.Setup(p => p.ReadAllText()).Returns("input");
            textProcessorMoq.Setup(p => p.ConvertText("input")).Returns("altered input");
            fileProcessorMoq.Setup(p => p.WriteToFile("altered input")).Throws(new Exception("Unable to save file."));

            var status = coordinator.ConvertText();

            Assert.True(status.TextExtractedFromFile);
            Assert.True(status.TextConverted);
            Assert.False(status.OutputFileSaved);
            Assert.Single(status.Errors);
            Assert.Equal("Unable to save file.", status.Errors.First());
        }
One addition we could make to our tests would be to verify that each dependency method is called an expected number of times while the code gets executed. The syntax for it would be similar to this:
fileProcessorMoq.Verify(p => p.ReadAllText(), Times.Once);
But in our case, this check is redundant, because our status object already has Boolean properties that get set to true whenever any particular method is called. Please also note how detailed our assertions are. We are literally applying them to every output property in every case. So, what we have written so far is sufficient to validate all possible scenarios.
Unit tests force your code to be SOLID
SOLID is a set of principles that every software developer who works with object oriented languages needs to be familiar with. If applied properly, these principles will help you to write clean and maintainable code.
For those who aren’t familiar with the term, SOLID is an acronym that stands for the following principles:
- Single responsibility principle
- Open-closed principle
- Liskov substitution principle
- Interface segregation principle
- Dependency inversion principle
And this is how unit tests will help you to adhere to these principles:
- You will want to minimize the number of unit tests you will need to re-write whenever your code changes. To help yourself with that, you will adhere to single responsibility principle, so each change to the code only affects a very small subset of functionality.
- If there is a new requirement, you will want to only add new tests and not redo the existing ones. Writing code that adheres to open-closed principle and Liskov substitution principle will help you with that.
- You will not want to setup any methods on low-level interface-based dependencies that your unit tests will never use. This is what interface segregation principle will help you with.
- Finally, dependency inversion principle will enable you to confine each unit tests just to the code within a single method and will enable you to set up low-level dependencies for any scenarios you want, just like we have covered in the above example.
Other resources
In this article, I have merely provided an introduction to the concepts of unit testing. Although this information is sufficient to get started, you may want to expand your knowledge and learn the subject in more depth. If you do, here is my list of recommended quality resources.
The Art of Unit Testing: with examples in C# is a book written by Roy Osherove. Although it has been originally written in 2009, it is still relevant. Moreover, it has some great reviews and countless examples in C# covering pretty much every case you can think of.
Test Driven Development: By Example is a great guide on Test Driven Development. It was written by Kent Beck, who is well known in the software development circles, especially in the Agile community. He has authored many books on software development practices, with subjects including, but not limited to, refactoring, design patterns and extreme programming. If you want to become familiar with TDD, this is arguably the best book on the subject.
Finally, Clean Code: A Handbook of Agile Software Craftsmanship written by Robert C. Martin, who is well known in software development circles as Uncle Bob, is, pretty much, the software developer’s Bible. It provides overview on a whole range of best practices of software development and not just unit tests and TDD. If you haven’t already read it, you probably should. It will massively impact your career in a positive way/p>